
1- FE- JAS4 -Hello World
2- FE- JAS4 -Hello World - Jasmine and Karma to call one function of TS files.
3- BE- Spring Rest - Hello world
4- BE- Spring Rest - Hello world JUnit
5- Jenking Integartion FE+BE- AJS4+Spring REST [3+4]
i.e.
Job1 - checkout FE code+Jasmine&Karma execution+build+ On success
Job2 - checkout BE code+Junit+build+ On success+ Create BE War
Job3- Stop TC + Undeploy Old FE Zip and BE war if present + Deploy both FE Zip and BE War + Start TC.- Not covered
1- FE- JAS4 -Hello World
We are using Visual Source code as IDE and Angular CLI to create base project and Angular Site https://angular.io/
First make sure to install following soft ware in your PC.
1- NPM :- https://www.npmjs.com/get-npm
2- NodeJS :- https://nodejs.org/en/
Step 1:- Create folder with name in your C:\VSC_WorkSpace_AngularJS_Jenkin
Step 2:- Open that folder in your VSC studio
Step 3:- In terminal window execute this command
npm install -g @angular/cli
Step 4:- Execute
ng new siddhu-jenkin-karma-jasmine-app
step 5:-
cd siddhu-jenkin-karma-jasmine-app
ng serve --open
2- FE- JAS4 -Hello World - Jasmine and Karma to call one function of TS files.
Now Lets do our Second Assignment of adding Jsamine and Karma to our call
By default when we create a new application using AngularJS frame work it will include all necessary files of Jasmine frame work (need to refresh the browser every time when we want to execute AJS test case)and karma tool (which helps developer to execute the test case just by saving in workspace on command prompt ) that are needed for doing unit testing.
Let execute the same. Lets imagine we have addNumber method that add the given two input and store in variable result and getAnswer() give us this answer varible
1:- app.component.ts
import { Component } from '@angular/core';
@Component({
selector: 'app-root',
templateUrl: './app.component.html',
styleUrls: ['./app.component.css']
})
export class AppComponent {
title = 'siddhu-jenkin-karma-jasmine-app';
answer: number;
/* addNumber(firstnumber : number, secondnumber : number) {
return firstnumber + secondnumber;
} */
addNumber(firstnumber , secondnumber) {
console.log(firstnumber);
console.log(secondnumber);
var myFirstNumber = +firstnumber;
var mySecondNumber = +secondnumber;
this.answer = myFirstNumber + mySecondNumber;
console.log(this.answer);
}
getAnswer() {
return this.answer;
}
}
2:- app.component.spec.ts
import { TestBed, async } from '@angular/core/testing';
import { RouterTestingModule } from '@angular/router/testing';
import { AppComponent } from './app.component';
describe('AppComponent', () => {
let objCaculator = new AppComponent();
let result : number;
beforeEach(() => {
objCaculator.addNumber(10,20);
result= objCaculator.getAnswer();
});
it('Lets call addNumber', () => {
expect(result)
.toEqual(30);
});
});
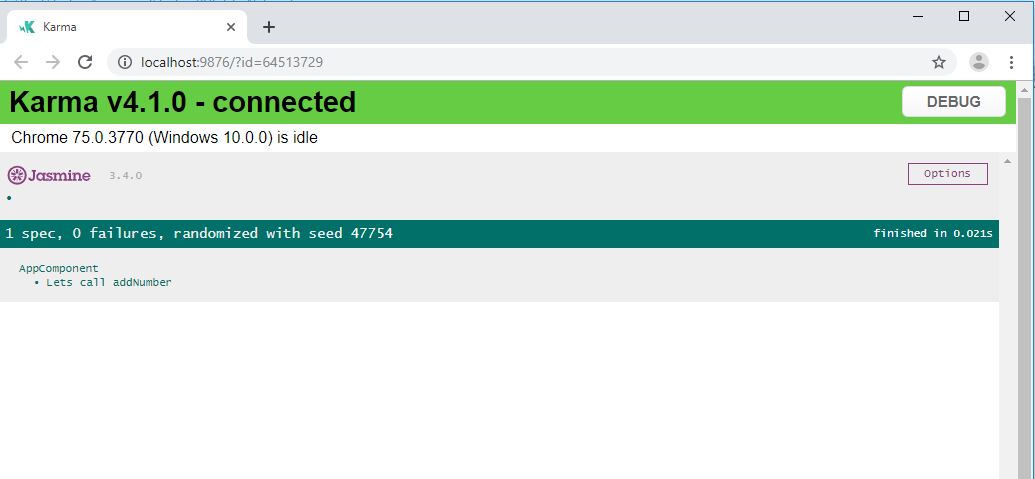
3- Execute the command ng test as see the result as shown below
Chrome 75.0.3770 (Windows 10.0.0): Executed 1 of 1 SUCCESS (0.022 secs / 0.006 secs)
TOTAL: 1 SUCCESS
TOTAL: 1 SUCCESS
Now lets try to execute both our Test and Build command at the same time from prompt.
for that we have to modify package.json
"scripts": {
"ng": "ng",
"start": "ng serve",
"build": "ng build",
"test": "ng test --no-watch",
"lint": "ng lint",
"e2e": "ng e2e",
"playground": "angular-playground",
"ci": "ng test --no-watch && ng build"
},
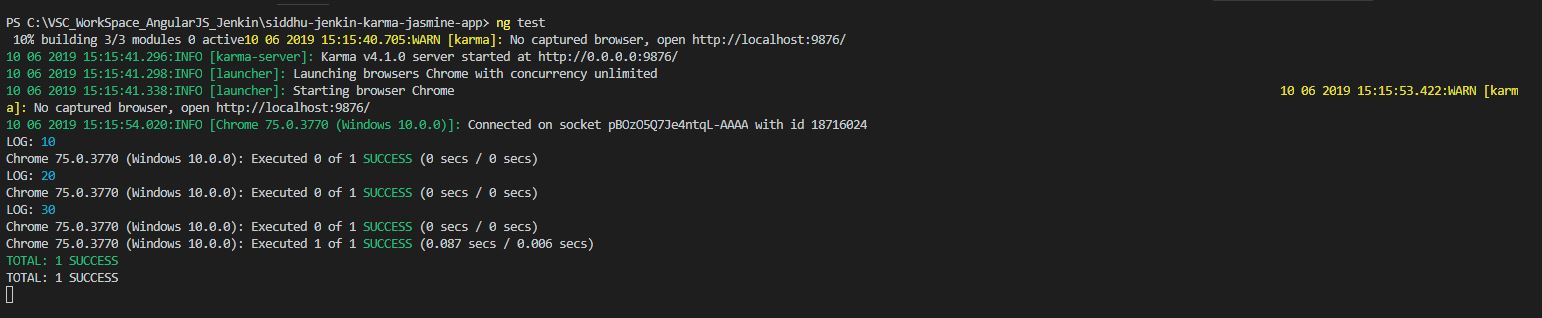
and from prompt use this command npm run ci as shown below.
C:\VSC_WorkSpace_AngularJS_Jenkin\siddhu-jenkin-karma-jasmine-app> npm run ci
> siddhu-jenkin-karma-jasmine-app@0.0.0 ci C:\VSC_WorkSpace_AngularJS_Jenkin\siddhu-jenkin-karma-jasmine-app
> ng test --no-watch && ng build
10% building 3/3 modules 0 active11 06 2019 14:34:37.689:INFO [karma-server]: Karma v4.1.0 server started at http://0.0.0.0:9876/
11 06 2019 14:34:37.716:INFO [launcher]: Launching browsers Chrome with concurrency unlimited
11 06 2019 14:34:37.738:INFO [launcher]: Starting browser Chrome 11 06 2019 14:34:47.228:INFO [Chrome 75.0.3770 (Windows 10.0.0)]: Connected on socket HggYH6j_YOej3ZlqAAAA with id 51549837
LOG: 10
Chrome 75.0.3770 (Windows 10.0.0): Executed 0 of 1 SUCCESS (0 secs / 0 secs)
LOG: 20
Chrome 75.0.3770 (Windows 10.0.0): Executed 0 of 1 SUCCESS (0 secs / 0 secs)
LOG: 30
Chrome 75.0.3770 (Windows 10.0.0): Executed 0 of 1 SUCCESS (0 secs / 0 secs)
Chrome 75.0.3770 (Windows 10.0.0): Executed 1 of 1 SUCCESS (0.03 secs / 0.01 secs)
TOTAL: 1 SUCCESS
TOTAL: 1 SUCCESS
Date: 2019-06-11T09:05:36.553Z
Hash: b9c533663dca7a158115
Time: 28900ms
chunk {main} main-es5.js, main-es5.js.map (main) 175 kB [initial] [rendered]
chunk {polyfills} polyfills-es5.js, polyfills-es5.js.map (polyfills) 546 kB [initial] [rendered]
chunk {runtime} runtime-es5.js, runtime-es5.js.map (runtime) 6.08 kB [entry] [rendered]
chunk {styles} styles-es5.js, styles-es5.js.map (styles) 182 kB [initial] [rendered]
chunk {vendor} vendor-es5.js, vendor-es5.js.map (vendor) 7.09 MB [initial] [rendered]
Date: 2019-06-11T09:05:51.535Z
Hash: 8c5277177a3fd36bff7c
Time: 14901ms
chunk {main} main-es2015.js, main-es2015.js.map (main) 175 kB [initial] [rendered]
chunk {polyfills} polyfills-es2015.js, polyfills-es2015.js.map (polyfills) 250 kB [initial] [rendered]
chunk {runtime} runtime-es2015.js, runtime-es2015.js.map (runtime) 6.08 kB [entry] [rendered]
chunk {styles} styles-es2015.js, styles-es2015.js.map (styles) 182 kB [initial] [rendered]
chunk {vendor} vendor-es2015.js, vendor-es2015.js.map (vendor) 6.49 MB [initial] [rendered]
Now lets move to third part of the assignment
3- BE- Spring Rest
Please refer below given URL i.e. helloworld Spring REST and import the same project in STS/Eclipse to understand the project flow
https://spring.io/guides/gs/rest-service/
Lets modify this example and create our own example Spring REST example
Step 1:- Create Students
package com.test.siddhu;
public class Students{
int id;
String studentsName;
public Students(int i, String studentsName) {
super();
this.id = i;
this.studentsName = studentsName;
}
public int getId() {
return id;
}
public void setId(int id) {
this.id = id;
}
public String getStudentsName() {
return studentsName;
}
public void setStudentsName(String studentsName) {
this.studentsName = studentsName;
}
}
Step 2:- Create controller StudentsController
package org.test.siddhu.controller;
import java.util.ArrayList;
import java.util.List;
import org.springframework.web.bind.annotation.PathVariable;
import org.springframework.web.bind.annotation.RequestMapping;
import org.springframework.web.bind.annotation.RequestMethod;
import org.springframework.web.bind.annotation.RestController;
import com.test.siddhu.Students;
@RestController
public class StudentsController {
@RequestMapping(value = "/students", method = RequestMethod.GET,headers="Accept=application/json")
public List<Students> getStudents()
{
List<Students> listOfStudents = new ArrayList<Students>();
listOfStudents=createStudentsList();
return listOfStudents;
}
@RequestMapping(value = "/students/{id}", method = RequestMethod.GET,headers="Accept=application/json")
public Students getStudentsById(@PathVariable int id)
{
List<Students> listOfStudents = new ArrayList<Students>();
listOfStudents=createStudentsList();
for (Students students: listOfStudents) {
if(students.getId()==id)
return students;
}
return null;
}
public List<Students> createStudentsList()
{
Students first=new Students(1, "First");
Students fourth=new Students(4, "Fourth");
Students third=new Students(3, "Third");
Students second=new Students(2, "Second");
List<Students> listOfStudents = new ArrayList<Students>();
listOfStudents.add(first);
listOfStudents.add(second);
listOfStudents.add(third);
listOfStudents.add(fourth);
return listOfStudents;
}
}
Step 3:- Change the springrest-servlet.xml and give our package
<context:component-scan base-package="org.test.siddhu.controller" />
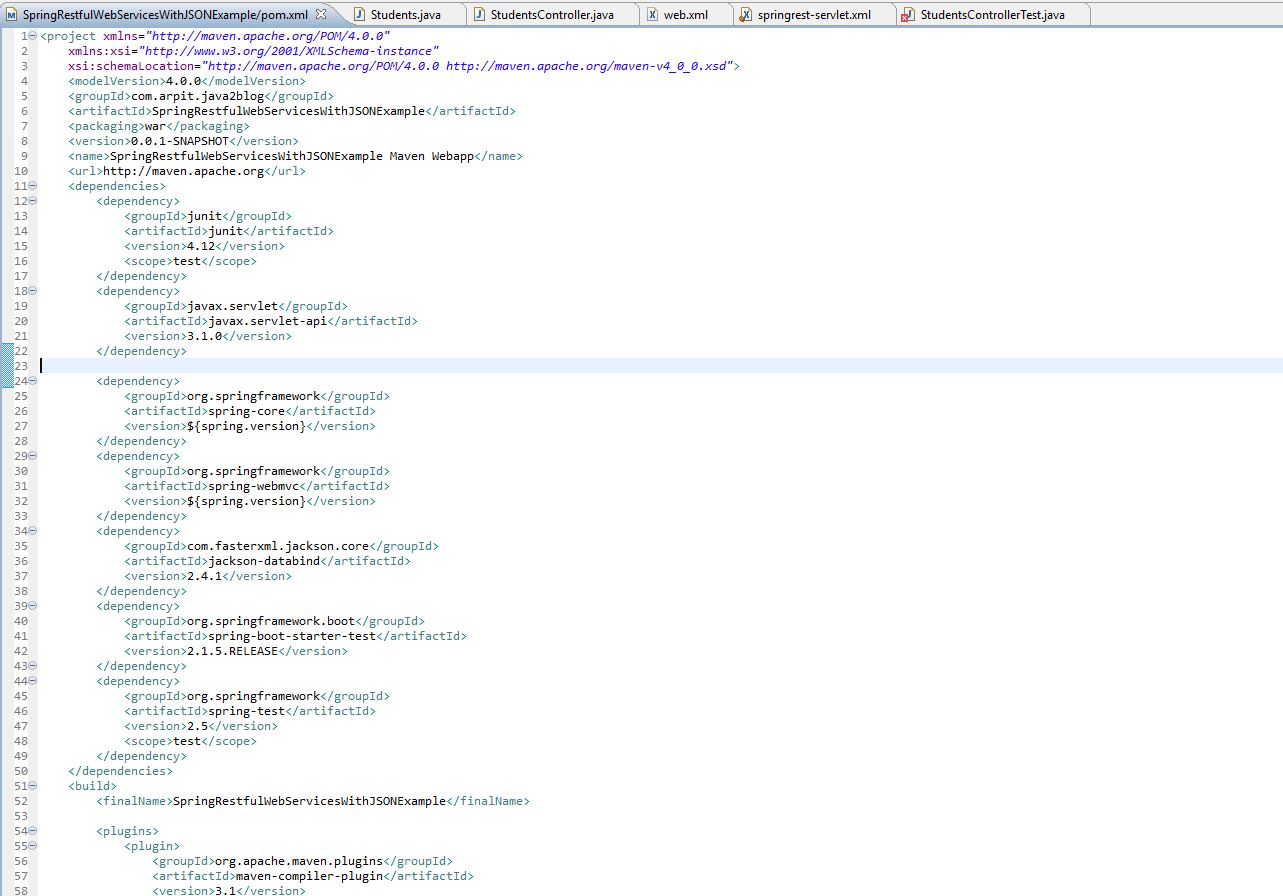
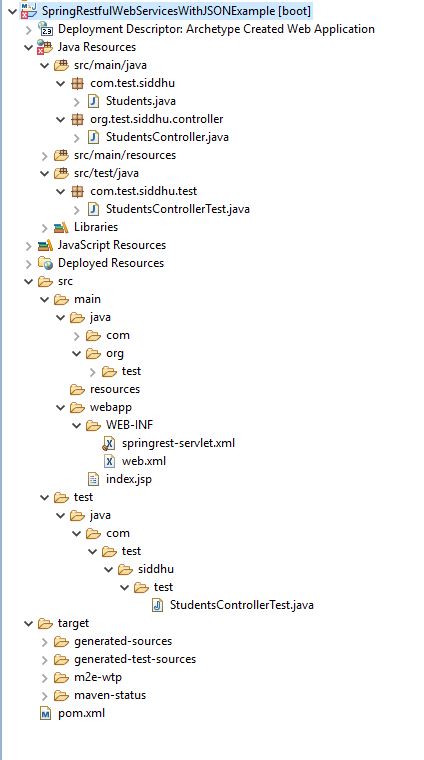
Step 4:- Try to have this POM.xml and folder structure
Execute our project using right click Poject -> Run on server
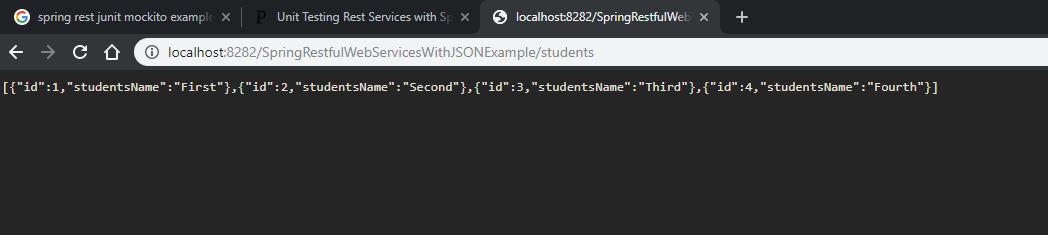

Now let move to Step 4
4- BE- Spring Rest with Junit we will try to use Mockito
Lets create a package com.test.siddhu.test and create file StudentsControllerTest
package com.test.siddhu.test;
import org.junit.Before;
import org.junit.Test;
import org.junit.runner.RunWith;
import org.mockito.InjectMocks;
import org.mockito.Mock;
import org.skyscreamer.jsonassert.JSONAssert;
import org.springframework.beans.factory.annotation.Autowired;
import org.springframework.beans.factory.annotation.Qualifier;
import org.springframework.http.MediaType;
import org.springframework.test.context.ContextConfiguration;
import org.springframework.test.context.junit4.SpringJUnit4ClassRunner;
import org.springframework.test.web.servlet.MockMvc;
import org.springframework.test.web.servlet.MvcResult;
import org.springframework.test.web.servlet.RequestBuilder;
import org.springframework.test.web.servlet.request.MockMvcRequestBuilders;
import org.springframework.test.web.servlet.setup.MockMvcBuilders;
import org.test.siddhu.controller.StudentsController;
import com.test.siddhu.Students;
@RunWith(SpringJUnit4ClassRunner.class)
@ContextConfiguration( classes = TestConfiguration.class )
public class StudentsControllerTest {
private MockMvc mockMvc;
@Mock
Students students;
@Autowired
@InjectMocks
@Qualifier("studentsController")
StudentsController studentsController;
@Before
public void setUp() {
//MockitoAnnotations.initMocks(this);
mockMvc = MockMvcBuilders.standaloneSetup(new StudentsController()).build();
}
@Test
public void testSaveUser() throws Exception {
RequestBuilder requestBuilder = MockMvcRequestBuilders
.get("/students/1")
.accept(MediaType.APPLICATION_JSON);
MvcResult result = mockMvc.perform(requestBuilder).andReturn();
System.out.println(result.getResponse().getContentAsString());
String expected = "{\"id\":1,\"studentsName\":\"First\"}";
JSONAssert.assertEquals(expected, result.getResponse().getContentAsString(), false);
//by sdhumale to execute method of controller
/*Students objStudents = studentsController.getStudentsById(1);
Assert.assertNotNull( objStudents );
Assert.assertEquals( objStudents.getId() , objStudents.getId() );*/
}
}
Please make following modification in POM.xml
<!-- for Junit start [ -->
<dependency>
<groupId>org.mockito</groupId>
<artifactId>mockito-core</artifactId>
<version>2.8.47</version>
<scope>test</scope>
</dependency>
<dependency>
<groupId>org.springframework</groupId>
<artifactId>spring-test</artifactId>
<version>4.3.7.RELEASE</version>
<scope>test</scope>
</dependency>
<dependency>
<groupId>org.springframework</groupId>
<artifactId>spring-context</artifactId>
<version>4.3.7.RELEASE</version>
</dependency>
<dependency>
<groupId>org.glassfish.jersey.bundles</groupId>
<artifactId>jaxrs-ri</artifactId>
<version>2.25</version>
</dependency>
<dependency>
<groupId>org.glassfish.jersey.media</groupId>
<artifactId>jersey-media-moxy</artifactId>
<version>2.25</version>
</dependency>
<!-- for Junit end ] -->
Now there are two ways to execute
1- We can execute the method of Controller
i.e.
Students objStudents = studentsController.getStudentsById(1);
Assert.assertNotNull( objStudents );
Assert.assertEquals( objStudents.getId() , objStudents.getId() );
2- By calling the URL to hit the Controller
private MockMvc mockMvc;
@Mock
Students students;
@Autowired
@InjectMocks
@Qualifier("studentsController")
StudentsController studentsController;
@Before
public void setUp() {
//MockitoAnnotations.initMocks(this);
mockMvc = MockMvcBuilders.standaloneSetup(new StudentsController()).build();
}
@Test
public void testSaveUser() throws Exception {
RequestBuilder requestBuilder = MockMvcRequestBuilders
.get("/students/1")
.accept(MediaType.APPLICATION_JSON);
MvcResult result = mockMvc.perform(requestBuilder).andReturn();
System.out.println(result.getResponse().getContentAsString());
String expected = "{\"id\":1,\"studentsName\":\"First\"}";
JSONAssert.assertEquals(expected, result.getResponse().getContentAsString(), false);
//by sdhumale to execute method of controller
/*Students objStudents = studentsController.getStudentsById(1);
Assert.assertNotNull( objStudents );
Assert.assertEquals( objStudents.getId() , objStudents.getId() );*/
}
Now lets move the concept more further and integrate our Jenkin with both FE and BE i.e. our Step 5- Jenking Integartion FE+BE- AJS4+Spring REST [3+4]
First of all we need to install Jenkin server to have CI/CD to be done by it for us.
You can download the same from https://wiki.jenkins.io/display/JENKINS/Home?src=sidebar
As i am using window machine download the jenking.exe. Run this exe and installed the jenkin by default it will start the jenkin as service in Window on port 8080 if you are using this port you can change the port in jenkins.xml Please refer to the below site for documentations.
https://wiki.jenkins.io/display/JENKINS/Thanks+for+using+Windows+Installer
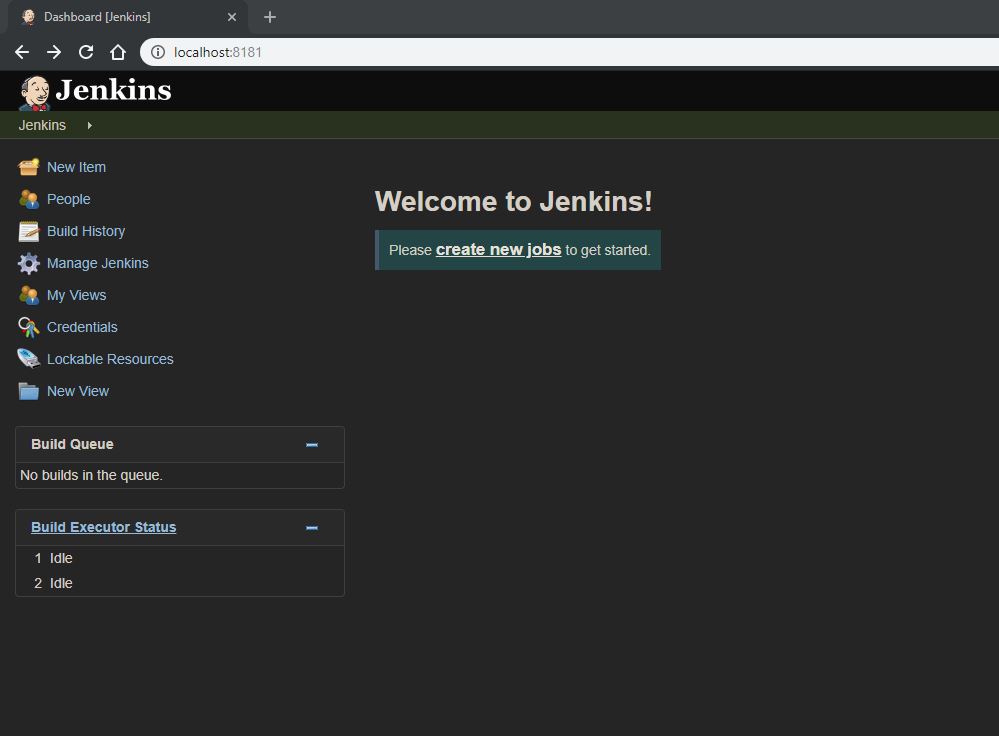
During first time login it will ask to install required plugin and it will also give you option to install new plugin. I choose to install base plugin and further it will ask to create user and after that your Jenkin will start on this url :- http://localhost:8181/
Now lets start to create our first job that will do following this
1- Creation of AngularJS6 FE folder after successful compilation with Karma and Jasmine executions.
2- Creation of Spring REST BE WAR file after successful compilation with Junit executions.
3- Deploying both FE Folder and BE WAR file on the dedicated Tomcat and start the server
[Note:- we will no go in details on how to stop the current running Tomcat and then take the old files back up and then deploy these new ZIP and WAR files and if this fails what will be the roll back strategy etc as this is not the part of assignment]
1- Creation of AngularJS6 FE Folder file after successful compilation with Karma and Jasmine executions.
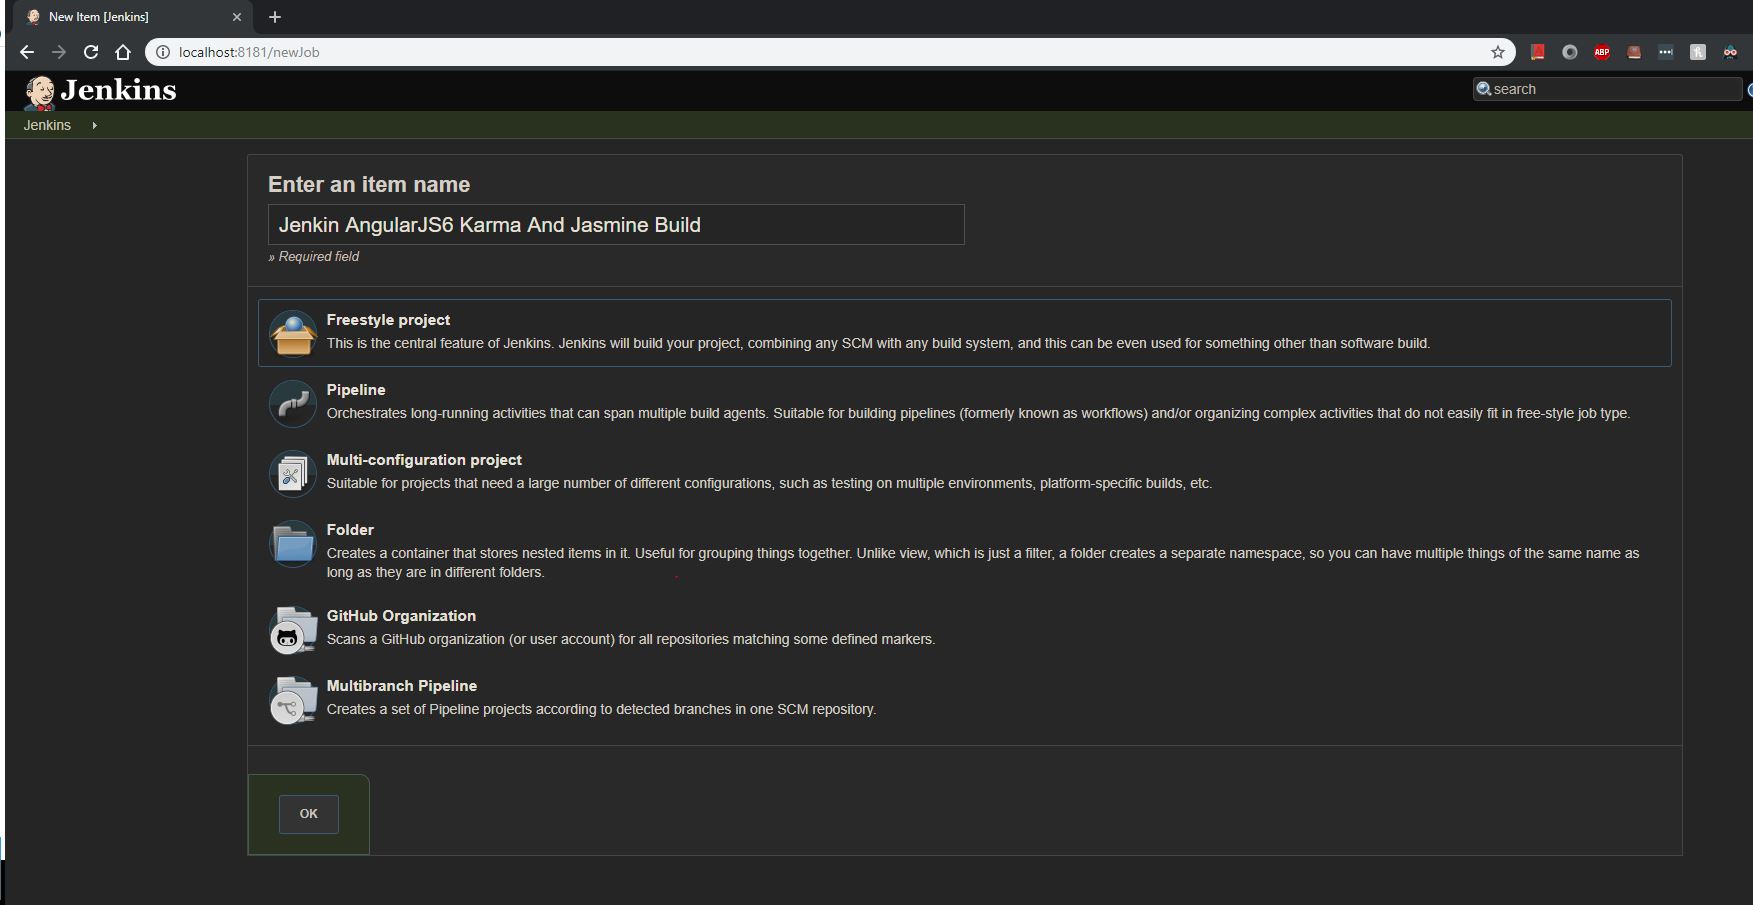
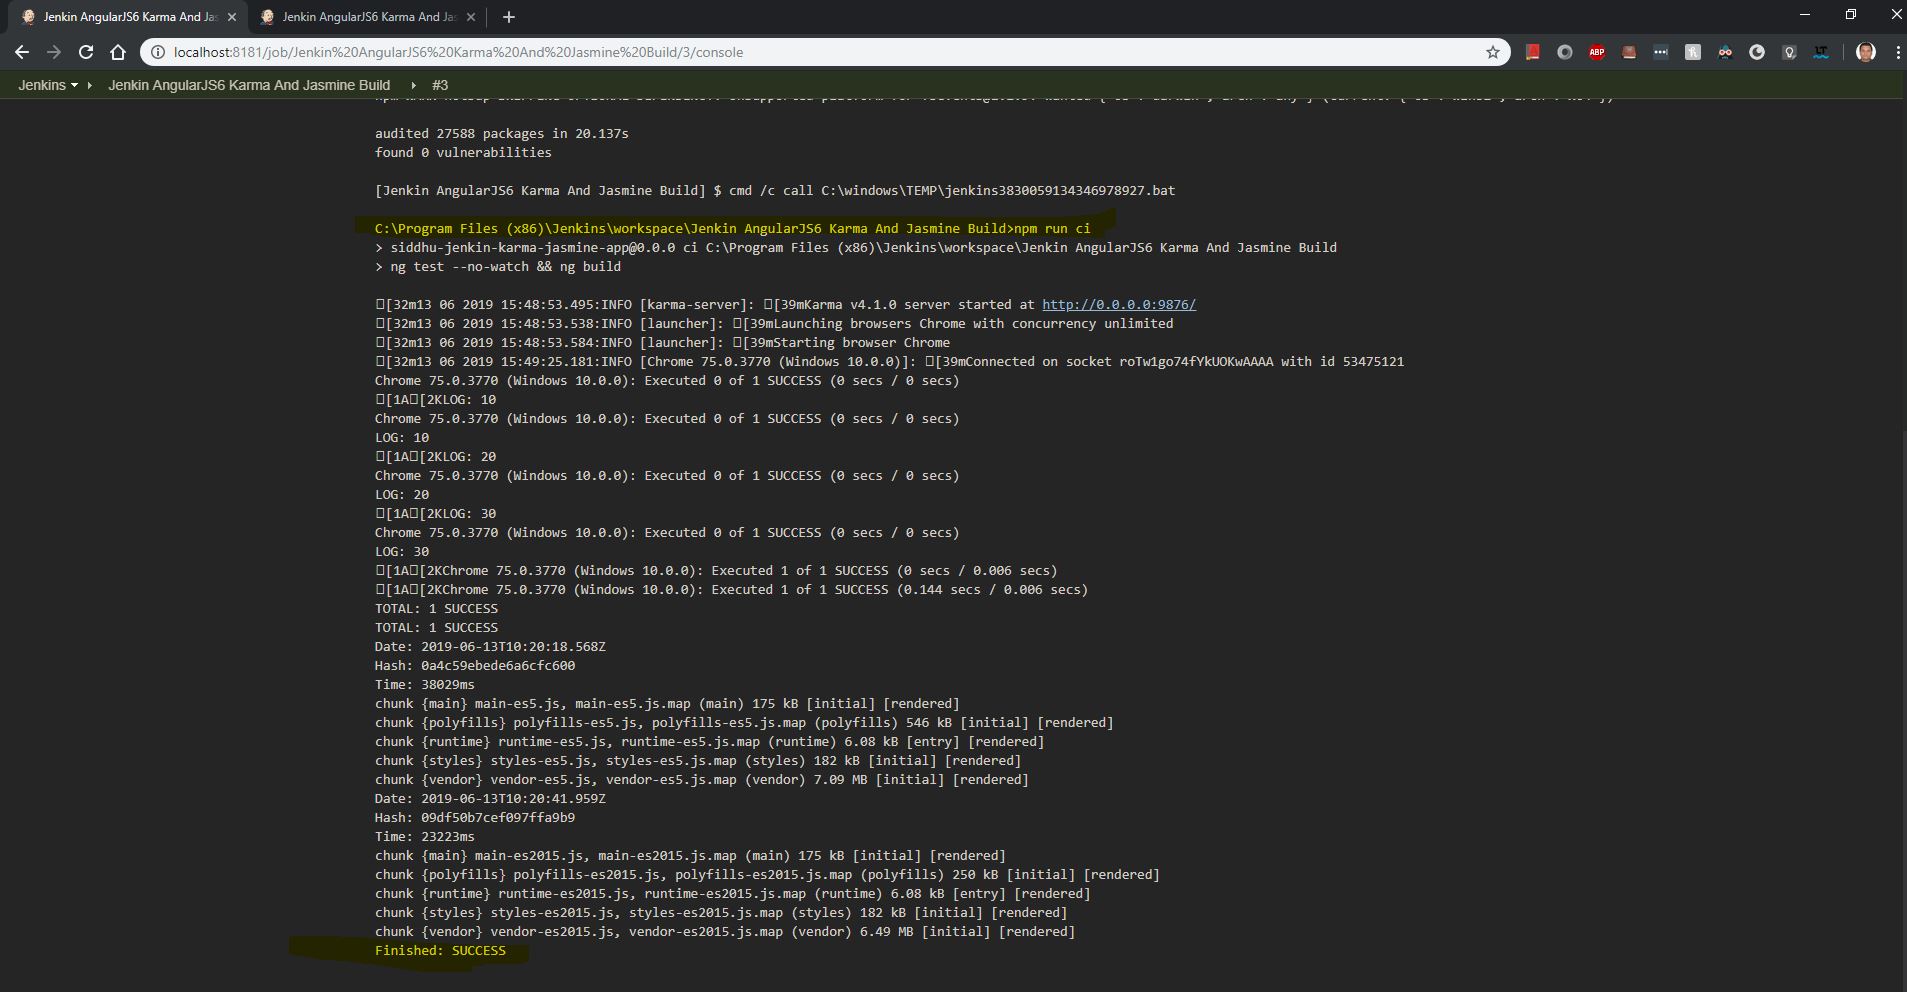
step 1:- First we will create a new Jenkin Job as shown below i.e. Jenkin AngularJS6 Karma And Jasmine Build
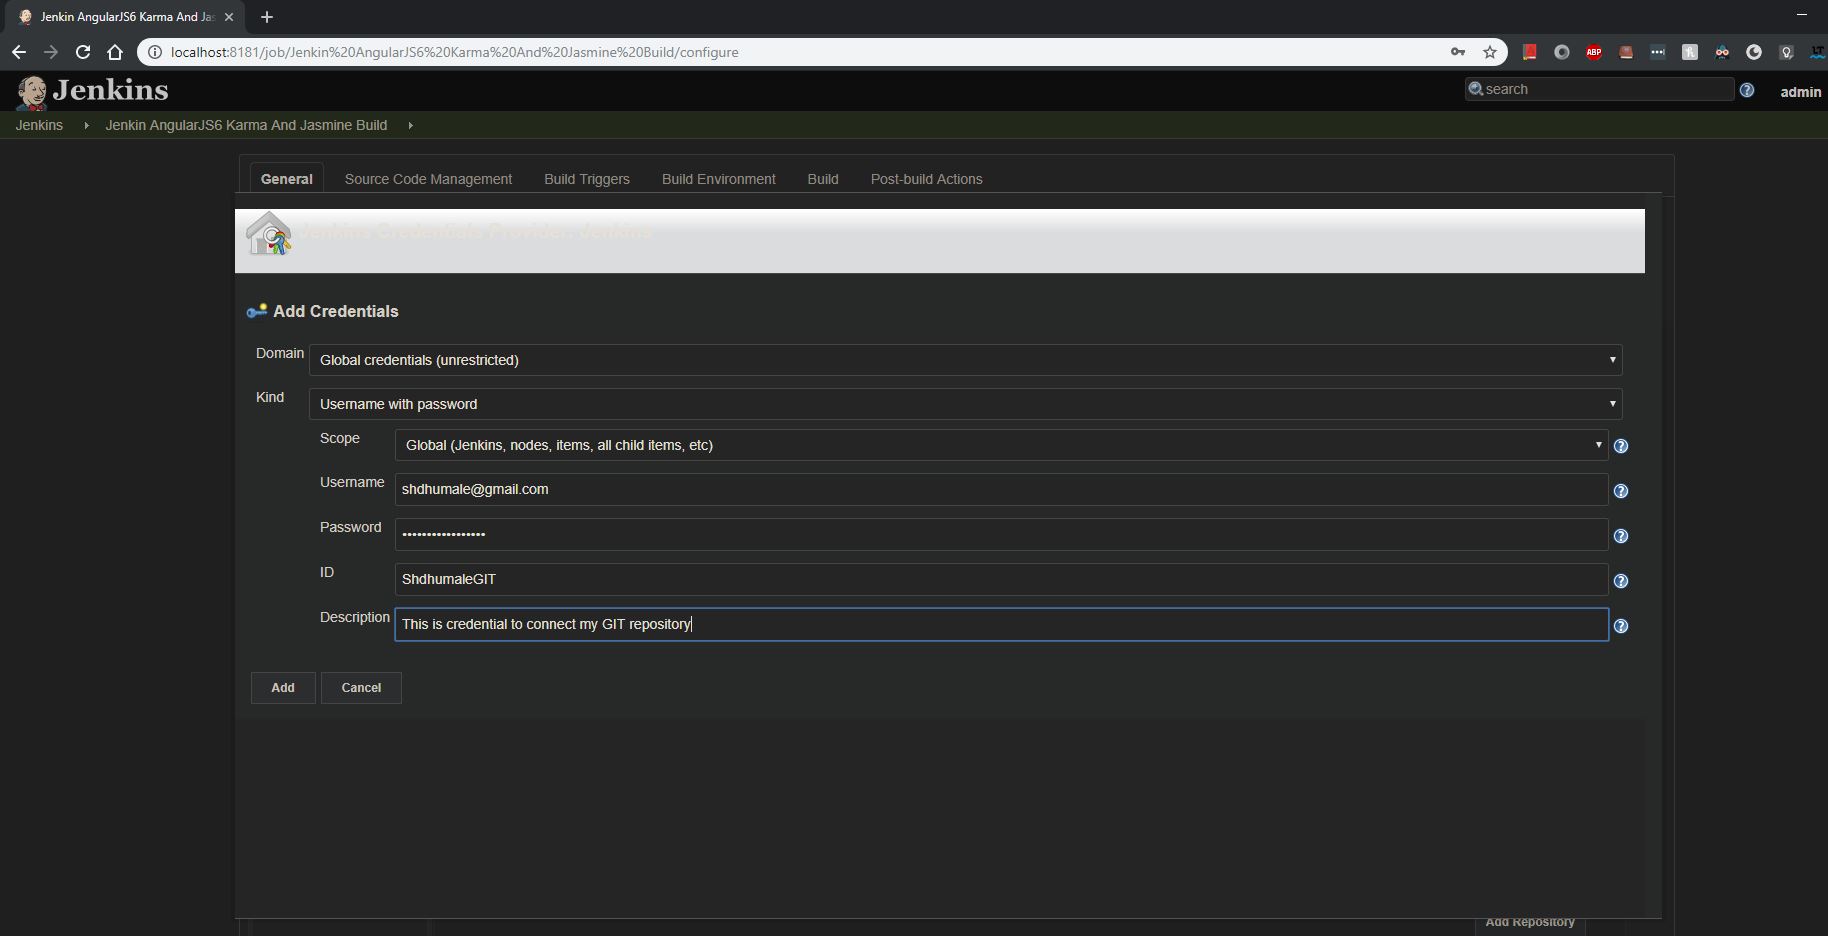
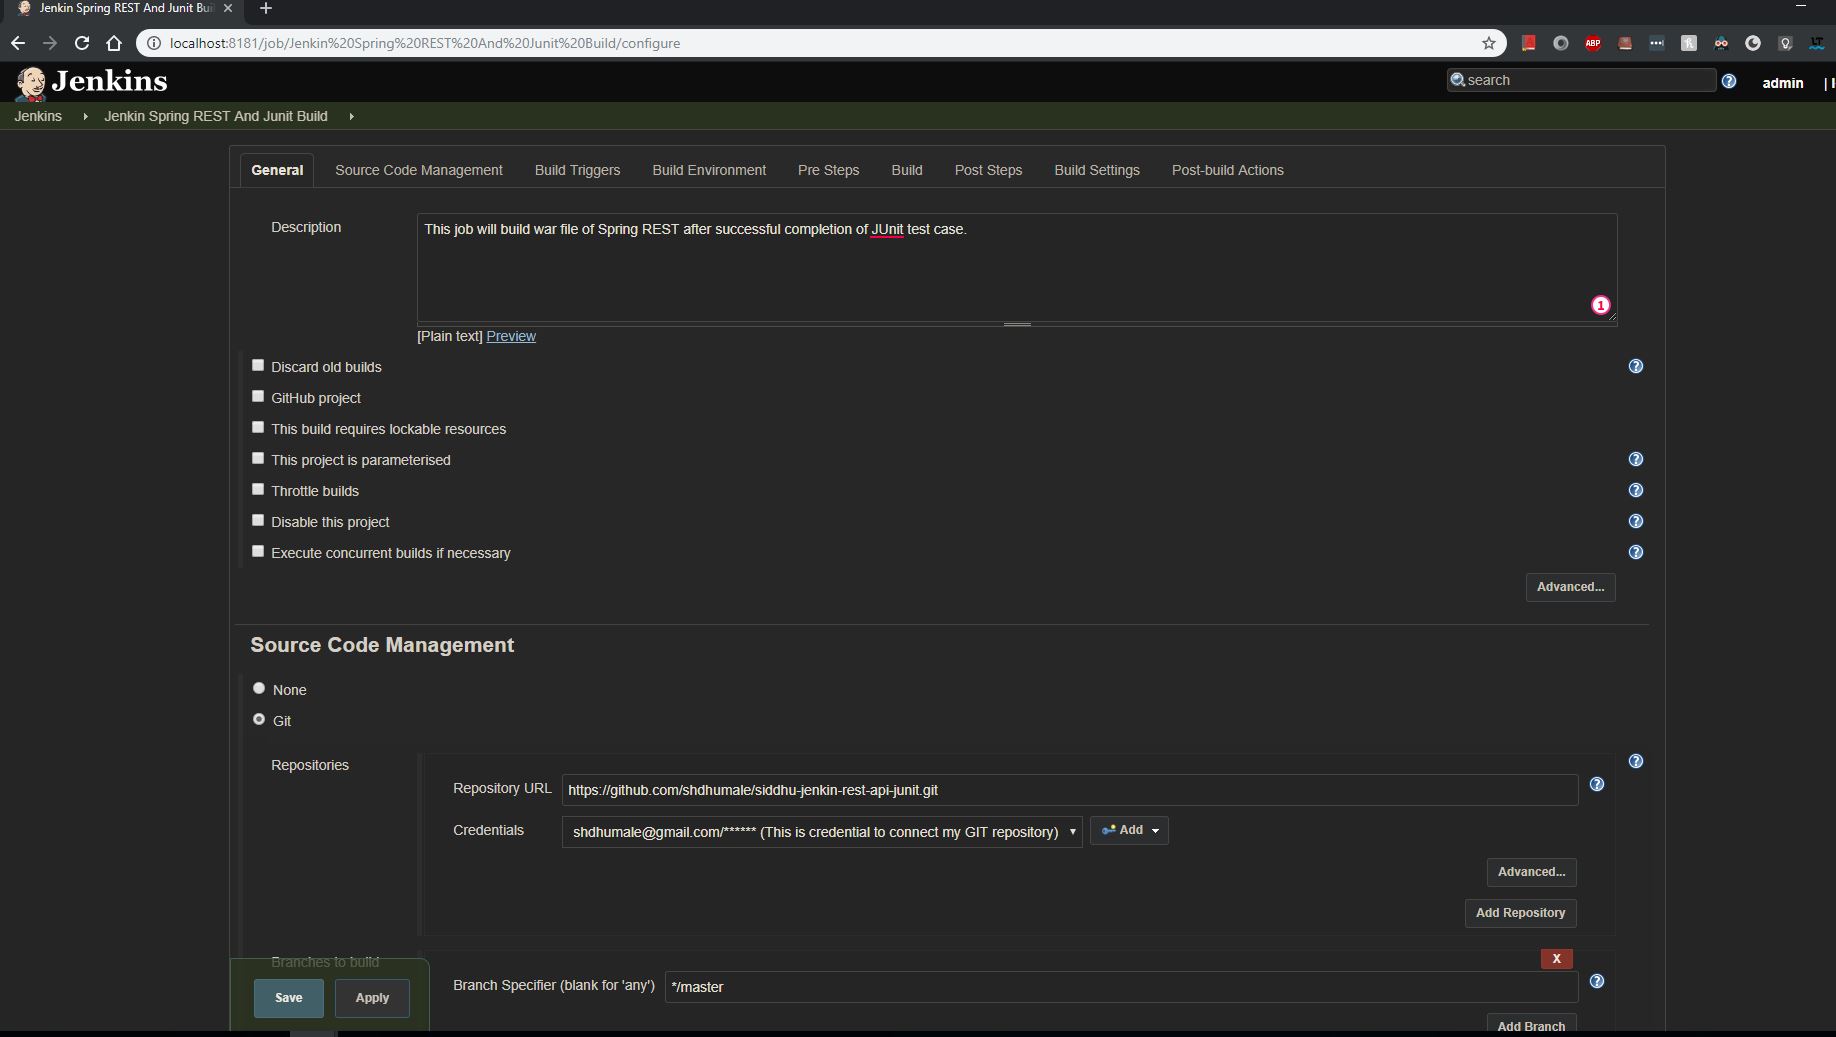
If we are using GIT as the repository then select GIT Option in Source Code Management and provide addition GIT credential for the same.
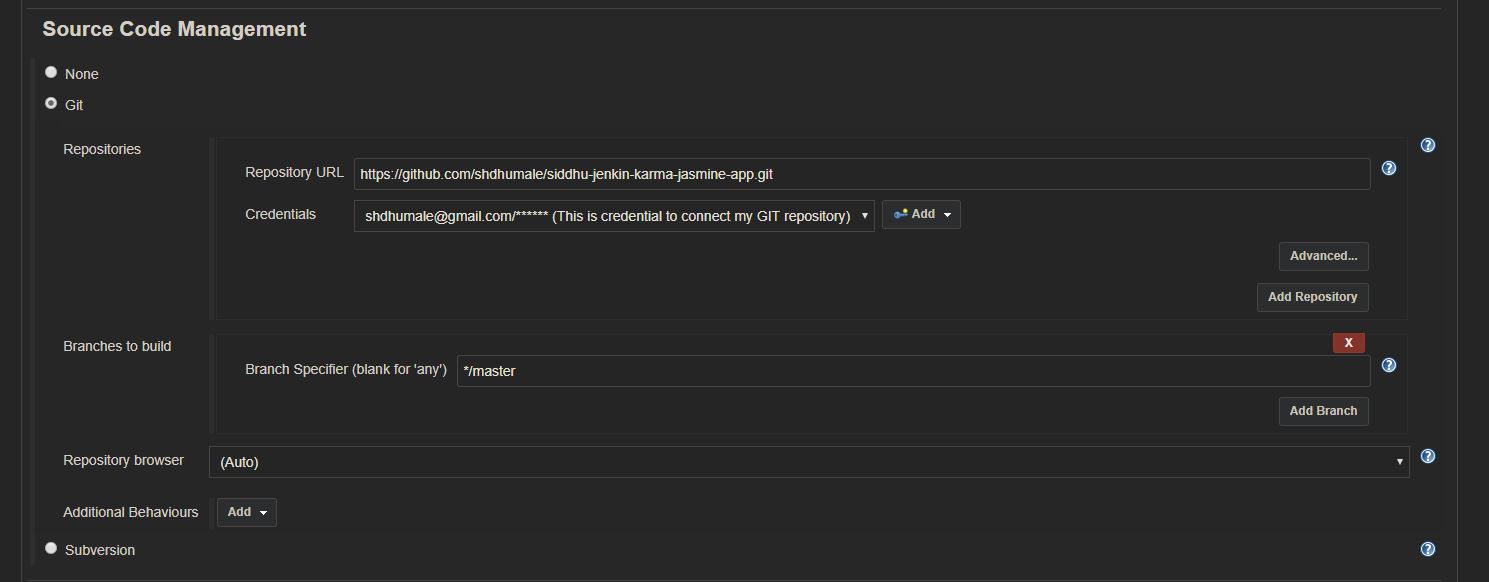
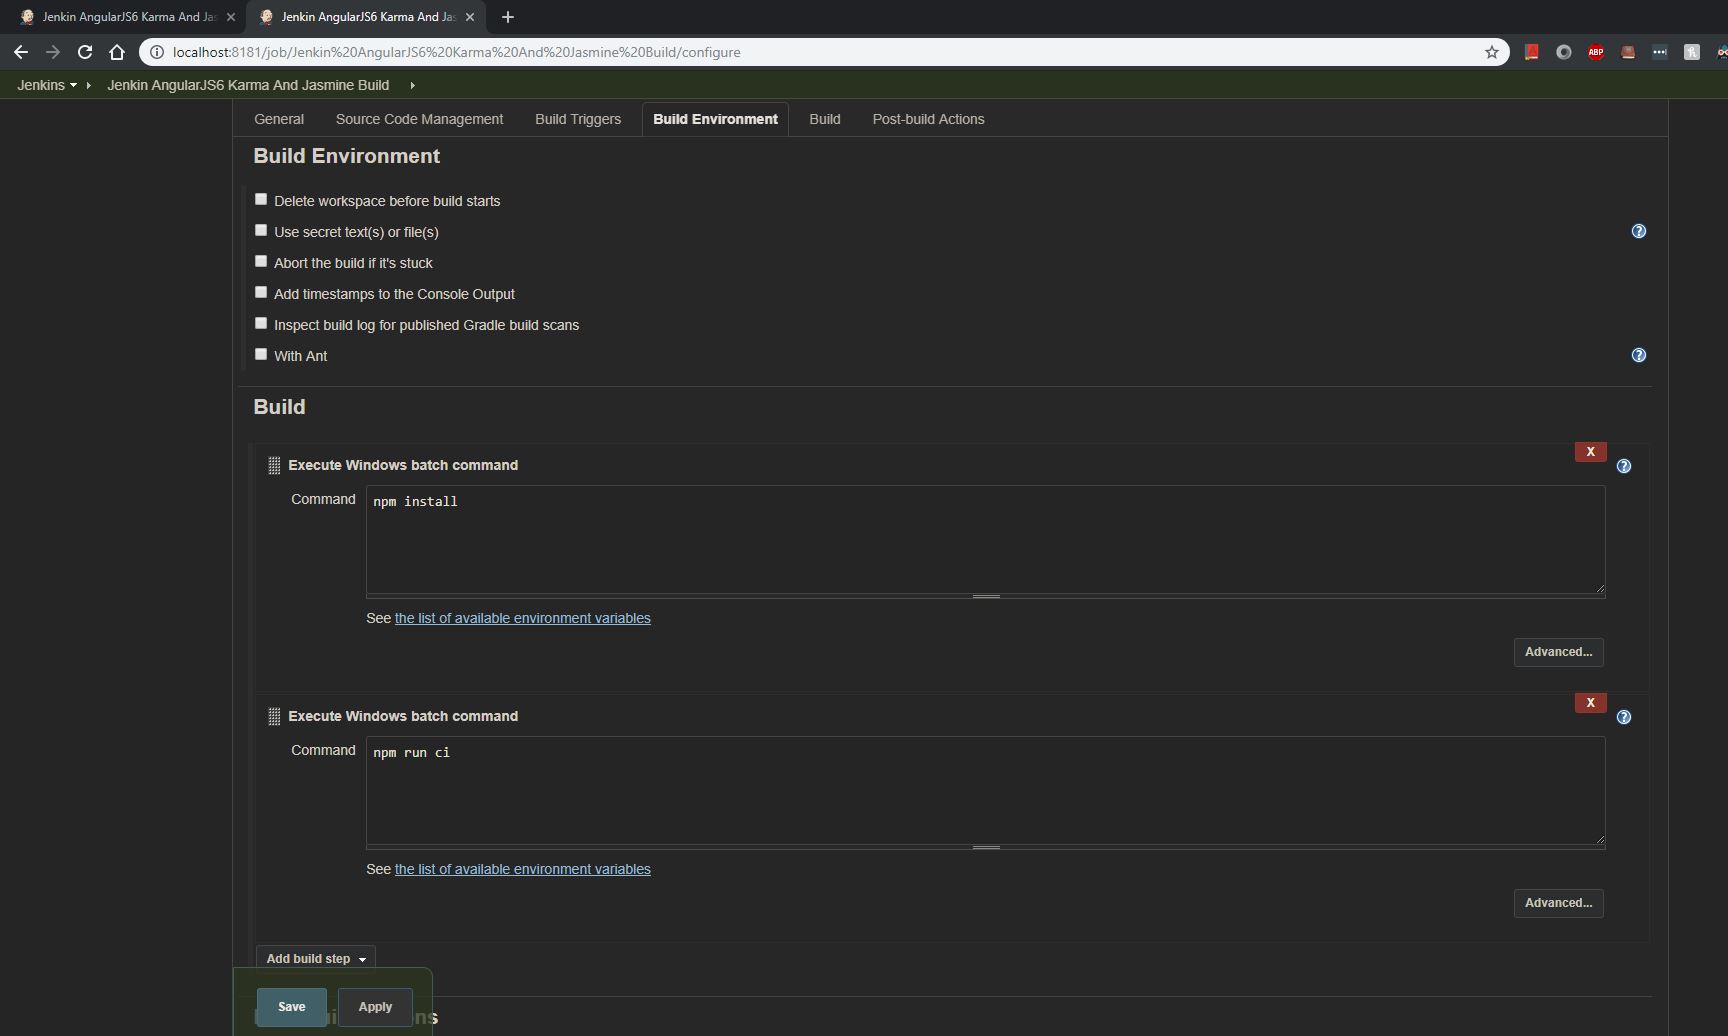
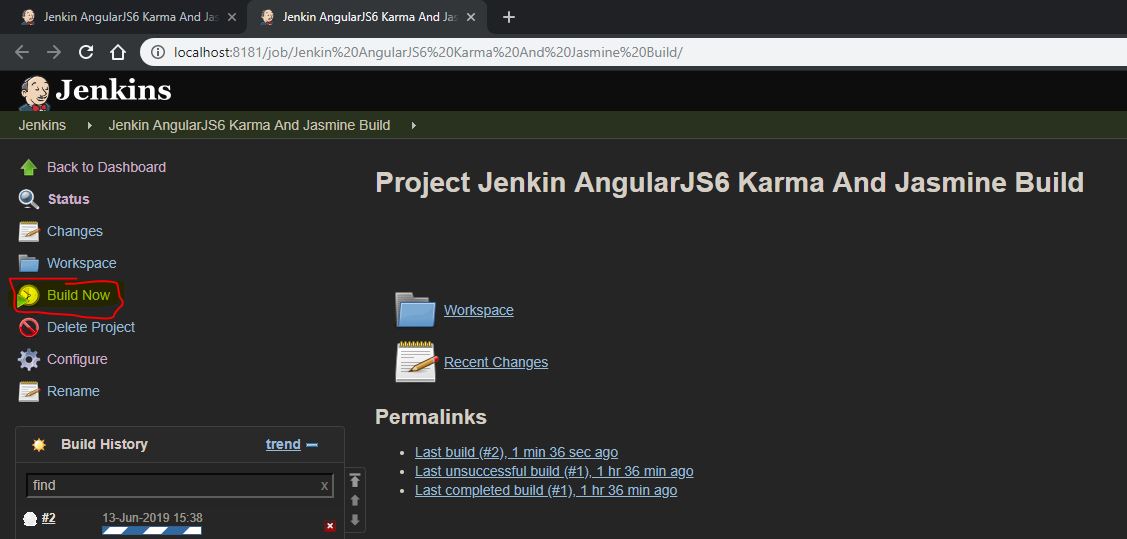
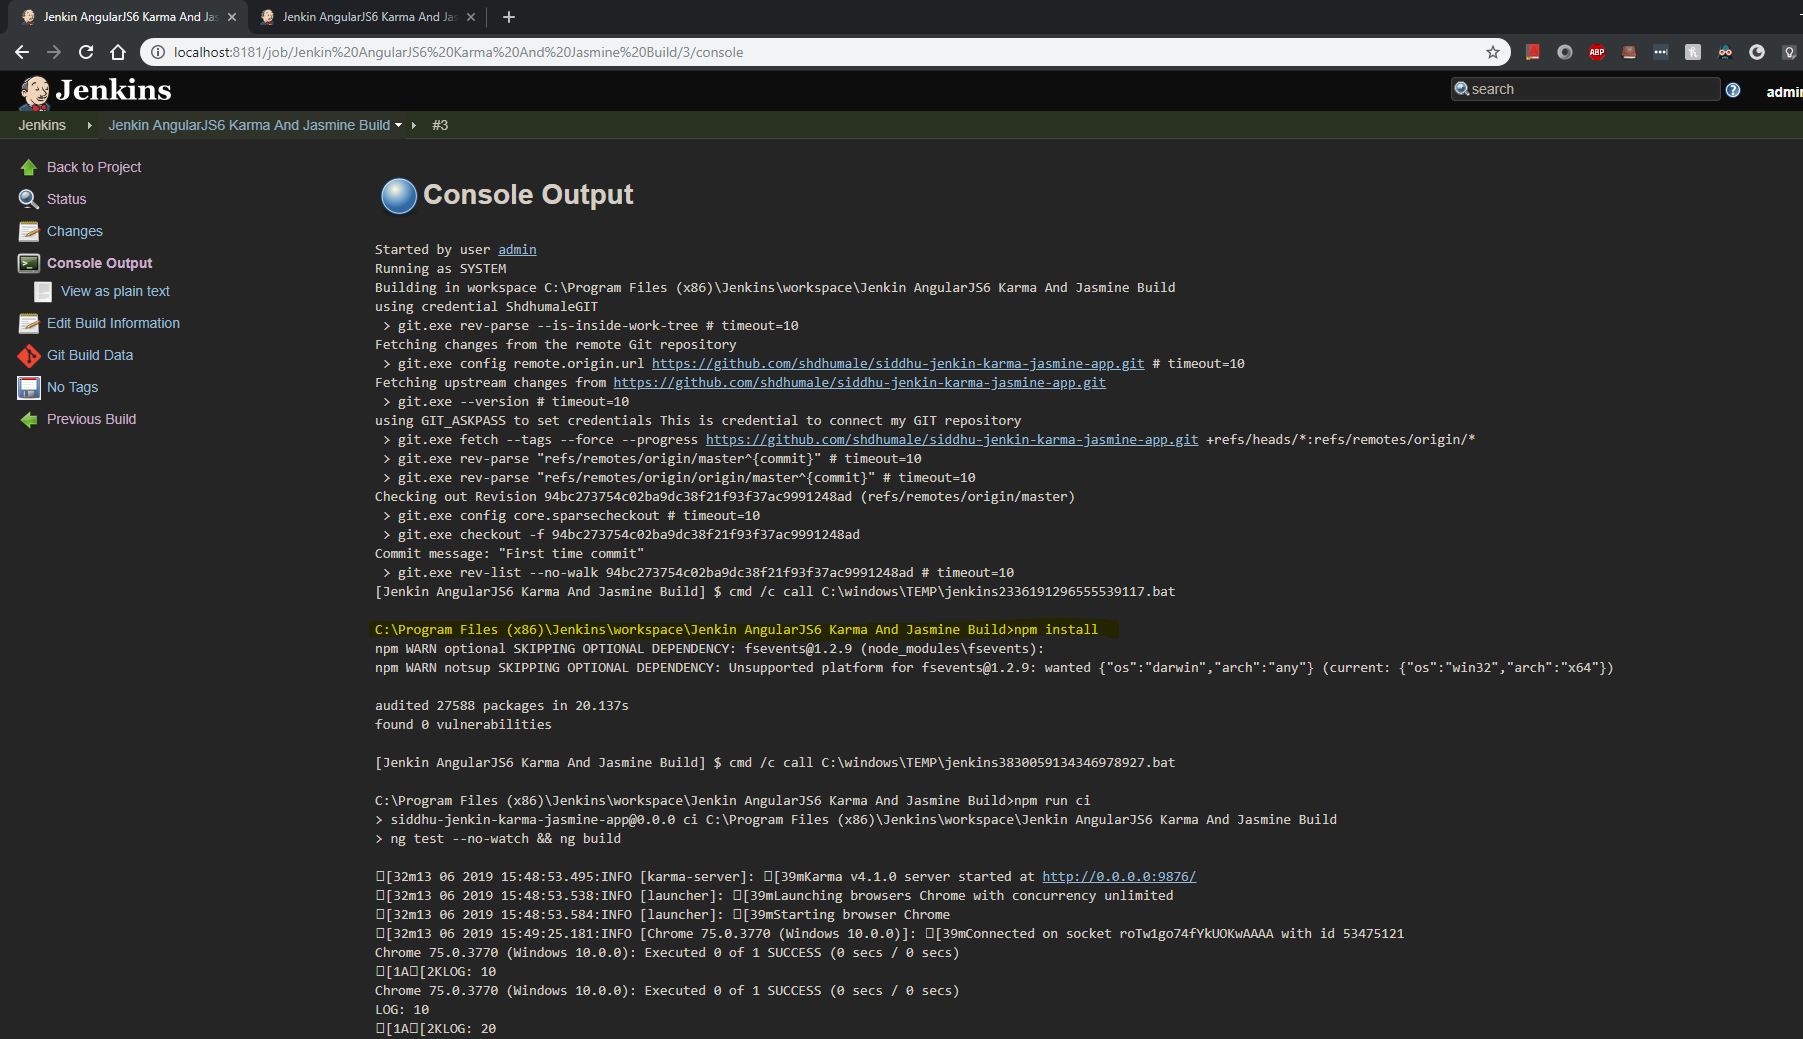
Now save your change and execute your job and check the console on jenkin
2- Creation of Spring REST BE WAR file after successful compilation with Junit executions.i.e.
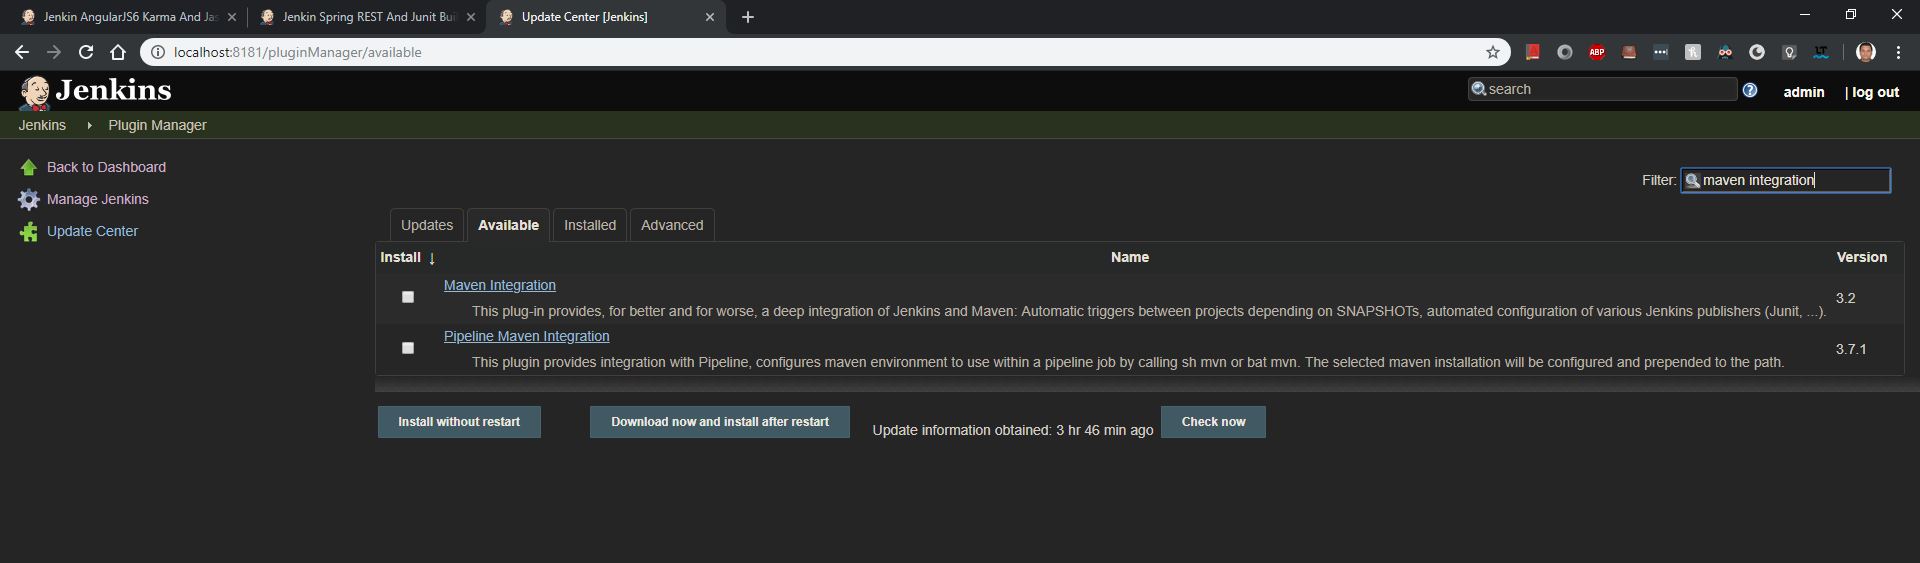
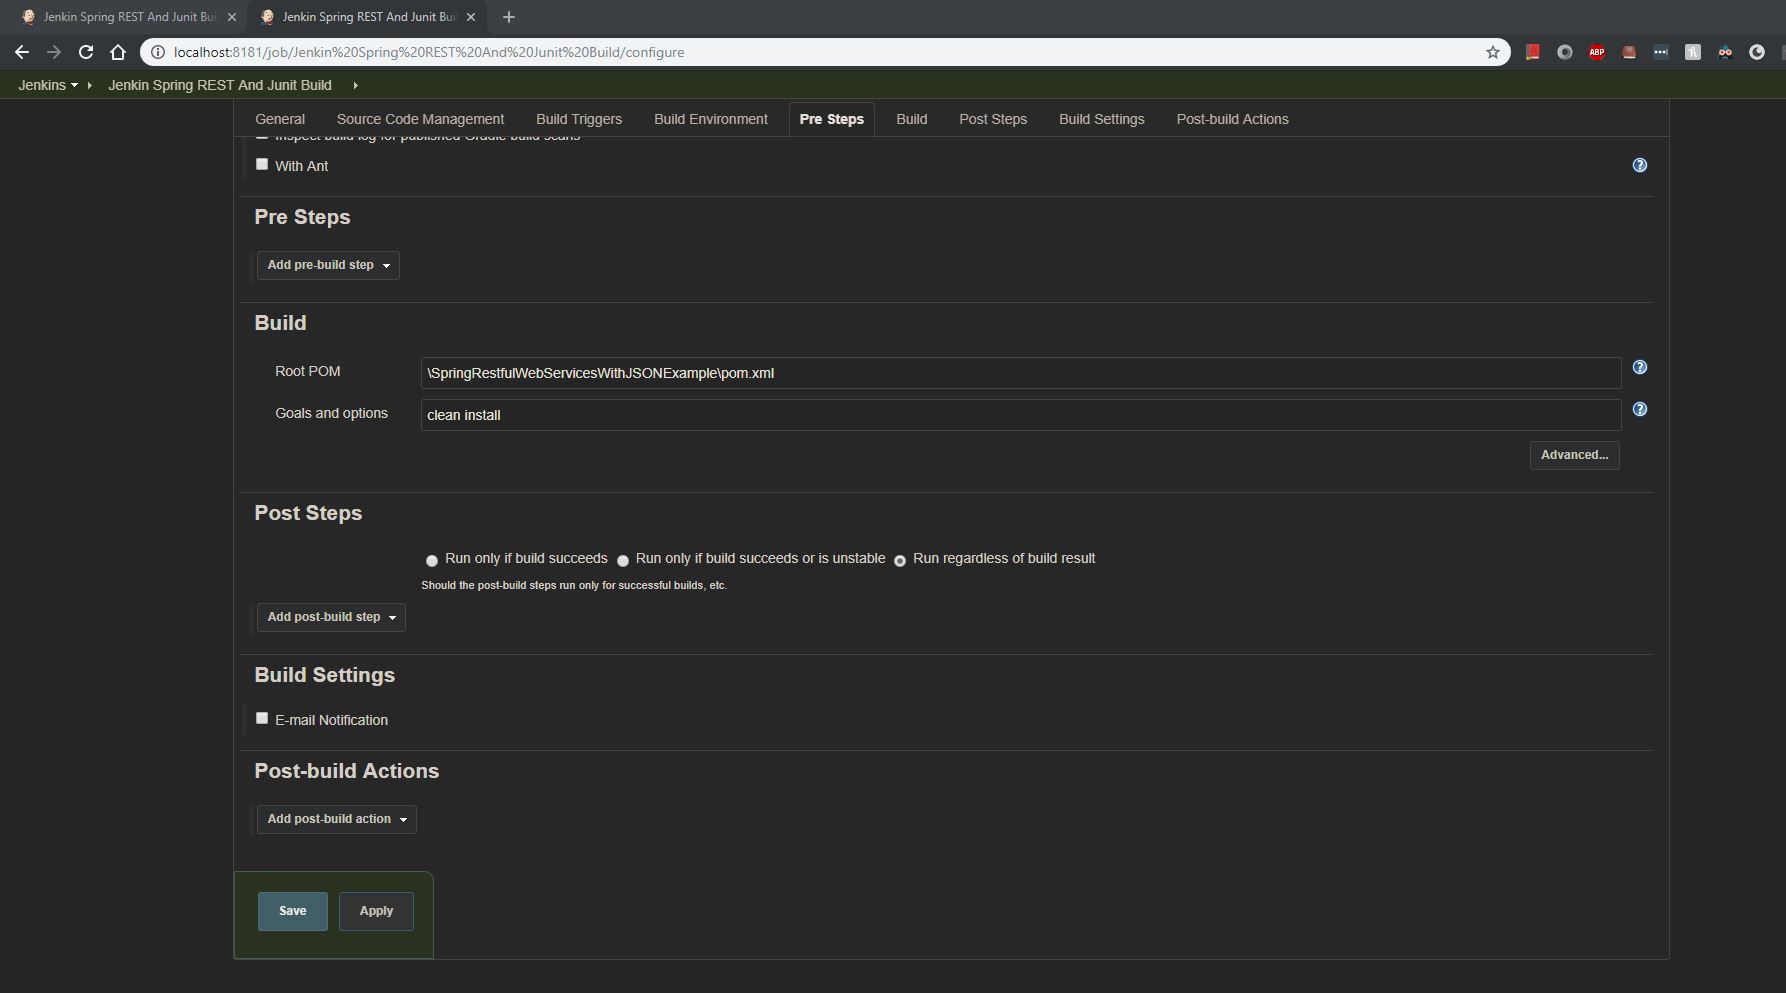
Now here as we going to execute Maven build script through Jenkin we need to install MAven plugin. For the follow this path
Go to Jenkins Dashboard ->Manage Jenkins ->Manage plugins ->Available ->Maven Integration ->Install
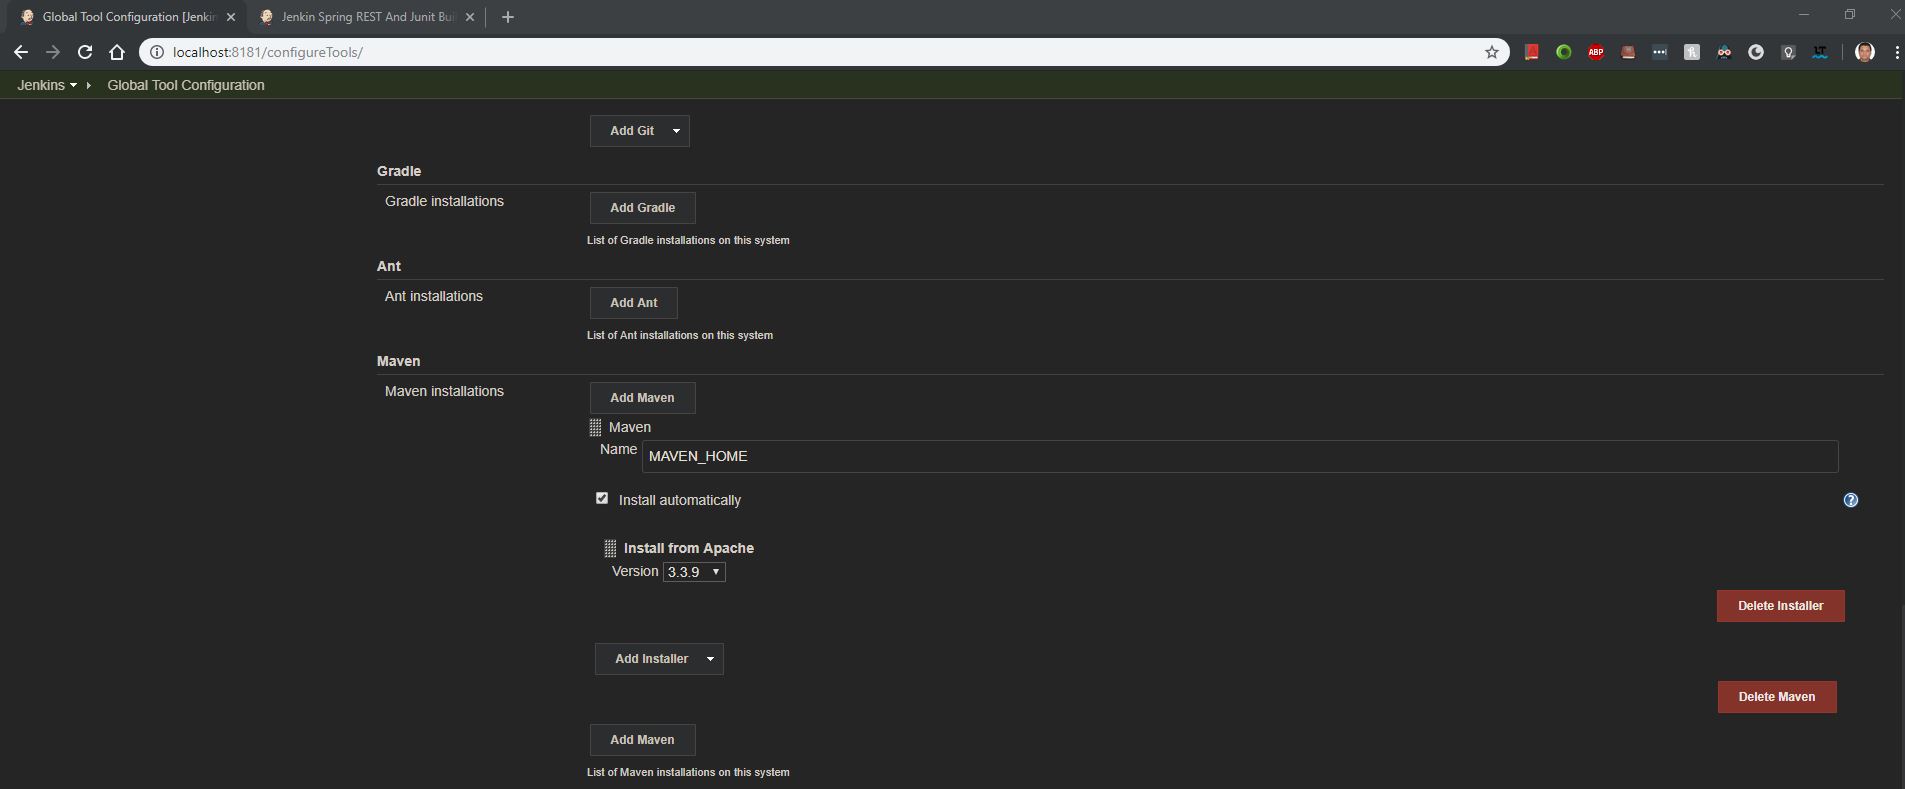
Go to Manage Jenkins->Global tool configuration->Maven -> Add Maven_home variable value (i.e. path of the maven file on your system).
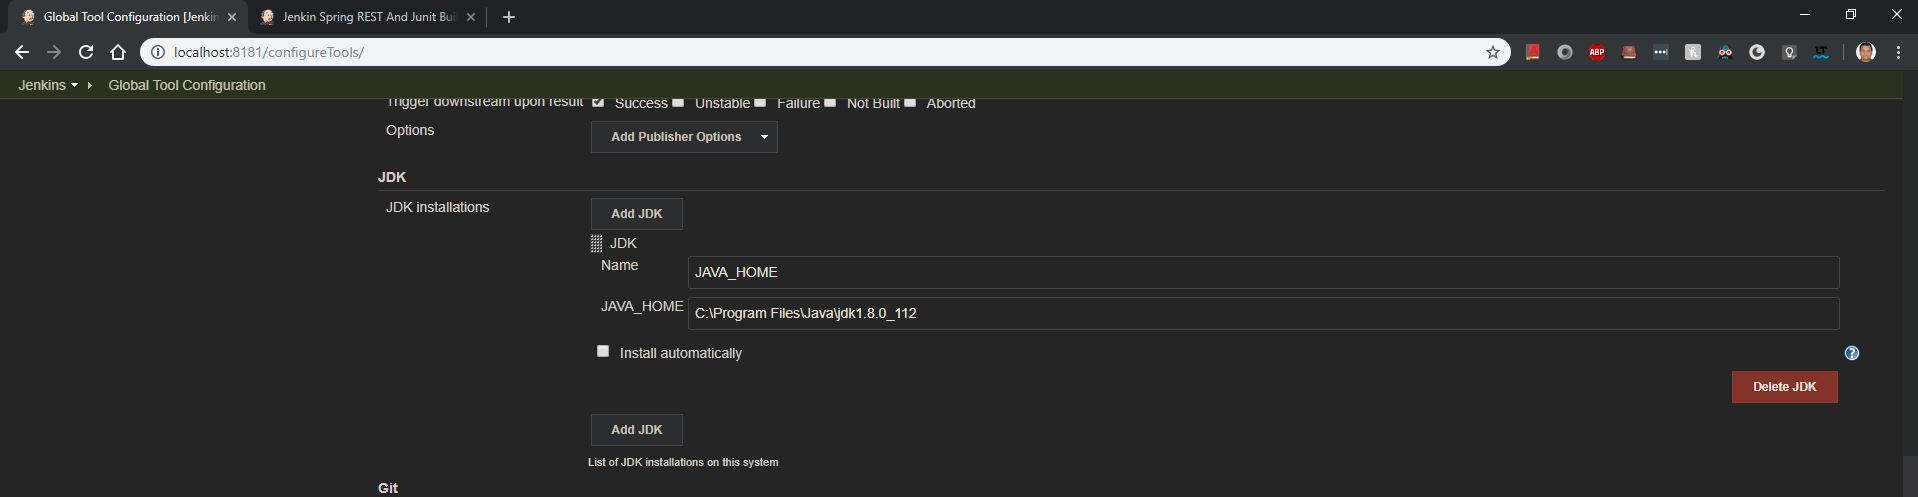
Also make sure to Set the Path of JDK for Jenking
Go to Manage Jenkins->Global tool configuration->JDK->Add JDK
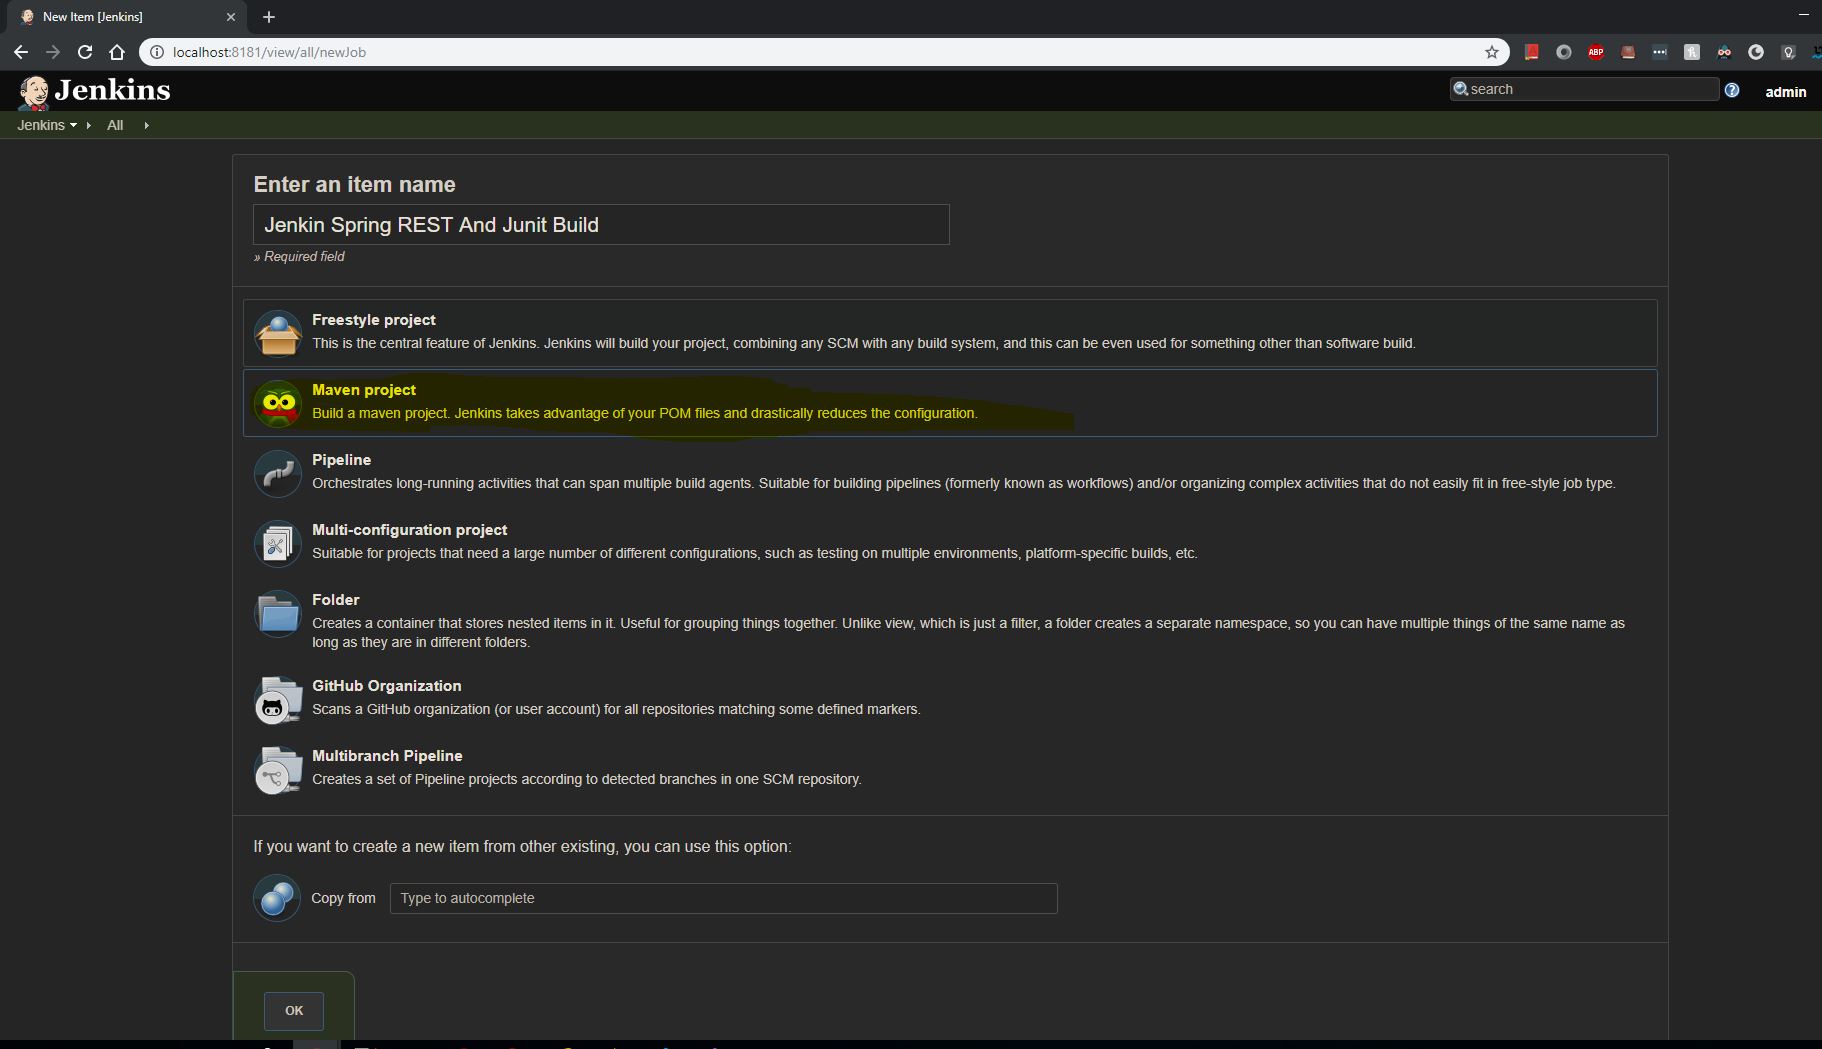
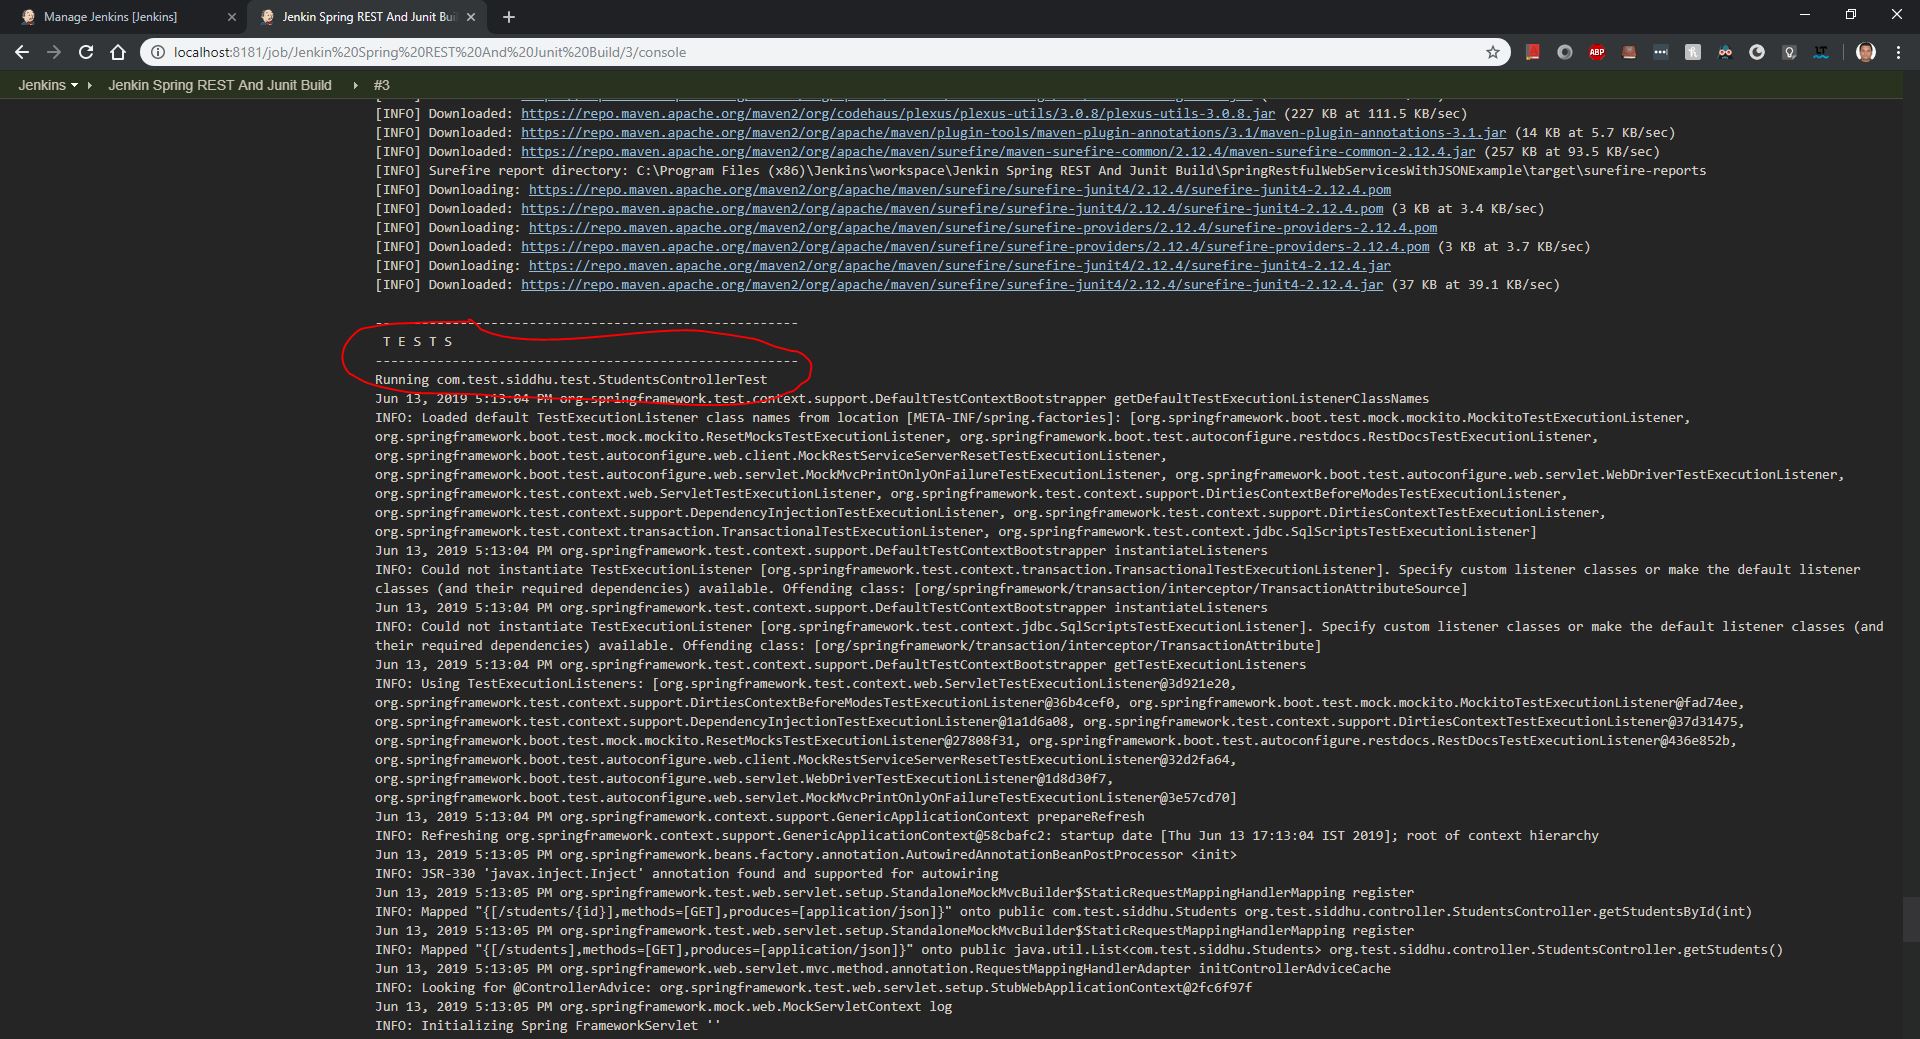
step 1:- First we will create a new Jenkin Job as shown below i.e. Jenkin Spring REST And Junit Build
Now save your change and execute your job and check the console on jenkin
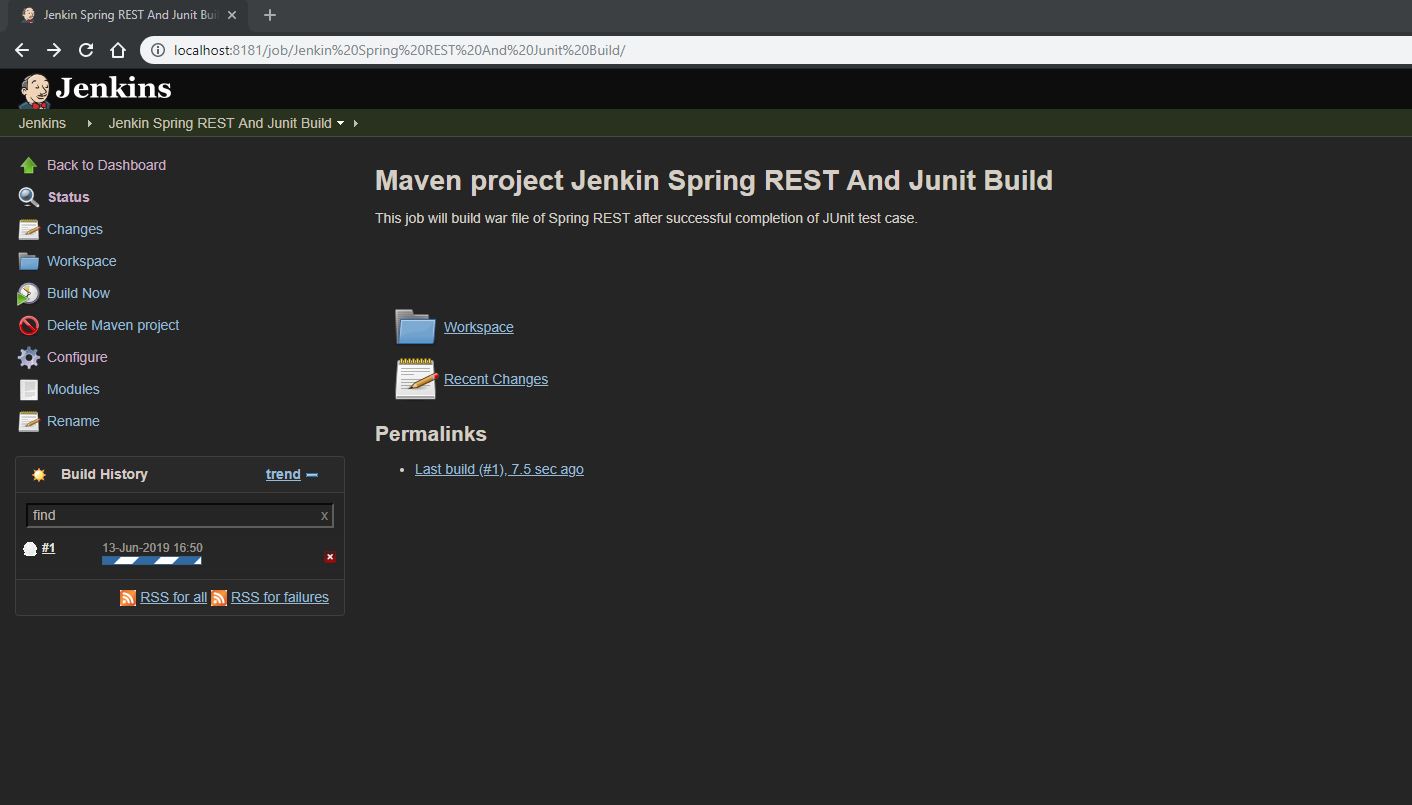
check the console and you will see war is created along with testing the Junit


2- FE- JAS4 -Hello World - Jasmine and Karma to call one function of TS files.
3- BE- Spring Rest - Hello world
4- BE- Spring Rest - Hello world JUnit
5- Jenking Integartion FE+BE- AJS4+Spring REST [3+4]
i.e.
Job1 - checkout FE code+Jasmine&Karma execution+build+ On success
Job2 - checkout BE code+Junit+build+ On success+ Create BE War
Job3- Stop TC + Undeploy Old FE Zip and BE war if present + Deploy both FE Zip and BE War + Start TC.- Not covered
1- FE- JAS4 -Hello World
We are using Visual Source code as IDE and Angular CLI to create base project and Angular Site https://angular.io/
First make sure to install following soft ware in your PC.
1- NPM :- https://www.npmjs.com/get-npm
2- NodeJS :- https://nodejs.org/en/
Step 1:- Create folder with name in your C:\VSC_WorkSpace_AngularJS_Jenkin
Step 2:- Open that folder in your VSC studio
Step 3:- In terminal window execute this command
npm install -g @angular/cli
Step 4:- Execute
ng new siddhu-jenkin-karma-jasmine-app
step 5:-
cd siddhu-jenkin-karma-jasmine-app
ng serve --open
2- FE- JAS4 -Hello World - Jasmine and Karma to call one function of TS files.
Now Lets do our Second Assignment of adding Jsamine and Karma to our call
By default when we create a new application using AngularJS frame work it will include all necessary files of Jasmine frame work (need to refresh the browser every time when we want to execute AJS test case)and karma tool (which helps developer to execute the test case just by saving in workspace on command prompt ) that are needed for doing unit testing.
Let execute the same. Lets imagine we have addNumber method that add the given two input and store in variable result and getAnswer() give us this answer varible
1:- app.component.ts
import { Component } from '@angular/core';
@Component({
selector: 'app-root',
templateUrl: './app.component.html',
styleUrls: ['./app.component.css']
})
export class AppComponent {
title = 'siddhu-jenkin-karma-jasmine-app';
answer: number;
/* addNumber(firstnumber : number, secondnumber : number) {
return firstnumber + secondnumber;
} */
addNumber(firstnumber , secondnumber) {
console.log(firstnumber);
console.log(secondnumber);
var myFirstNumber = +firstnumber;
var mySecondNumber = +secondnumber;
this.answer = myFirstNumber + mySecondNumber;
console.log(this.answer);
}
getAnswer() {
return this.answer;
}
}
2:- app.component.spec.ts
import { TestBed, async } from '@angular/core/testing';
import { RouterTestingModule } from '@angular/router/testing';
import { AppComponent } from './app.component';
describe('AppComponent', () => {
let objCaculator = new AppComponent();
let result : number;
beforeEach(() => {
objCaculator.addNumber(10,20);
result= objCaculator.getAnswer();
});
it('Lets call addNumber', () => {
expect(result)
.toEqual(30);
});
});
3- Execute the command ng test as see the result as shown below
Chrome 75.0.3770 (Windows 10.0.0): Executed 1 of 1 SUCCESS (0.022 secs / 0.006 secs)
TOTAL: 1 SUCCESS
TOTAL: 1 SUCCESS
Now lets try to execute both our Test and Build command at the same time from prompt.
for that we have to modify package.json
"scripts": {
"ng": "ng",
"start": "ng serve",
"build": "ng build",
"test": "ng test --no-watch",
"lint": "ng lint",
"e2e": "ng e2e",
"playground": "angular-playground",
"ci": "ng test --no-watch && ng build"
},
and from prompt use this command npm run ci as shown below.
C:\VSC_WorkSpace_AngularJS_Jenkin\siddhu-jenkin-karma-jasmine-app> npm run ci
> siddhu-jenkin-karma-jasmine-app@0.0.0 ci C:\VSC_WorkSpace_AngularJS_Jenkin\siddhu-jenkin-karma-jasmine-app
> ng test --no-watch && ng build
10% building 3/3 modules 0 active11 06 2019 14:34:37.689:INFO [karma-server]: Karma v4.1.0 server started at http://0.0.0.0:9876/
11 06 2019 14:34:37.716:INFO [launcher]: Launching browsers Chrome with concurrency unlimited
11 06 2019 14:34:37.738:INFO [launcher]: Starting browser Chrome 11 06 2019 14:34:47.228:INFO [Chrome 75.0.3770 (Windows 10.0.0)]: Connected on socket HggYH6j_YOej3ZlqAAAA with id 51549837
LOG: 10
Chrome 75.0.3770 (Windows 10.0.0): Executed 0 of 1 SUCCESS (0 secs / 0 secs)
LOG: 20
Chrome 75.0.3770 (Windows 10.0.0): Executed 0 of 1 SUCCESS (0 secs / 0 secs)
LOG: 30
Chrome 75.0.3770 (Windows 10.0.0): Executed 0 of 1 SUCCESS (0 secs / 0 secs)
Chrome 75.0.3770 (Windows 10.0.0): Executed 1 of 1 SUCCESS (0.03 secs / 0.01 secs)
TOTAL: 1 SUCCESS
TOTAL: 1 SUCCESS
Date: 2019-06-11T09:05:36.553Z
Hash: b9c533663dca7a158115
Time: 28900ms
chunk {main} main-es5.js, main-es5.js.map (main) 175 kB [initial] [rendered]
chunk {polyfills} polyfills-es5.js, polyfills-es5.js.map (polyfills) 546 kB [initial] [rendered]
chunk {runtime} runtime-es5.js, runtime-es5.js.map (runtime) 6.08 kB [entry] [rendered]
chunk {styles} styles-es5.js, styles-es5.js.map (styles) 182 kB [initial] [rendered]
chunk {vendor} vendor-es5.js, vendor-es5.js.map (vendor) 7.09 MB [initial] [rendered]
Date: 2019-06-11T09:05:51.535Z
Hash: 8c5277177a3fd36bff7c
Time: 14901ms
chunk {main} main-es2015.js, main-es2015.js.map (main) 175 kB [initial] [rendered]
chunk {polyfills} polyfills-es2015.js, polyfills-es2015.js.map (polyfills) 250 kB [initial] [rendered]
chunk {runtime} runtime-es2015.js, runtime-es2015.js.map (runtime) 6.08 kB [entry] [rendered]
chunk {styles} styles-es2015.js, styles-es2015.js.map (styles) 182 kB [initial] [rendered]
chunk {vendor} vendor-es2015.js, vendor-es2015.js.map (vendor) 6.49 MB [initial] [rendered]
Now lets move to third part of the assignment
3- BE- Spring Rest
Please refer below given URL i.e. helloworld Spring REST and import the same project in STS/Eclipse to understand the project flow
https://spring.io/guides/gs/rest-service/
Lets modify this example and create our own example Spring REST example
Step 1:- Create Students
package com.test.siddhu;
public class Students{
int id;
String studentsName;
public Students(int i, String studentsName) {
super();
this.id = i;
this.studentsName = studentsName;
}
public int getId() {
return id;
}
public void setId(int id) {
this.id = id;
}
public String getStudentsName() {
return studentsName;
}
public void setStudentsName(String studentsName) {
this.studentsName = studentsName;
}
}
Step 2:- Create controller StudentsController
package org.test.siddhu.controller;
import java.util.ArrayList;
import java.util.List;
import org.springframework.web.bind.annotation.PathVariable;
import org.springframework.web.bind.annotation.RequestMapping;
import org.springframework.web.bind.annotation.RequestMethod;
import org.springframework.web.bind.annotation.RestController;
import com.test.siddhu.Students;
@RestController
public class StudentsController {
@RequestMapping(value = "/students", method = RequestMethod.GET,headers="Accept=application/json")
public List<Students> getStudents()
{
List<Students> listOfStudents = new ArrayList<Students>();
listOfStudents=createStudentsList();
return listOfStudents;
}
@RequestMapping(value = "/students/{id}", method = RequestMethod.GET,headers="Accept=application/json")
public Students getStudentsById(@PathVariable int id)
{
List<Students> listOfStudents = new ArrayList<Students>();
listOfStudents=createStudentsList();
for (Students students: listOfStudents) {
if(students.getId()==id)
return students;
}
return null;
}
public List<Students> createStudentsList()
{
Students first=new Students(1, "First");
Students fourth=new Students(4, "Fourth");
Students third=new Students(3, "Third");
Students second=new Students(2, "Second");
List<Students> listOfStudents = new ArrayList<Students>();
listOfStudents.add(first);
listOfStudents.add(second);
listOfStudents.add(third);
listOfStudents.add(fourth);
return listOfStudents;
}
}
Step 3:- Change the springrest-servlet.xml and give our package
<context:component-scan base-package="org.test.siddhu.controller" />
Step 4:- Try to have this POM.xml and folder structure
Execute our project using right click Poject -> Run on server
Now let move to Step 4
4- BE- Spring Rest with Junit we will try to use Mockito
Lets create a package com.test.siddhu.test and create file StudentsControllerTest
package com.test.siddhu.test;
import org.junit.Before;
import org.junit.Test;
import org.junit.runner.RunWith;
import org.mockito.InjectMocks;
import org.mockito.Mock;
import org.skyscreamer.jsonassert.JSONAssert;
import org.springframework.beans.factory.annotation.Autowired;
import org.springframework.beans.factory.annotation.Qualifier;
import org.springframework.http.MediaType;
import org.springframework.test.context.ContextConfiguration;
import org.springframework.test.context.junit4.SpringJUnit4ClassRunner;
import org.springframework.test.web.servlet.MockMvc;
import org.springframework.test.web.servlet.MvcResult;
import org.springframework.test.web.servlet.RequestBuilder;
import org.springframework.test.web.servlet.request.MockMvcRequestBuilders;
import org.springframework.test.web.servlet.setup.MockMvcBuilders;
import org.test.siddhu.controller.StudentsController;
import com.test.siddhu.Students;
@RunWith(SpringJUnit4ClassRunner.class)
@ContextConfiguration( classes = TestConfiguration.class )
public class StudentsControllerTest {
private MockMvc mockMvc;
@Mock
Students students;
@Autowired
@InjectMocks
@Qualifier("studentsController")
StudentsController studentsController;
@Before
public void setUp() {
//MockitoAnnotations.initMocks(this);
mockMvc = MockMvcBuilders.standaloneSetup(new StudentsController()).build();
}
@Test
public void testSaveUser() throws Exception {
RequestBuilder requestBuilder = MockMvcRequestBuilders
.get("/students/1")
.accept(MediaType.APPLICATION_JSON);
MvcResult result = mockMvc.perform(requestBuilder).andReturn();
System.out.println(result.getResponse().getContentAsString());
String expected = "{\"id\":1,\"studentsName\":\"First\"}";
JSONAssert.assertEquals(expected, result.getResponse().getContentAsString(), false);
//by sdhumale to execute method of controller
/*Students objStudents = studentsController.getStudentsById(1);
Assert.assertNotNull( objStudents );
Assert.assertEquals( objStudents.getId() , objStudents.getId() );*/
}
}
Please make following modification in POM.xml
<!-- for Junit start [ -->
<dependency>
<groupId>org.mockito</groupId>
<artifactId>mockito-core</artifactId>
<version>2.8.47</version>
<scope>test</scope>
</dependency>
<dependency>
<groupId>org.springframework</groupId>
<artifactId>spring-test</artifactId>
<version>4.3.7.RELEASE</version>
<scope>test</scope>
</dependency>
<dependency>
<groupId>org.springframework</groupId>
<artifactId>spring-context</artifactId>
<version>4.3.7.RELEASE</version>
</dependency>
<dependency>
<groupId>org.glassfish.jersey.bundles</groupId>
<artifactId>jaxrs-ri</artifactId>
<version>2.25</version>
</dependency>
<dependency>
<groupId>org.glassfish.jersey.media</groupId>
<artifactId>jersey-media-moxy</artifactId>
<version>2.25</version>
</dependency>
<!-- for Junit end ] -->
Now there are two ways to execute
1- We can execute the method of Controller
i.e.
Students objStudents = studentsController.getStudentsById(1);
Assert.assertNotNull( objStudents );
Assert.assertEquals( objStudents.getId() , objStudents.getId() );
2- By calling the URL to hit the Controller
private MockMvc mockMvc;
@Mock
Students students;
@Autowired
@InjectMocks
@Qualifier("studentsController")
StudentsController studentsController;
@Before
public void setUp() {
//MockitoAnnotations.initMocks(this);
mockMvc = MockMvcBuilders.standaloneSetup(new StudentsController()).build();
}
@Test
public void testSaveUser() throws Exception {
RequestBuilder requestBuilder = MockMvcRequestBuilders
.get("/students/1")
.accept(MediaType.APPLICATION_JSON);
MvcResult result = mockMvc.perform(requestBuilder).andReturn();
System.out.println(result.getResponse().getContentAsString());
String expected = "{\"id\":1,\"studentsName\":\"First\"}";
JSONAssert.assertEquals(expected, result.getResponse().getContentAsString(), false);
//by sdhumale to execute method of controller
/*Students objStudents = studentsController.getStudentsById(1);
Assert.assertNotNull( objStudents );
Assert.assertEquals( objStudents.getId() , objStudents.getId() );*/
}
Now lets move the concept more further and integrate our Jenkin with both FE and BE i.e. our Step 5- Jenking Integartion FE+BE- AJS4+Spring REST [3+4]
First of all we need to install Jenkin server to have CI/CD to be done by it for us.
You can download the same from https://wiki.jenkins.io/display/JENKINS/Home?src=sidebar
As i am using window machine download the jenking.exe. Run this exe and installed the jenkin by default it will start the jenkin as service in Window on port 8080 if you are using this port you can change the port in jenkins.xml Please refer to the below site for documentations.
https://wiki.jenkins.io/display/JENKINS/Thanks+for+using+Windows+Installer
During first time login it will ask to install required plugin and it will also give you option to install new plugin. I choose to install base plugin and further it will ask to create user and after that your Jenkin will start on this url :- http://localhost:8181/
Now lets start to create our first job that will do following this
1- Creation of AngularJS6 FE folder after successful compilation with Karma and Jasmine executions.
2- Creation of Spring REST BE WAR file after successful compilation with Junit executions.
3- Deploying both FE Folder and BE WAR file on the dedicated Tomcat and start the server
[Note:- we will no go in details on how to stop the current running Tomcat and then take the old files back up and then deploy these new ZIP and WAR files and if this fails what will be the roll back strategy etc as this is not the part of assignment]
1- Creation of AngularJS6 FE Folder file after successful compilation with Karma and Jasmine executions.
step 1:- First we will create a new Jenkin Job as shown below i.e. Jenkin AngularJS6 Karma And Jasmine Build
If we are using GIT as the repository then select GIT Option in Source Code Management and provide addition GIT credential for the same.
Now save your change and execute your job and check the console on jenkin
2- Creation of Spring REST BE WAR file after successful compilation with Junit executions.i.e.
Now here as we going to execute Maven build script through Jenkin we need to install MAven plugin. For the follow this path
Go to Jenkins Dashboard ->Manage Jenkins ->Manage plugins ->Available ->Maven Integration ->Install
Go to Manage Jenkins->Global tool configuration->Maven -> Add Maven_home variable value (i.e. path of the maven file on your system).
Also make sure to Set the Path of JDK for Jenking
Go to Manage Jenkins->Global tool configuration->JDK->Add JDK
step 1:- First we will create a new Jenkin Job as shown below i.e. Jenkin Spring REST And Junit Build
Now save your change and execute your job and check the console on jenkin
check the console and you will see war is created along with testing the Junit

No comments:
Post a Comment