Lets try to build now our own PWA application. For sake of knowledge we are using very simple page that display my image with few of my descriptions.
Lets create a simple html that dispaly image with some text and call it as index.html.
we will add few of the CSS to have its look and feel good.
Now let try to run the application on server. Many ways to do it. Either you can use the server extension of Google chorom or if you have node in stalled in your pc you can use serve . command.
As I am using VS code and its plugin “Open with live server” it will exposed our application on server localhost as shown below.
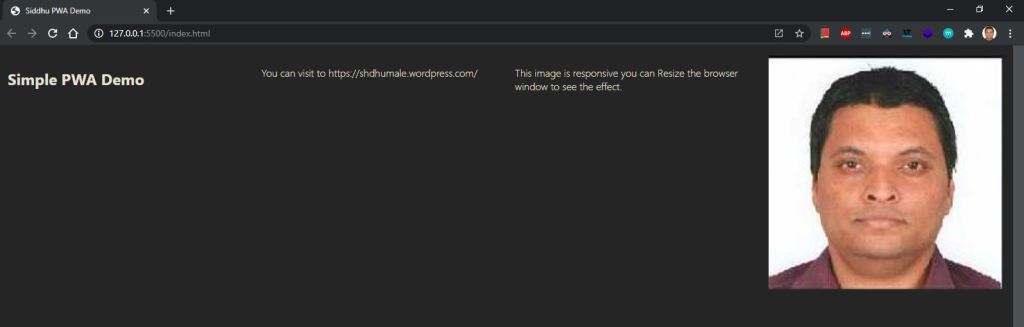
As we had added responsive behaviour you can see the site looks different when we change the browser width.

Now lets start to make our application as PWA.
As we stated PWA main part is to have a javascript know as service worker java script. we will create a file called as sw.js.
Additional PWA application provide us the facilities to add the shortcut of our application on mobile or desktop device this can be done by adding a file called as manifest.webmanifest.
manifest.webmanifest files contains information tag such as name, url, icons that is going to be displayed on the desktop etc.
Once this file is present in the project we can easily have the option of add to screen. When we try to open the google chorme developer tool F12 and see the application tab we will find that we did not get the add to home screen rather that it shows an error saying no matching service worker detected.


Above error is valid as still now we did not define any service worker javascript which is the core of PWA. Service workere JS reside in between application and you internet. sw.js is event driven means it get activated by firing event as an input and work accordingly.
Its main function is as follow
1- As a event driven it take event from user screen and work accordigly i.e either go to internet to fetch data or go to cache for the same.
2- As an intermediater between application and internet it will first cache all the items that we want it to cache and then if required call the internet for data.
3- It also has capaility to talk with server.
4- The main function it do is to call the internet to get the new data if the url is changed and deletet the old cache and fill with new data internet bring. If the internet is not there it will load the cache data to the user.
5- It will also store the whole form data in the cache so that whenever the internet come online data is submitted to the server and hence user did not have to fill the whole data again.
6- It also supopor the push mechanisum means it allows your applicatoin to get notification even though you are OFFLINE
7- It helps in auto sync means once the internet is on we can send the data from client to server automatically
8- It also support the functionality to access user device camera.
9- It also help to get the user location.
In our applicaiton we will try to implement following below items in sw.js
1- Event Driven function
2- Push
3- Sync
So lets create a sw.js file. In this files we will do following
//Install
//Activate
//Fetch
Lets try to understand what all above things in terms of development
//Install :- In this step we will check if the browser allows us to use the PWA functionality. If not we will show error to the end user.
//Activate :- In this step we will delete all the old cache and refill it with the new data that we get from the internet.
//Fetch:- Here we do following things
Step A:- Frist check if the internet is online. If online then we will make a call to server using internet and cache the new data.
Step B:- If no internet then show the result from the cache to the end users.
As shown below in sw.js we are doing following this sequence wise
//Define the cache name. By this name of the cache data is fetch when no internet is there.
const cacheName = 'siddhucache.1.0';
//This is the array that define the files that need to be cache
const staticAssets = [
    './',
    './index.html',
    './styles.css',
    './image/siddhu.jpg'
];

//Install :- This will be executed if site is accessed fresh or the version of the SW change. This is called immediately
// Once the browser detect the new version of SW for registration.
self.addEventListener('install', async e => {
    const cache = await caches.open(cacheName);
    await cache.addAll(staticAssets);
    //below line of code will tell start working as soon as request is made.
    return self.skipWaiting();
});
//Activate :- In this step we will delete all the old cache and refill it with the new data that we get from the internet. This will
// always be called once the user closed all the other browser instance and again install is called followed by Activate else it
// may create intrupt to the existing fucntionality/tab of the user.
self.addEventListener('activate', e => {
    //below line of code will tell old cache will be deleted and new will be created for new service worker.
    self.clients.claim();
});
//Fetch:- Here we do following things
//Step A:- Frist check if the internet is online. If online then we will make a call to server using internet and cache the new data.
//Step B:- If no internet then show the result from the cache to the end users.
self.addEventListener('fetch', async e => {
    const req = e.request;
    const url = new URL(req.url);

    if (url.origin === location.origin) {
        //below line indicate if the requested url is same and no internet then fetch the date from the cache
        e.respondWith(displayFirstCache(req));
    } else {
        //below line indicate else make a call to the internet and fetch the new data.
        e.respondWith(callNetworkFirstAndThenDoCache(req));
    }
});

//This fuction will be used to take the data from the cache defined in cacheName
async function displayFirstCache(req) {
    //Opening the cachee
    const cache = await caches.open(cacheName);
    //Matching the request
    const cached = await cache.match(req);
    //if same then return the cached else call the internet using fetch method.
    return cached || fetch(req);
}

//This fuction will be used to take the data from the internet and fill the new values in the cache defined in cacheName
async function callNetworkFirstAndThenDoCache(req) {
    const cache = await caches.open(cacheName);
    try {
        //calling internet and taking new data.
        const fresh = await fetch(req);
        //deleting the old cahce and pusing the new data.
        await cache.put(req, fresh.clone());
        return fresh;
    } catch (e) {
        //if no internet then use the old data.
        const cached = await cache.match(req);
        return cached;
    }
}

//this method is used to show the push notification to the user even though they are offline.
self.addEventListener('push', function (event) {
    console.log('[Service Worker] Push Received.');
    console.log('[Service Worker] Push had this data: "${event.data.text()}"');

    const title = 'Siddhu Push Notication comes';
    const options = {
        body: 'Push notification comes. This time it is from Chorme browser',
        icon: 'image/icon-192x192.png',
        badge: 'image/icon-512x512.png'
    };

    self.registration.showNotification(title, options);
});

//This method is used for having sync call between device and server. If the user fill the data on form and internet goes off and when
//the user again comes online at that time this sync is called. There is sync periodic Sync that run at definite interval of time.
self.addEventListener('sync', function (event) {
    if (event.tag == 'myFirstSync') {
        event.waitUntil(doSomeStuff());
    }
});
//Do the things which we want once the sync is on
async function doSomeStuff() {
    console.log("reached here")
}
Now as we have written our service worker java script we need to integrate it with our application. To do that lets add one more javascript file index.js
In this index.js we will fire the event driven command that will be taken by our sw.js
index.js:-
<!-- wp:paragraph -->
<p>window.addEventListener('load', () => {<br>registerSW();<br>syncButton()<br>});</p>
<!-- /wp:paragraph -->
<!-- wp:paragraph -->
<p>async function registerSW() {<br>if ('serviceWorker' in navigator) {<br>try {<br>await navigator.serviceWorker.register('./sw.js');</p>
<!-- /wp:paragraph -->
<!-- wp:syntaxhighlighter/code -->
<pre class="wp-block-syntaxhighlighter-code">} catch (e) {
console.log('SW registration failed');
}</pre>
<!-- /wp:syntaxhighlighter/code -->
<!-- wp:paragraph -->
<p>}<br>}</p>
<!-- /wp:paragraph -->
<!-- wp:paragraph -->
<p>async function syncButton() {<br>try {<br>await navigator.serviceWorker.ready.then(function (swRegistration) {<br>return swRegistration.sync.register('myFirstSync');<br>});<br>} catch (e) {<br>console.log('SW registration failed');<br>}<br>}</p>
<!-- /wp:paragraph -->
<!-- wp:paragraph -->
<p>Now check the site on browser F12 by doing both the option offline and online.</p>
<!-- /wp:paragraph -->

Offline Mode
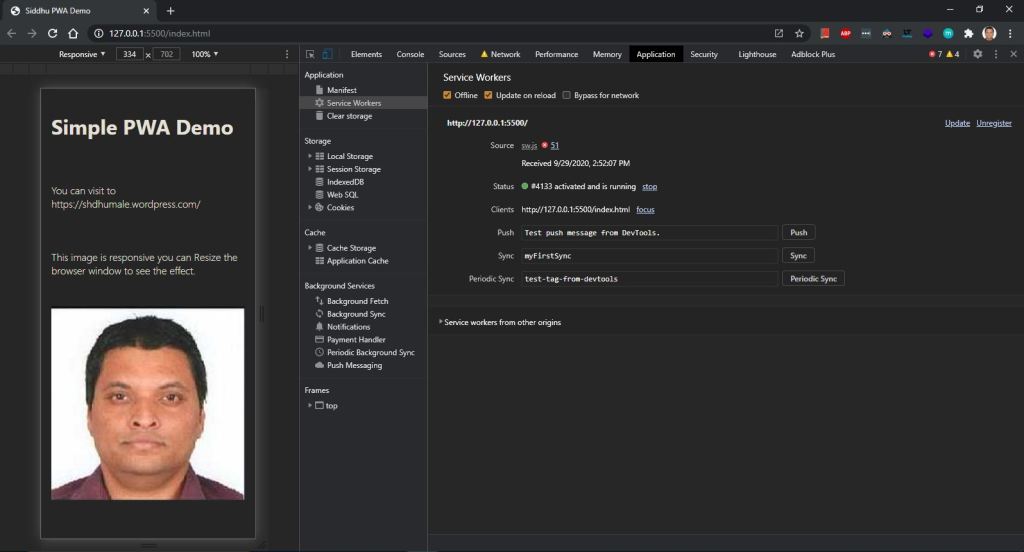

Now lets try to execute push button
Note:- TO make the push button display on the screen go to below screen and mark allows


Now lets try for Sync functionality

Note:- You can download this applicatoin from the git hub
https://github.com/shdhumale/siddhupwaexample
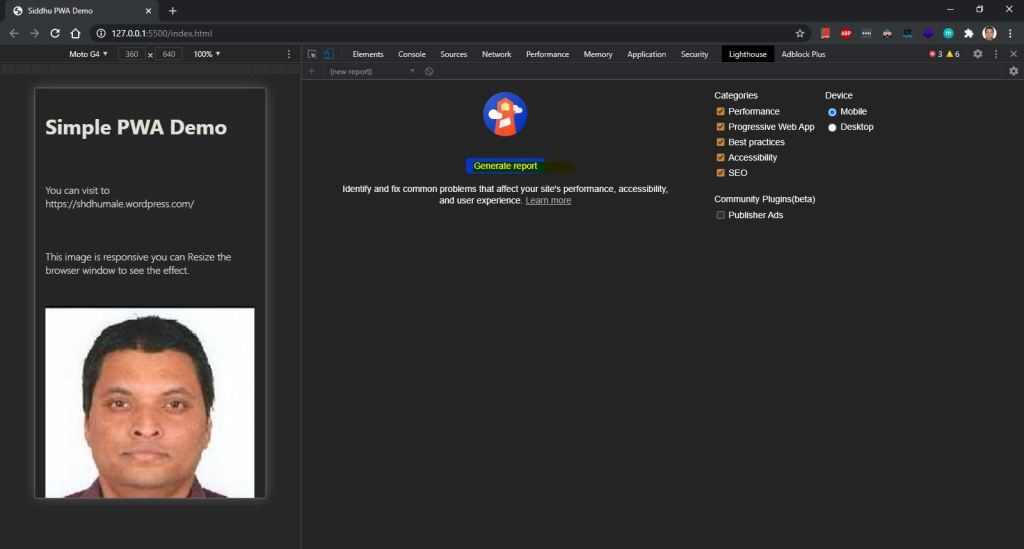
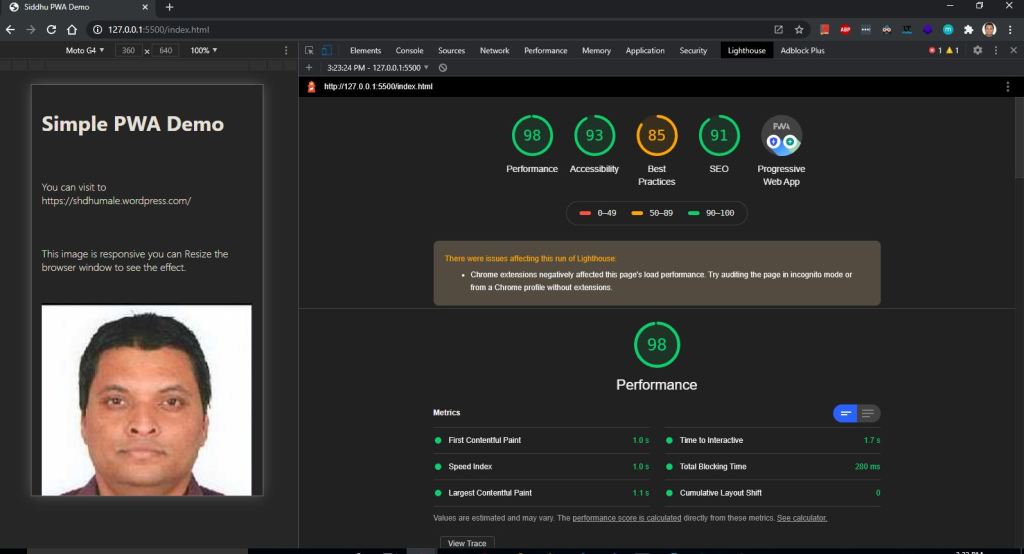
you can also use the Lighthouse tab provided by the google to check how your applicaiton stands with PWA mark.
Benefits of PWA:-
1- Site can be loaded offline
2- Sync of data can be done as on when internet comes.
3- No new code development of Andriod, IOS and windows.
4- Work on Service Worker architecture hence on java script
5- Easily integrated with most of the sites written in any languages i.e pyhton, AngularJS, ReactJS, Vue or pyhton or anyother web technologies.
6- New tools like workbox support many new features like amount of cache, its life,
7- Workbox provide simple yet sofisticated mehods for creating and integrating PWA in existing website.
8- It can be integrated at any stage i.e. already developed site, in mid of development or complete new site development.
9- Completly depends on developer and user to integrate what items need to be added in site i.e. cache, add to screen, push , sync, camera access, geolocation etc.
10- Facilities to integrate PWA on selected module of the application i,e, we can define to which module we want to have PWA customer module but not the payment modules.
11- No seperate installation of the application required in Andriod or IOS or Windows. Hence saving the space.
12- Adding the feature as you go. No hard and fast rule to add all the feature.
13- Service worker run on thread base and hence execution is non blocking and speedy.
Drawbacks of PWA:-
1- supported by most of the browser but not the supporting old browser like IE, edge and safari
2- Need to have the web application responsive in nature by default.
In next post we will try to use the better api for PWA using workbox.