Tuesday, March 21, 2017

Setting Development environment for Ionic Frame work Mobile Hybrid Development.


Mobile development is now become the back bone of application development. It is presume that organisation that are not thinking of mobile development for their site is on risk. More and more people are preferring to use small and handy gadget like mobile, Tablet etc over computer for day to day activity.
There are different type of mobile development i.e. Android, IOS, Windows etc. Every Mobile O/S has its own structure and framework to develop mobile application i.e. Android has Android studio etc.
Problem is when the user ask to have an mobile application which run on many different platform. Currently if we develop application for one O/S Android that application did not work on IOS and Window platform. Developing the same application for Other Plate Form is time consuming along with huge investment.
To over come this developer has come with Hybrid Mobile Development. In this developer use famous framework like Ionic Frame work to develop application and can use the same developed application on different platform like android, IOS, Windows etc.
To Develop Ionic Application we need to installed Coredova base software on which we develop hybride mobile development.
Before installing cordova make sure we had Node.Js and NPM install. NPM can be very useful for installation of required software for Mobile Development.
Step 1:- Use following below command for installation of cordova
npm install -g cordova ionic
Step 2:- As a new era developer we always like to have an IDE as development tool. And an open source developer i love to have Eclipse as IDE. So lets download our IDE for Mobile development
- Download latest version of Eclipse. I had used Neon
- Eclipse come with many plugin for mobile development one of the best is to use Red Hat JBoss developer studio. It come with in build Hybrid plug in used to develop hybrid mobile development. i.e.https://tools.jboss.org/downloads/devstudio/neon/10.3.0.GA.html#marketplace or we can also use https://www.eclipse.org/thym/. But I presonally prefer to use JBOSS Red Hat plugin.
Image1
- Once you install this plugin make sure it is reflected into your Eclipse Help --About page.
Image2
Step 3:- Lets create a simple Hybride application now using this tool.
file --> new --> other --> inside Mobile --> Hybride Mobile (Cordova) Application Project. Fill the proper information as needed i.e. project name and select cordova version and you will be able to see the developed application.
Image3
Run this application to the ui
right click on project --> run as -> Run w/CorDovaSim and we will be able to see this screen.
Image4
Step 4:- Now lets talk about creating a simple Ionic Application and run it on browser. Ionic application can be created using CLI Tool :- Command Lind Interface Tool. You can refer to the site https://ionicframework.com/getting-started/.
Three option are available to develop base framework for Ionic application. See the different of all in the given site.
$ ionic start mySiddhuApp blank
$ ionic start mySiddhuApp tabs
$ ionic start mySiddhuApp sidemenu
Step 5:- Once we had executed the above command we will have an folder called as mySiddhuApp. Go inside that mySiddhuApp and execute ionic server
cd mySiddhuApp
ionic serve

we will be able to see that browser will be opened with url and we will be able to see the default framework on the screen. Just try to play with it and see the navigatio etc.
From the folder structure you will be able to see that the folder and code which is inside the www folder is the important part for the development. we do teh development in that part only. Ionic work over Angularjs frame work. so beter to have some understanding of angularjs.

Once you go inside the js folder we will find java script like app.js, controller.js, directive.js, routes.js and service.js. Learn more about this from angularjs point of view. Let me try to explain them in few words

app.js - use to configure over all frame/app of angularjs
controller.js :- Provide the business logic for ui part
directive.js :- Provide the directive to the applicaiton.
routes.js :- To give navigation rule to the applications.
service.js - Use to make service call ie. Web service call.

Ionic also gives you a famous way of creating UI using Ionic creator. It is available in both flavour web and desktop. At present they are allowing only one project to create. Ionic creator is very good to develop UI for Ionic Applcation. We can download the developed UI code i.e. WWW foder and then integrate it in our applications.

I prefer to develop UI in Ionic using Ionic Creator where i get the navigation flow and then down load it and integrate its code in our application create through CLI and finally import that project in our Eclipes for further development
i.e.
1- Create Ionic project using Ionic Creator.
2- Download the whole ui source code from Ionic Creator.
3- Create an Ionic application using CLI and please Note- use the same name of project which is created in Ionic Creator.
i.e. - Copy paste all the code from www folder from the project downloaded from https://creator.ionic.io/ and place it in newly create project (Keep the SAME name ie.siddhuionicproject of newcreate project and project created in the https://creator.ionic.io/) and check it is working fine using ionic serve command.
4- Run this application on browser and see its all navigation is working perfectly.

Finally lets try to import that project inside Eclipse+Jboss red hat for starting development
- Import Ionic CLI application in our Eclipse + Hymt or Eclise + JBoss Mobile IDE and run the applications in CorDovaSim motion.
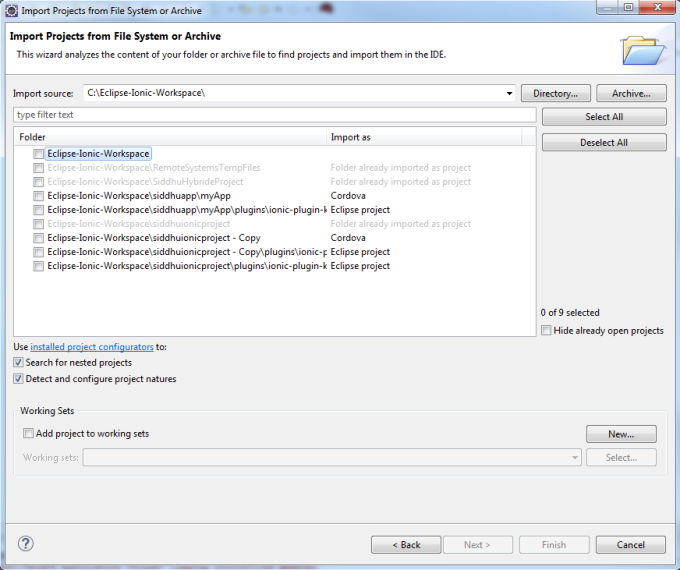
- right click --> import --> General --> Projects from Folder or Archive --> inside import source take the path where we had copied our project i.e. C:\Eclipse-Ionic-Workspace --> Select our project
Image1Image2Image3Image4Image5
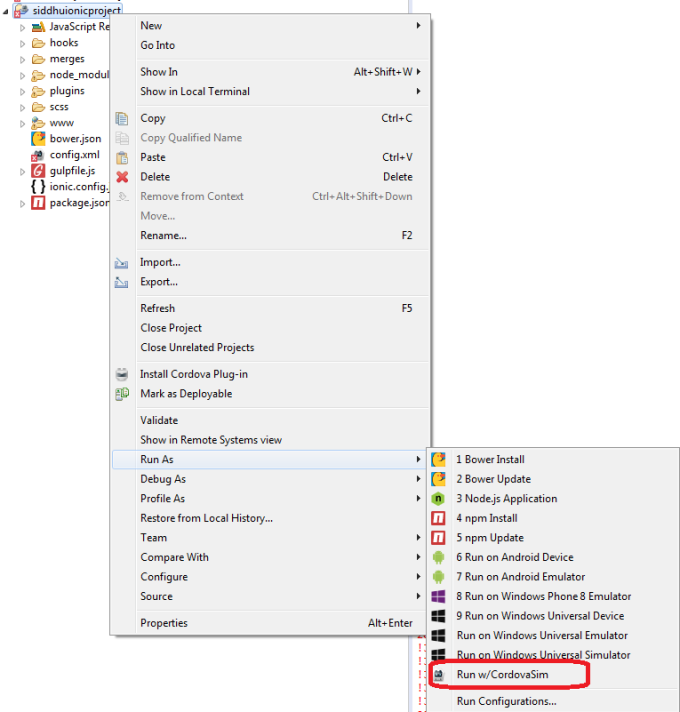
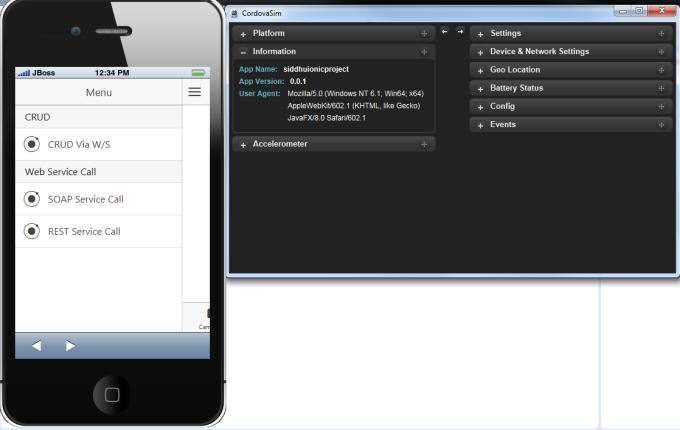
- right click on project --> Run as --> run cordovasim
- I had created an Ionic application having left menu as CRUD, SOAP and REst CAll we are going to use them in next exercise 

Tuesday, March 07, 2017

Calling SOAP and REST Webservice using Django 1.10, Python 35

We are using Eclipse as IDE and PyDev plugin for Django
Step 1:- Create Django project refer this site for creating Django Project
https://shdhumale.wordpress.com/2017/03/03/simple-django-hello-world-programe-using-eclipse-python-3-5-and-django-1-10/
Step 2:- Create view.py and add following code in it
import json
from django.forms import ModelForm
from django.shortcuts import render, redirect, get_object_or_404
import requests
from requests.auth import HTTPDigestAuth
import requests
import xml.etree.ElementTree as ET
import re
def SiddhuDefaultPage (request, template_name='siddhudjangowebservicecall/SiddhuCallWS_form.html'): 
return render(request, template_name)

def SiddhuSOAPCall(request, template_name='siddhudjangowebservicecall/SiddhuCallWS_form.html'):
url="http://IPADDRESS:8088/mockExposeWebServiceSoap11Binding?WSDL"
#headers = {'content-type': 'application/soap+xml'}
headers = {'content-type': 'text/xml'}
body = """YOUR SOAP REQUEST"""

response = requests.post(url,data=body,headers=headers)

print (response.content)
data = {}
data['object_list'] = parse(response.content) 
return render(request, template_name, data)
def SiddhuRestCall(request, template_name='siddhudjangowebservicecall/SiddhuCallWS_form.html'):
#if request.method == 'POST':
# Replace with the correct URL
url = "http://services.groupkt.com/country/get/iso2code/IN"
myResponse = requests.get(url)
# check api response is (OK = 200)
if(myResponse.ok):

print("----myResponse.content-------" + myResponse.text)
jData = json.loads(myResponse.content.decode('utf-8'))
print(jData)
locations = jData['RestResponse']['result']['alpha2_code']
print("locations" + locations)
data = {}
data['object_list'] = locations 

else:
myResponse.raise_for_status()
return render(request, template_name, data)

def parse(answer):
print("\nANSWER<<", answer)
try:
tree = ET.fromstring(answer)
result = {}
for item in tree.getiterator():
if item.tag in ['{http://dataobject.siddhu.com/xsd}codeReviewCoverage']:
result[item.tag] = item.text
#print ("get<<%s" % result.get('status', None))

resp1 = result.get('{http://dataobject.siddhu.com/xsd}codeReviewCoverage')
print("\resp1<<>>>>>>>>>>>>>>>>>>>>>>>", resp1)

except Exception:
print ("\nERROR <<", str("Err"))
return -1
return resp1
Step 3:- Modify url.py as below
from django.conf.urls import url
from django.contrib import admin
from siddhudjangowebservicecall import views

urlpatterns = [
url(r'^admin/', admin.site.urls),
url(r'^$', views.SiddhuDefaultPage),
url(r'^SOAPWS/', views.SiddhuSOAPCall, name='siddhu_soap_call'),
url(r'^RESTWS/', views.SiddhuRestCall, name='siddhu_rest_call'),
]
Step 4:- Create a template folder inside project and create another folder with name siddhudjangowebservicecall (prioject name) inside template.
Keep our html files in that folder
SiddhuCallWS_form.html:-


Folder Structure:-
Image1
UI Screen
Image2

Click on CAll REST W/S and check your url value is changed i.e. url is appended with RESTWS/and we will get ui as below
Image3
Note :- We are using REST service exposed in url = "http://services.groupkt.com/country/get/iso2code/IN"
Click on CAll SOAP W/S and check your url value is changed i.e. url is appended with SOAPWS/ and we will get ui as below
Image4

Monday, March 06, 2017

Simple CRUD Web example using Django 1.10, Python 35, Sqlite Db

Django comes with its own concept of developing web application using Model of the Table as base.
Basic steps involved in creating a CRUD app in Django are as follows:-
1- Create an Django Web Application base folder structure. We are using Eclipse with PyDev. For more details refer to below site: https://shdhumale.wordpress.com/2017/03/03/simple-django-hello-world-programe-using-eclipse-python-3-5-and-django-1-10/
2- Create the Model class. This model class is responsible for creation of Table in our Database.
3- Create the View logic that we are planning to display to the end user
4- Declare and define the URLs which is going to map our view part. This url is resposible to divert the call to specific python class and html page depending on our relam or browser url.
5- Create the Templates where we put all our html file that we are planning to display to the end user.i.e. html file.
Step 1:- Creating an Django application. We can do this using CLI command i.e. ./manage.py startapp servers or use Eclipse process to create the Django Projects. Files marked in red colour will not be created by our eclipse plugin.
Image1
Step 2:- Add our newly created project entry in settings.py
INSTALLED_APPS = [
'django.contrib.admin',
'django.contrib.auth',
'django.contrib.contenttypes',
'django.contrib.sessions',
'django.contrib.messages',
'django.contrib.staticfiles',
'siddhucruddjango',
]
Step 3:- Create Model class.
This class represent our Database Table. Create Model.py class inside our project.
from django.db import models
from django.core.urlresolvers import reverse
class SiddhuModel(models.Model):
name = models.CharField(max_length=200)
address = models.CharField(max_length=200)
emailid = models.CharField(max_length=20)
def __unicode__(self):
return self.name
def get_absolute_url(self):
return reverse('siddhu_update', kwargs={'pk': self.pk})

In Django Primary key is mandatory to have in table. If we did not define it frame work will automatically create an ID field for the same in table for us. In above python we had define a class SiddhuModel. When we execute this class using below command we will see migration folder created inside our project with files like __init__.py and 0001_initial.py.
./manage.py makemigrations
./manage.py migrate
Try to analysis the code created inside 0001_initial.py.
operations = [
migrations.CreateModel(
name='SiddhuModel',
fields=[
('id', models.AutoField(auto_created=True, primary_key=True, serialize=False, verbose_name='ID')),
('name', models.CharField(max_length=200)),
('address', models.CharField(max_length=200)),
('emailid', models.CharField(max_length=20)),
],
),
Above code indicate when this files is executed it will create a table called siddhumodel with following four field. id, name, address and emailid.
As we are using SQLite as database, I prefer to use SQLite Studio to see the database and its table.
You can download SQLite from https://sqlitestudio.pl/index.rvt.
our model.py will create follwing table in our database.
Image2
Step 3:- Modify our View logic for displaying the data to the end users.
Create a views.py file inside our project and place following code. Note:- We are using Class-based views.
from django.http import HttpResponse
from django.views.generic import TemplateView,ListView
from django.views.generic.edit import CreateView, UpdateView, DeleteView
from django.core.urlresolvers import reverse_lazy
from siddhucruddjango.models import SiddhuModel
class SiddhuList(ListView):
model = SiddhuModel
class SiddhuInsert(CreateView):
model = SiddhuModel
success_url = reverse_lazy('siddhu_list')
fields = ['name', 'address', 'emailid']
class SiddhuUpdate(UpdateView):
model = SiddhuModel
success_url = reverse_lazy('siddhu_list')
fields = ['name', 'address', 'emailid']
class SiddhuDelete(DeleteView):
model = SiddhuModel
success_url = reverse_lazy('siddhu_list')
Step 4:- Modify URLS for navigations.
Change urls.py with below code.

from django.conf.urls import url
from django.contrib import admin
from siddhucruddjango import views

urlpatterns = [
url(r'^admin/', admin.site.urls),
url(r'^$', views.SiddhuList.as_view(), name='siddhu_list'),
url(r'^insert$', views.SiddhuInsert.as_view(), name='siddhu_insert'),
url(r'^update/(?P\d+)$', views.SiddhuUpdate.as_view(), name='siddhu_update'),
url(r'^delete/(?P\d+)$', views.SiddhuDelete.as_view(), name='siddhu_delete'),
]
Step 5:- Develop UI HTML Part
Create a template folder inside our project. Create another folder with siddhucruddjango inside template and keep all our ui part files inside it.


and open the url the screen http://127.0.0.1:8000/
Image4
Click on Click to Create New Data link and follwing screen will be displayed
Image5
Fill the data and click on submit and check data is enter in our sqlite db.
Image6
Click on delete option and you will get following screen submit the button and check data is deleted from screen and databae.
Image7


Note:- For Function Based View use below code

1- urls.py 

from django.conf.urls import url
from django.contrib import admin

from siddhucruddjango import views

urlpatterns = [
    url(r'^admin/', admin.site.urls),
    url(r'^$', views.SiddhuList, name='siddhu_list'),
  url(r'^insert$', views.SiddhuInsert, name='siddhu_insert'),
  url(r'^update/(?P\d+)$', views.SiddhuUpdate, name='siddhu_update'),
  url(r'^delete/(?P\d+)$', views.SiddhuDelete, name='siddhu_delete'),
]

2- views.py

from django.shortcuts import render, redirect, get_object_or_404
from django.forms import ModelForm

from siddhucruddjango.models import SiddhuModel

class ServerForm(ModelForm):
    class Meta:
        model = SiddhuModel
        fields = ['name', 'address', 'emailid']

def SiddhuList(request, template_name='siddhucruddjango/SiddhuModel_list.html'):
    servers = SiddhuModel.objects.all()
    data = {}
    data['object_list'] = servers
    return render(request, template_name, data)

def SiddhuInsert(request, template_name='siddhucruddjango/SiddhuModel_form.html'):
    form = ServerForm(request.POST or None)
    if form.is_valid():
        form.save()
        return redirect('siddhu_list')
    return render(request, template_name, {'form':form})

def SiddhuUpdate(request, pk, template_name='siddhucruddjango/SiddhuModel_form.html'):
    server = get_object_or_404(SiddhuModel, pk=pk)
    form = ServerForm(request.POST or None, instance=server)
    if form.is_valid():
        form.save()
        return redirect('siddhu_list')
    return render(request, template_name, {'form':form})

def SiddhuDelete(request, pk, template_name='siddhucruddjango/SiddhuModel_confirm_delete.html'):
    server = get_object_or_404(SiddhuModel, pk=pk)    
    if request.method == 'POST':
        server.delete()
        return redirect('siddhu_list')
    return render(request, template_name, {'object':server})

Sunday, March 05, 2017

How to resolve Django 1.10: TemplateDoesNotExist while referring to specific *.html

As per the new standard and frame work provided by Django it is suggested to put all the *.html files inside a template folder of specific application
For example lets assume we had an Django applciation with following folder structure

-siddhuDjangoapplication (Eclipse Folder name of Django Applcation)
-siddhuDjangoapplication (Main Django Applcation where all our files is placed)
- __inti__.py
- setings.py
- urls.py
- views.py
- wsgi.py
-manage.py

Now if we are creating our UI using *.html i.e. siddhu.html and place directly inside the siddhuDjangoapplication (Main Django Applcation where all our files is placed) and if we try to access the ui files we will get this error on the screen
-siddhuDjangoapplication (Eclipse Folder name of Django Applcation)
-siddhuDjangoapplication (Main Django Applcation where all our files is placed)
- __inti__.py
- setings.py
- urls.py
- views.py
- wsgi.py
- siddhu.html
-manage.py

TemplateDoesNotExist at /siddhuDjangoapplication/
/siddhu.html
to Over come this please make following changes give below
step 1:- Open your settings.py and under TEMPLATES dictionary add following line
TEMPLATES = [
{
'BACKEND': 'django.template.backends.django.DjangoTemplates',
'DIRS': [os.path.join(BASE_DIR, 'templates')],
'APP_DIRS': True,
'OPTIONS': {
'context_processors': [
'django.template.context_processors.debug',
'django.template.context_processors.request',
'django.contrib.auth.context_processors.auth',
'django.contrib.messages.context_processors.messages',
],
},
},
]
Step 2:- Create a folder called as templates inside siddhuDjangoapplication (Main Django Applcation where all our files is placed).
As we had different module in that case it is best practise to make ui component in individual folder i.e. template/siddhuDjangoapplication

So our new folder structure will be
-siddhuDjangoapplication (Eclipse Folder name of Django Applcation)
-siddhuDjangoapplication (Main Django Applcation where all our files is placed)
- __inti__.py
- setings.py
- urls.py
- views.py
- wsgi.py
- templates
       - siddhuDjangoapplication
           - siddhu.html
           - siddhu2.html
-manage.py

Friday, March 03, 2017

Simple Django Hello world program using Eclipse, Python 35 and Django 1.10

Lets start with DJango framework to create Python Web application.
Django comes with excellent CLI command but as usual being java developer love to have IDE and that also Eclipse is my favourite :).
We had used Eclipse Neon and pyDev with Django plugin.
Make sure you had Python and Django instlled in your sytem. We had used Python 35 and Django 1.10
Lets first create hello world Django Python Project
Step1:- Create a new Django project
File --> New -> Other -> Inside PyDev select PyDev Django Project
image1
Step 2:- Click Next and follow the below given images.
image2
If we had different version of python and want to change the python interpretor click on the link given in red colour box following screen will be opened.
image3
to remove current python interpretor use remove button and to configure antoher one click on Advance Auto-cofig button it will list down the multiple python version we had installed select approriate for your applications.

Step 3:- Click next-next of step 2 and you will see the following screen. Please select approriate Django version i.e. our is 1.10 so select approprate value in combobox. For now we are not going to perform any DB operation so please neglect rest field.
image4

Once you click finish you will be able to see the Django project structure created for you with following few files
1- manage.py :- This is the entry point from where your Django start application. It do two things (1) It set our project to sys.path and (2) it helps in adding our project setting files to DJANGO_SETTINGS_MODULE
2- _inti_.py :- this is empty file just to say it is Python Django project.
3- setting.py :- This is the files used to do the configuration of our project. It set all the required modules needed for Django to make our application run as web i.e. our database setting, wsgi application setting, template setting, base url, defualt installed app provided by Django Frame work etc.
4- urls.py :- This files help us to route our request to perticular page. For now consider it as a files that send our URL request to perticular function of Python.
5- wsgi.py :- WSGI stands for web server gateway interface. This is the gateway or interface specification between Web server and Python application. It helps and provide specification which help webserver and python application to talk each other.https://wsgi.readthedocs.io/en/latest/
Lets create a new python file and name it as siddhuview.py and add follwing code in it
from django.http import HttpResponse
def hello(request):
return HttpResponse('Hello, World')

6- Make modification in url.py
from siddhuhello import siddhuviews

urlpatterns = [
url(r'^admin/', admin.site.urls),
url(r'^$', siddhuviews.hello),
]
7- Execute the programe i.e. right click on application -->runas --> django project
refer to the console if you get below line i.e. starting development serever at http://127.0.0.1:8000/ you are done
You have 13 unapplied migration(s). Your project may not work properly until you apply the migrations for app(s): admin, auth, contenttypes, sessions.
Run 'python manage.py migrate' to apply them.
March 03, 2017 - 16:45:29
Django version 1.10.5, using settings 'siddhuhello.settings'
Starting development server at http://127.0.0.1:8000/
Quit the server with CTRL-BREAK.
8- open your brower and paste http://127.0.0.1:8000/ and see the output.
image5
Note:- If you observe your url.py u will find one entry for admin. To set the new Admin or Supre user use below comand and open the same url adding admin/ in it i.e. http://127.0.0.1:8000/admin
How to reset the admin or superuser password
python manage.py createsuperuser
Username: admin
Email address: admin@admin.com
Password:
Password (again):
Superuser created successfully.