Tuesday, June 23, 2020

Integration of tailwind CSS with ExpressJS

First we will install express generator to have express project in nodejs

Express comes in build with expressgenerator that helps us to set the default framework for creating Nodejs application using ExpressJS frame work.

https://expressjs.com/en/starter/generator.html

Lets try to use it

First create package.json using
npm init
then install express using
npm install express
check in package.json if express is install

install nodemon for auto refresh

npm install -g nodemon

then install express-generator using below command

npx express-generator
or
npm install -g express-generator

I prefer to use second command as it help me to further take view engine as my need i.e.

npm install -g express-generator

Note:- Use below command to create a project name as myapp and view as .pug or any of the template you want as an view engine.

express --view=ejs myapp

As we have our project folder and we dont want to create a new folder and want EJS as view, so we will first install EJS view using below command.

npm install ejs

Then we will create Folder structure

express --view=ejs
PS C:\Visual_Source_Code_WorkSpace_NodeJS\tailwindnodejs> express --view=ejs
destination is not empty, continue? [y/N] y
create : public\
create : public\javascripts\
create : public\images\
create : public\stylesheets\
create : public\stylesheets\style.css
create : routes\
create : routes\index.js
create : routes\users.js
create : views\
create : views\error.ejs
create : views\index.ejs
create : app.js
create : package.json
create : bin\
create : bin\www
install dependencies:
> npm install
run the app:
> SET DEBUG=tailwindnodejs:* & npm start
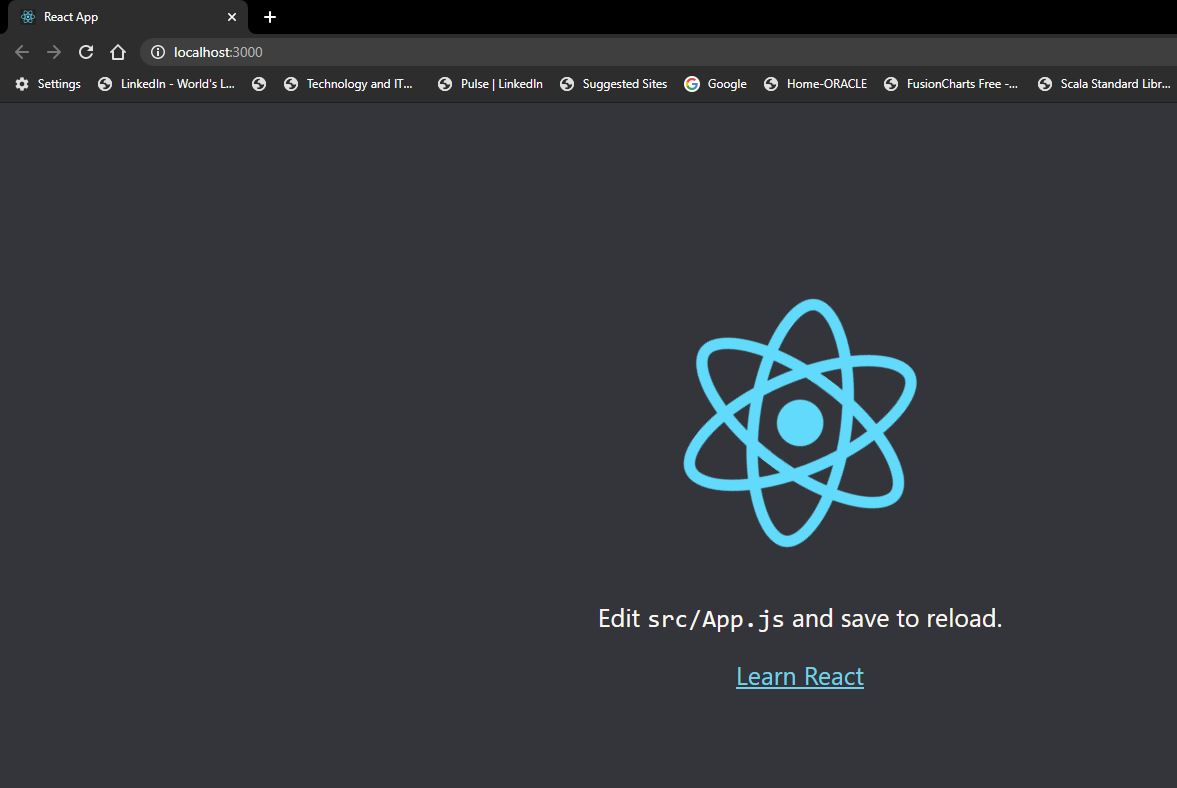
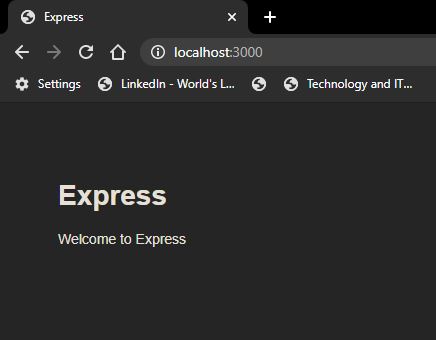
Finally confirm the our project created by Express Generator is working fine by executing the below command.
npm install
SET DEBUG=tailwindnodejs:* ; npm start
Check the url http://localhost:3000/ and you will be able to see
Image1
Now lets work on integration of tailwind with in our project
I want to keep my CSS files project.css intact and want to have one more CSS file specially for TailwindCSS.
So let's create a new CSS file inside \public\stylesheets\ and name it as source.css which is dedicated to TailwindCSS
1- Install tailwind
npm install tailwindcss
PS C:\Visual_Source_Code_WorkSpace_NodeJS\tailwindnodejs> npm install tailwindcss
+ tailwindcss@1.4.6
added 85 packages from 80 contributors and audited 140 packages in 42.052s
7 packages are looking for funding
run `npm fund` for details
found 0 vulnerabilities
2- Add following lines in source.css files under \public\stylesheets\
@tailwind base;
@tailwind components;
@tailwind utilities;
3- As we want to generate our style.css file so you can actually use in your project. Simply use npx and generate the file.
npx tailwindcss build ./public/stylesheets/source.css -o ./public/stylesheets/style.css
they above command will create a new style.css that contains css of tailwindCSS
Good we have installed now tailwindcss. Now simply go into the file that hosts your layout for the project and add the stylesheet in your header
<link rel="stylesheet" href="/stylesheets/style.css" />

We can also added this command to my package.json and made it look like so :
"scripts": {
"start": "npm build:css && node ./bin/www",
"build:css": "npx tailwindcss build ./public/stylesheets/source.css -o ./public/stylesheets/style.css"
}
or

"scripts": {
"start": "node ./bin/www",
"build:css": "npx tailwindcss build ./public/stylesheets/source.css -o ./public/stylesheets/style.css"
}
Note:-
Optionally, if we would like to add extra configurations to our tailwindcss setup, you can initialize a settings file via npx:
npx tailwindcss init
This will create tailwind.config.js put this file into your root directory
// tailwind.config.js
module.exports = {
theme: {},
variants: {},
plugins: [
require('tailwindcss'),
require('autoprefixer')
],
};
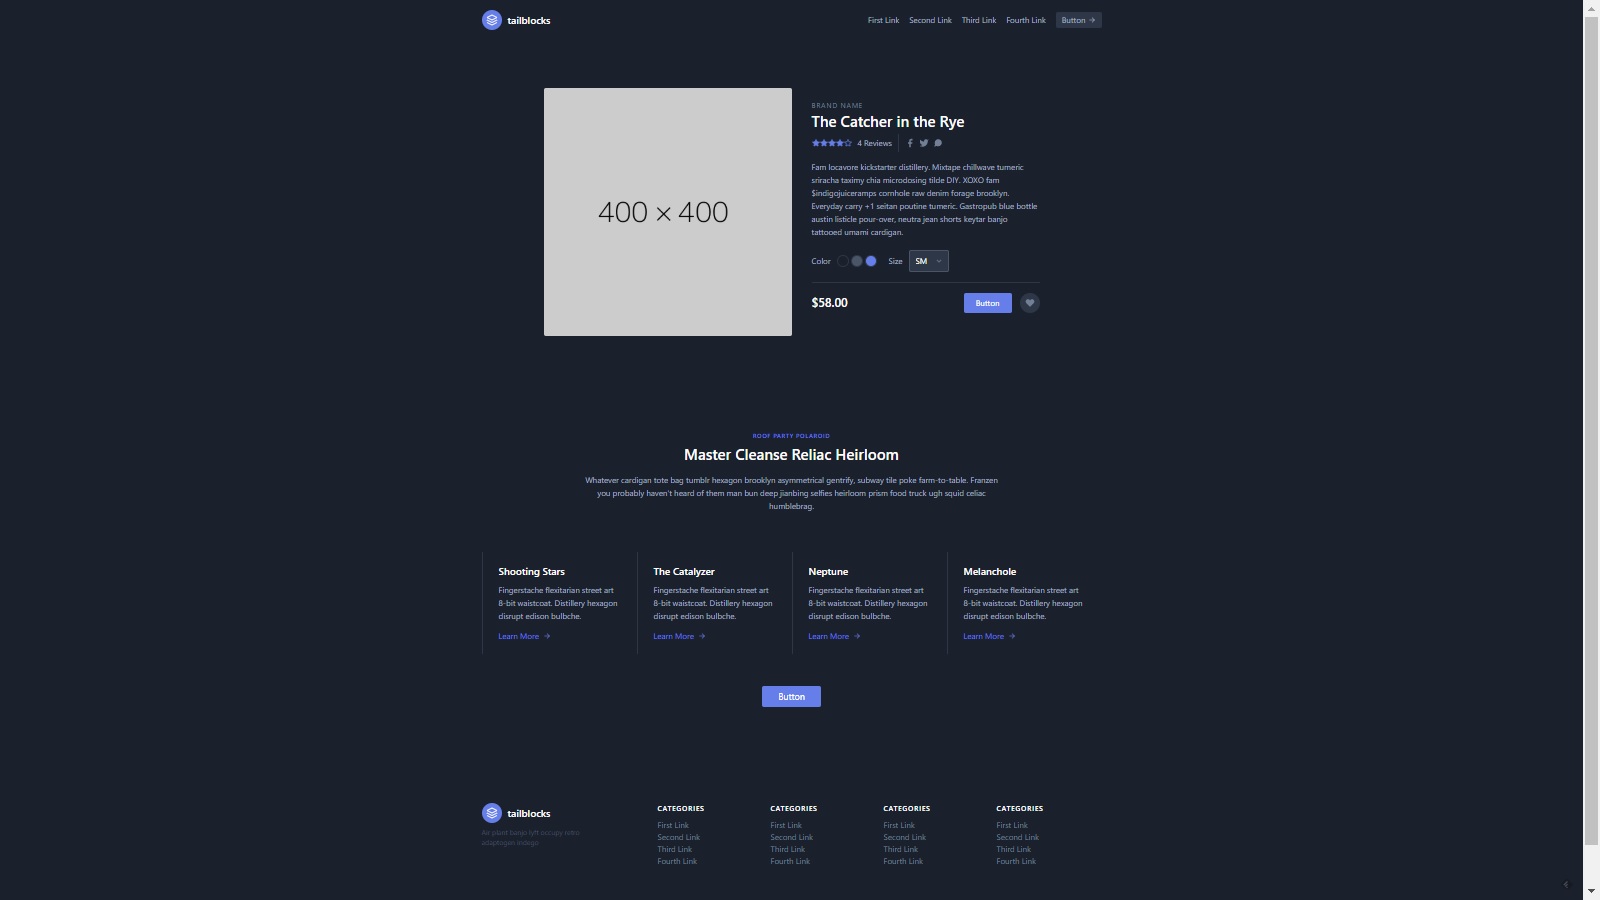
Now let's have one simple TailwindBlock component added to our application from https://mertjf.github.io/tailblocks/.
We will have following components
1- Header
2- Footer
3- Blog
4- Contact
5- Content
6- CTA
7- E-Commerce
8- Feature
9- Gallery
10- Hero
11- Pricing
12- Statistic
13- Team
14- Testimonial
but we will use header, ecommerce and footer. After integration, we will be able to see he screen as shown below.
Image2.
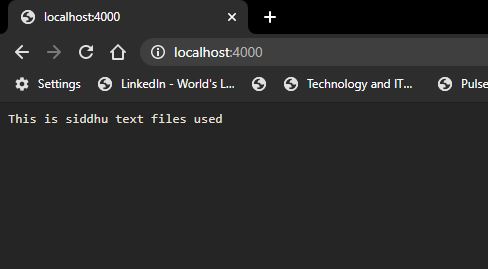
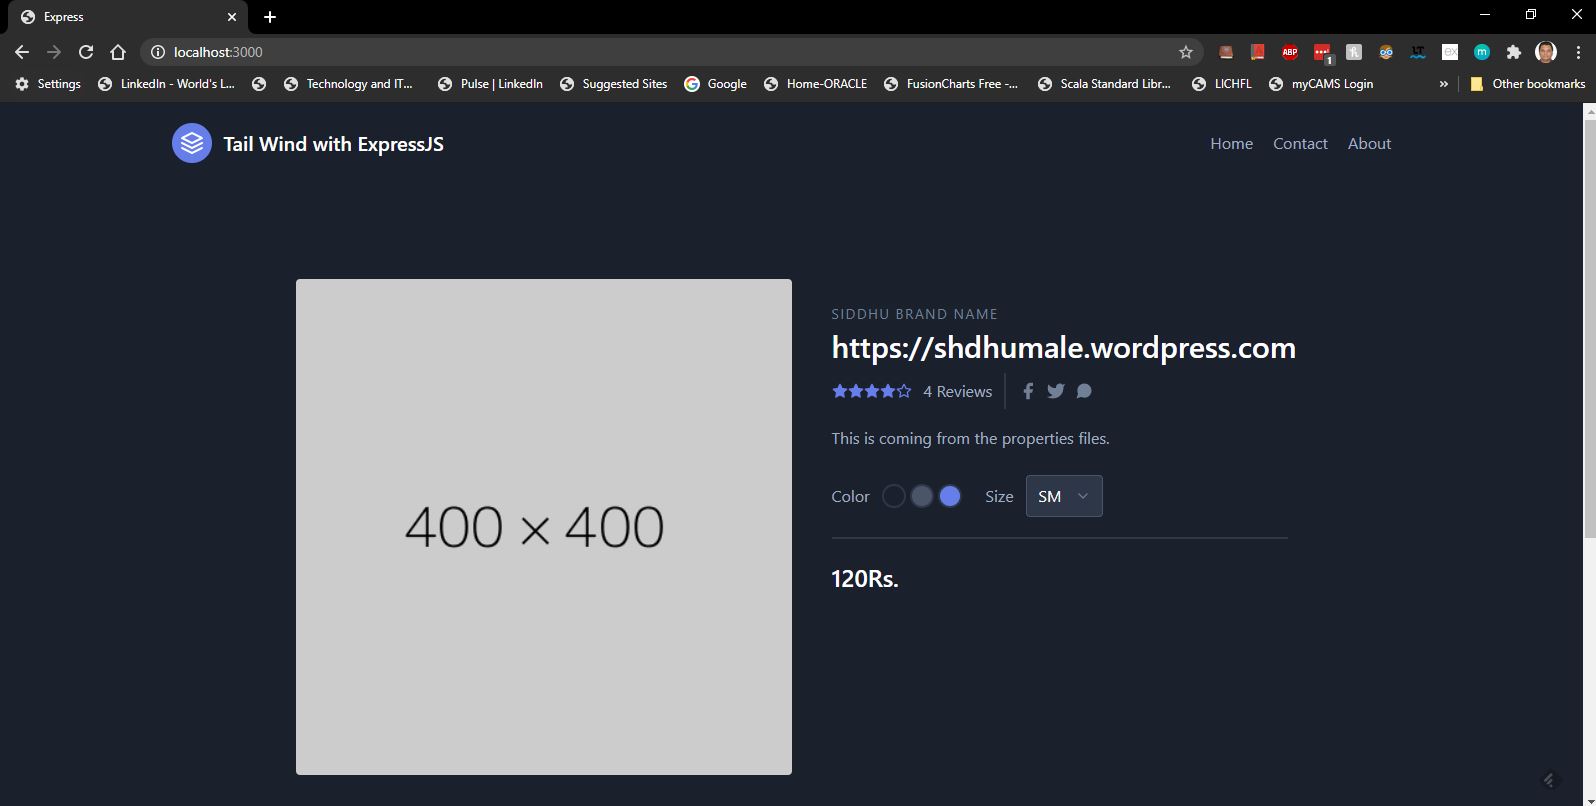
Now lets try to bring the hard code text from text files.
Let's create a new folder called as properties inside public folder and create following properties files for that we will use

https://www.npmjs.com/package/properties-reader

So first install properties module using below command
npm install properties-reader
Image3.
Note: you can get downlaod the code from

https://github.com/shdhumale/tailwindnodejs

Express JS framework for NodeJs development

As per the site Express is :- Fast, unopinionated, minimalist web framework for Node.js. In short it is a framework for developing web and mobile development using nodejs. It also help in creating robust API framework with good performance and secure.

There are many other framework avaialable in addition to ExpressJS  like NestJS, Feather,Sails etc.

Please refer to
https://expressjs.com/en/resources/frameworks.html

Lets setup the express for our application in nodeJS. FYI I am using VSCode as an IDE.
1- First create a package.json file using
npm init
2- we need to install it using below command. you can also follow https://expressjs.com/en/starter/installing.html
npm install express --save
3- We will also add nodemon for quick development and auto refresh of the server using  https://www.npmjs.com/package/nodemon
npm install -g nodemon
4- Lets create first express nodejs application hello world as shown below

//Aquire express module
const express = require('express')
//create app using express function
const app = express()
const port = 3000

//getting ready for accepting GET request on URL "/" and sending hellow world response
app.get('/', (req, res) => res.send('Hello World!'))

//Listen to the port that is define along with the console log that indicate starting of the server.
app.listen(port, () => console.log(`Example app listening at http://localhost:${port}`))

check the browser hitting url http://localhost:3000/ you will be able to see hello world on the browser.


2-Express Template Engine Basic Introduction

Express frame work give us many UI template to display the runtime data on the screen web/mobile using nodejs. Few of them are pug, jade etc. You can find list of the template on this location supported by expressjs.

https://expressjs.com/en/resources/template-engines.html


We will discuss few of them
1- pug
To use this first we need to install pug view using command
npm install pug --save

once it is installed use below line to inform express to indicate which engine need to be used for rendring page on ui.

app.set('view engine', 'pug')


Whole code:-
//Aquire the express
const express = require('express');
//Create the App from the express
const app = express();
//Indicate the express which engine need to be taken for rendring the ui.
app.set('view engine', 'pug')
//indicating the port on which the nodejs application will listen.
const port = 3000;

//shows the url on which it will take the request
app.get('/', (req, res) => { res.render('index', { titlename: 'Hey', bodymessage: 'Hello there!' }) })

//listening the port
app.listen(port, () => { Console.log(`Server started at the port ${port}`) })

Now we need to defind index.pug file as shown below
html
  head
    title= titlename
  body
    h1= bodymessage

Now lets run the applications and check the url using command


3- Basic and Advance Routing in express and node.js

In express routing is handled in simple format
app.METHOD(PATH, HANDLER)
depending on the path we suggest we have different PATH depending of he path our request can be bifergated. Also depending upon the METHOD we can bifergate get,put,post,delete etc.

few of the example are:-

Respond to GET request on the root route (/)
app.get('/', function (req, res) {
  
})
Respond to POST request on the root route (/)

app.post('/', function (req, res) {
  
})

Respond to a PUT request to the /user route:
app.put('/user', function (req, res) {
  
})

Respond to a DELETE request to the /user route:
app.delete('/user', function (req, res) {
  
})

Lets create one small application that will demonstrate the different routing

//Aquire express module
const express = require('express')
//create app using express function
const app = express()
const port = 3000

//getting ready for accepting GET request on URL "/" and sending hellow world response
app.get('/', (req, res) => res.send('Get request on /'))

app.post('/', (req, res) => res.send('Post request on /'))

app.put('/user', (req, res) => res.send('Put Request on /'))

app.delete('/employee', (req, res) => res.send('Delete request on /'))

//Listen to the port that is define along with the console log that indicate starting of the server.
app.listen(port, () => console.log(`Example app listening at http:localhost:${port}`))


try to hit all the url using postman and check the response and you will find we can easily rout the request to respective

Also please do visit to below site which will give you details of Advance routing

https://expressjs.com/en/guide/routing.html

i.e.
This route path will match acd and abcd. i.e. b will be there or not. it is not mandate.
app.get('/ab?cd', function (req, res) {
 })

This route path will match abcd, abbcd, abbbcd, and so on. i.e. we can have as many b as it is possible
app.get('/ab+cd', function (req, res) {
 )

This route path will match abcd, abxcd, abRANDOMcd, ab123cd, and so on.i.e. any thing between b and c
app.get('/ab*cd', function (req, res) {

})

This route path will match /abe and /abcde. i.e. cd may or may not be there in the url.

app.get('/ab(cd)?e', function (req, res) {
})

we can also use regular expression 
This route path will match anything with an “a” in it.

app.get(/a/, function (req, res) {  
  })

This route path will match butterfly and dragonfly, but not butterflyman, dragonflyman, and so on.
app.get(/.*fly$/, function (req, res) {
})

Using Rout parameters
Route path: /users/:userId/books/:bookId
Request URL: http://localhost:3000/users/34/books/8989
req.params: { "userId": "34", "bookId": "8989" }

app.get('/users/:userId/books/:bookId', function (req, res) {
  res.send(req.params)
})

We can use - and . also in the url.


app.get('/flights/:from-:to', function (req, res) {
    console.log(req.params.from, req.params.to)
    res.send(req.params)
})
hit this url :- http://localhost:3000/flights/sid-dhu
Output :- {"from":"sid","to":"dhu"}


app.get('/plantae/:genus.:species', function (req, res) {
    console.log(req.params.genus, req.params.species)
    res.send(req.params)
})

hit this url :- http://localhost:3000/plantae/sid.dhu
Output :- {"genus":"sid","species":"dhu"}


ExpressJs also support chainable route handlers for a route path by using app.route().

Using app.route() we can create path at a single location

app.route('/book')
  .get(function (req, res) {
    res.send('Get a random book')
  })
  .post(function (req, res) {
    res.send('Add a book')
  })
  .put(function (req, res) {
    res.send('Update the book')
  })

 
We can also create router handlers that can be easily mounted to any component using express.Router

This means we can have a seperate js file that will be treated as a router module for your application. Lets do it

expressrouter.js 

var express = require('express')
var router = express.Router()

//middleware that is specific to this router
//We will learn middle ware in details in next chapte. For now just remember it is the additional funtionality that we want to introduced
//as a middle men before the reques is executed.
router.use(function timeLog (req, res, next) {
  console.log('Time: ', Date.now())
  next()
})
// define the home page route
router.get('/', function (req, res) {
  res.send('home page')
})
// define the about route
router.get('/about', function (req, res) {
  res.send('About Pages')
})
// define the siddhu route
router.get('/siddhu', function (req, res) {
  res.send('Siddhu Pages')
})
module.exports = router 

now lets add this rounter class in our main app.js

like this

var expressrouter = require('./expressrouter')
app.use('/expressrouter', expressrouter)


Now start your nodejs
PS C:\Visual_Source_Code_WorkSpace_NodeJS\expressjsexample\component\router> nodemon .\app.js


hit :- http://localhost:3000/expressrouter
Output on browser :- home page

hit :- http://localhost:3000/expressrouter/siddhu
Output on browser :- Siddhu Pages


So in short we have two Router
1- Basic
2- Advance - AWCR

In basic we can differentiate routing using app.METHOD(PATH, HANDLER) where METHOD can be GET,PUT,POST,PATCH etc and PATH  can be your url path. HANDLER can be function with req and res as parameters.

In advance we have concept like

'- app.all - We can use app.all instead of defining request for get,put,post etc
'- Wild card - we can use *, ?, //, ./$
'- handling more than one call back functions using next() and array
'- app.route() - create chainable route handlers for a route path by using app.route()
'- express.Router :- we can have module base router.

For more details visit to site
https://expressjs.com/en/guide/routing.html


4- Serving static files in Express

We can use belwo command to  load the static files such as image, css, defualt html 404 etc using below comments
express.static(root, [options])

By using below middleware command we load all the files from folder public.

app.use(express.static('public'))

After doing this we can directly access the static files using direct url
i.e.
http://localhost:3000/images/XYZ.jpg
http://localhost:3000/css/style.css
http://localhost:3000/js/app.js
we can also create a virtual path using for security i.e. if we want to hide the original path of our files from url we can give virtual path as in below we have given name as static which did not exist

app.use('/xyzpath', express.static('public'))

After this we can access images and css files.

http://localhost:3000/xyzpath/images/XYZ.jpg
http://localhost:3000/xyzpath/css/style.css
http://localhost:3000/xyzpath/js/app.js

download :- https://github.com/shdhumale/expressjsexample

5- MiddleWare concept in Express

Middleware functions access to the request and  response object and then after doing some function on it transfer it to next function using next(). Next will always invoked, executes the middleware succeeding the current middleware.

Middleware functions can perform the following tasks:

'- Execute any code written inside it
'- Make changes to the request and the response objects.
'- End the request-response cycle.
'- Call the next middleware in the stack.

we can use the middleware function in three ways

1- using use() method
2- we can directly us it in rounting between path and hanlder i.e. app.METHOD(PATH, MIDDLEWARE , HANDLER). This MIDDLEWARE can be an array also.
i.e. app.get('/', requestTime, function (req, res) or app.get('/', [requestTime], function (req, res)

Uses:- Middle ware can be use espicially for validation, cookies verification , loggers or anyother function which we want to execute before our main

There are many ways/level/postions we can use middleware

1-Application-level middleware :- this are the middleware defined at the app level using key word as app.use()
2-Router-level middleware :- this are the middleware definded at the router level i.e. var router = express.Router() and then expose using module.exports = router . And finally those js which want to use it has to required it and use it using app.use()
3-Error-handling middleware - This are the middleware used to handle the err it is thrown using var err = new Error() and then next(err)...and finally app.use(function (err, req, res, next) catch that error and do the proper functions.
4-Built-in middleware :- Express from 4.16+ uses some of the inbuild middleware such as "express.static" serves static assets such as HTML files, images, and so on, "express.json" parses incoming requests with JSON payloads. NOTE: Available with Express 4.16.0+ and "express.urlencoded" parses incoming requests with URL-encoded payloads. NOTE: Available with Express 4.16.0+
5-Third-party middleware :- This are the middleware provided by the third party the best examle is cookie-parser. it can be used by installing it  npm install cookie-parser and then

var express = require('express')
var app = express()
var cookieParser = require('cookie-parser')

// load the cookie-parsing middleware
app.use(cookieParser())


6- Error Handling in Express  - Start from here.
https://expressjs.com/en/guide/error-handling.html

There are two type of function
1- Sync :- For express if you throw any error from the sync block it will be caught by deafult by the express. you dont need to do anything extra as show below

app.get('/', function (req, res) {
  throw new Error('BROKEN') // Express will catch this on its own.
})


2- Asysn :- if you are using async method like writefiles, readfiles in such Async file it is mandate to give your error to the Express if it comes. For doing that you need to use next function i.e.

app.get('/', [
    function (req, res, next) {
        fs.writeFile('d:\\', 'data', next)
        //next(err)
    },
    function (req, res) {
        res.send('OK')
    }
])

app.use(function (err, req, res, next) {
    res.status(500);
    res.send(err.message + " ---Oops, something went wrong.")
});

In above function while writing the file using Async writeFile we have given wrong path and hence error is thrown and by default we have used next in the write files as a last argument and because of that our express are able to catch the error in belwo block ie,e, res.send(err.message + " ---Oops, something went wrong."). In above case if the error come then only the next is called else it will execute res.send('OK')

In short For errors returned from asynchronous functions invoked by route handlers and middleware, you must pass them to the next() function, where Express will catch and process them.

Another example

app.get('/', function (req, res, next) {
  fs.readFile('/file-does-not-exist', function (err, data) {
    if (err) {
      next(err) // Pass errors to Express.
    } else {
      res.send(data)
    }
  })
})

app.use(function (err, req, res, next) {
    res.status(404);
    res.send(err.message + " ---Oops, something went wrong.")
});

There is also another way to handle the error in Asys fucntion and that is to use the Try..Catch blog

app.get('/', [
    function (req, res, next) {
        try {
            const post = db.post.insert({ title, author });
            res.json(post);
        } catch (error) {
            //We can directly catch the error her and do what ever we want to do 
            return res.status(500).json({
                status: 'error',
                message: 'Internal Server Error'
            });
            //Else we can give it to Express function using next which will be caught by the given below functions.
            //next(error)
        }

    }
])


Wednesday, June 17, 2020

Express Generator and its uses in Express JS

Express comes inbuild with expressgenerator that helps us to set the defualt frame work for creating Nodejs application using ExpressJS frame work.
https://expressjs.com/en/starter/generator.html
Lets try to use it
First create package.json using
npm init
then install express using
npm install express --save
check in package.json if express is install
install nodemon for auto refresh
npm install -g nodemon
then install express-generator using below command
npx express-generator
or
npm install -g express-generator
I prefer to use second command as it help me to further take view engine as my need i.e. npm install -g express-generator
Check package.json is updated with the express-generator.
Note:- If you want to create project with express you can do it in two ways
1- Directly executing command
npx express-generator
This will create a project with its own Package.json and view as JADE by default
2- Use below this command to install the express generator
npm install -g express-generator
then use below command to create a project name as myapp and view as .pug or any of the template you want as an view engine.
express --view=pug myapp
3- If you have your project folder and you dont want to create a new folder and want PUG as view use this command
express --view=pug


Note:- Now as I already had my folder ready i will use this command express --view=pug
By defualt The generated app has the following directory structure:
.
+-- app.js
+-- bin
¦ +-- www
+-- package.json
+-- public
¦ +-- images
¦ +-- javascripts
¦ +-- stylesheets
¦ +-- style.css
+-- routes
¦ +-- index.js
¦ +-- users.js
+-- views
+-- error.pug
+-- index.pug
+-- layout.pug
7 directories, 9 files
you can run the application using
set DEBUG=myapp:* & npm start
After executing express --view=pug
PS C:\Visual_Source_Code_WorkSpace_NodeJS\expressgeneratorexample> express --view=pug
destination is not empty, continue? [y/N] y
create : public\
create : public\javascripts\
create : public\images\
create : public\stylesheets\
create : public\stylesheets\style.css
create : routes\
create : routes\index.js
create : routes\users.js
create : views\
create : views\error.pug
create : views\index.pug
create : views\layout.pug
create : app.js
create : package.json
create : bin\
create : bin\www
install dependencies:
> npm install
run the app:
> SET DEBUG=expressgeneratorexample:* & npm start

Now as shown above first execute this command to install all dependencies
> npm install
and then run the app using npm start or go one step above
SET DEBUG=expressgeneratorexample:*; npm start

and check brower http://localhost:3000/ you will be able to see first defualt expressgenerator screen

Image1

We can also use other Template Engine Basic Introduction
Express frame work give us many UI template to display the runtime data on the screen web/mobile using nodejs. Few of them are pug, jade etc. You can find list of the template on this location supported by expressjs.
https://expressjs.com/en/resources/template-engines.html

Lets discuss one more template engine We will discuss few of them
1- ejs
To use this first we need to install pug view using command
npm install ejs --save
once it is installed use below line to inform express to indicate which engine need to be used for rendring page on ui.
app.set('view engine', 'ejs')

'<html>
This is EJS file example
'<head>'</head>
'<body>
'<p>'<%=title %>'</p>
'</body>
'</html>

Now lets run the applications and check the url
Image2

Download:- https://github.com/shdhumale/expressgeneratorexample

Tuesday, June 16, 2020

NodeJs basic concepts

It is a server side runtime environment for java script running on google chrome v8 machine that allows java script to run on server side stand alone machine as a applications. Hence Nodejs is not a language. It has following benefits
1- It is Event driven. Means as in this we have event that is fired and depending on the type of event listener catch it and perform operations.
2- It is non blocking i.e. if we get three hit or nodejs request all are executed at the same time and one which complete the processing will be given the result first. It is not like old fashion where all ther request are queued and depending on FIFO algo they are taken for request processing on availability of server.
3- It is lightweight, fast and highly recommended for real time applications.
you can download the latest stable version of nodejs from https://nodejs.org/en/download/
Make sure to install both node and npm and check the version of Node and Npm using command
node -v
npm-v
to check if the nodejs is working fine on your machine just print node and perform this simple example
PS C:\Visual_Source_Code_WorkSpace_NodeJS\nodejsexample> node
Welcome to Node.js v14.2.0.
Type ".help" for more information.
> console.log ("hello world")
hello world
undefined
Now lets start to set up the working folder for the nodejs that we are going to us for our demo small projects.
I am using Microsoft Visual Source Code as an IDE which comes with inbuild many nodejs plugin for ease of development.
First we will set the working folder and then we will run the command as
npm init
This will create a package.json file that will contains all the base module that we are going to use in our application. In real world scenario we give our code with package.json file. At run time the developer/tester or Production/SAT environemnt can create the whole project just by running
npm install
The above command will by default look into package.json and install all the module register into that are mandate to running our application.
Whern we run npm init it will ask for some default informaion fill it and it wil create package.json files.
PS C:\Visual_Source_Code_WorkSpace_NodeJS\nodejsexample> npm init
This utility will walk you through creating a package.json file.
It only covers the most common items, and tries to guess sensible defaults.
See `npm help json` for definitive documentation on these fields
and exactly what they do.
Use `npm install <pkg>` afterwards to install a package and
save it as a dependency in the package.json file.
Press ^C at any time to quit.
package name: (nodejsexample) nodejsexample
version: (1.0.0)
description: This package containes nodejs exmaple
entry point: (index.js)
test command:
git repository: (https://github.com/shdhumale/nodejsexample.git)
keywords:
author: Siddaratha dhumale
license: (ISC)
About to write to C:\Visual_Source_Code_WorkSpace_NodeJS\nodejsexample\package.json:
{
"name": "nodejsexample",
"version": "1.0.0",
"description": "This package containes nodejs exmaple",
"main": "index.js",
"scripts": {
"test": "echo \"Error: no test specified\" && exit 1"
},
"repository": {
"type": "git",
"url": "git+https://github.com/shdhumale/nodejsexample.git"
},
"author": "Siddaratha dhumale",
"license": "ISC",
"bugs": {
"url": "https://github.com/shdhumale/nodejsexample/issues"
},
"homepage": "https://github.com/shdhumale/nodejsexample#readme"
}

Is this OK? (yes) y
1- Package.json
{
"name": "nodejsexample",
"version": "1.0.0",
"description": "This package containes nodejs exmaple",
"main": "index.js",
"scripts": {
"test": "echo \"Error: no test specified\" && exit 1"
},
"repository": {
"type": "git",
"url": "git+https://github.com/shdhumale/nodejsexample.git"
},
"author": "Siddaratha dhumale",
"license": "ISC",
"bugs": {
"url": "https://github.com/shdhumale/nodejsexample/issues"
},
"homepage": "https://github.com/shdhumale/nodejsexample#readme"
}
now let create a new nodejs file and name it as siddhu.js

console.log("Hello world")
var a = 10
var b = 20
console.log(a + b)

and execute it using command as
PS C:\Visual_Source_Code_WorkSpace_NodeJS\nodejsexample> node .\siddhu.js
Hello world
30
3- Object, Anonymous and Arrow Function:-
In node js we can create an object as shown below
var user = { name: 'siddhu', surname: 'dhumale' }
console.log(JSON.stringify(user))
PS C:\Visual_Source_Code_WorkSpace_NodeJS\nodejsexample> node .\siddhuobject.js
{"name":"siddhu","surname":"dhumale"}

'- Anonymous funtoin :- This are the funtion which has no name we can define it as
var user = function (a) {
console.log("values are" + a)
}
user(10)
PS C:\Visual_Source_Code_WorkSpace_NodeJS\nodejsexample> node .\annonymus.js
values are10
'- Arrow funtion
const user = () => {
console.log("hello Arrow function")
}
user();
PS C:\Visual_Source_Code_WorkSpace_NodeJS\nodejsexample> node .\annonymus.js
hello Arrow function
4- Global Objects in node js:-
These are the few of the global object that are predefined object and user can use it as it is defualt available to the user while development
1- Dirname - give the directory names.
2- filename - give the file name full file name with paths.
3- exports - use to export the module/class/components so that it can be used by other component in the application.
4- console - use to print the value on prompt
5- module - this is used to export the module class/components etc
6- buffer
7- requires : to import the package that we are going to use in our applications.

'- anonymus.js
var user = function (a) {
console.log("values are" + a)
}
function testExport(a, b) {
var c = a + b
console.log("ans" + c)
}
user(10)
module.exports.user = user
module.exports.testExport = testExport
'- importtest.js
var user = require('./annonymus')
console.log('---------user---------------' + JSON.stringify(user))
console.log('-----------testExport-------------' + JSON.stringify(user.testExport(2, 3)))
output:-
PS C:\Visual_Source_Code_WorkSpace_NodeJS\nodejsexample> node .\importtest.js
values are10
---------user---------------{}
ans5
-----------testExport-------------undefined

5- Some basic concept of What is ECMAScript
var, const and let
a) const :-
means it is consant and canno be changed but once you define it as an object it will allow you to change
const a =10
const a =20
//this will give error
const a = {
name:"siddharatha",
surname:"dhumale"
}
console.log(a.name)
output :- siddharatha
we can also modify it
const a = {
name:"siddharatha"
surname:"dhumale"
}
a.address="india"
//or a.name="siddhu"
console.log(a.address)
output :- india

b) let
can be used in templage literal
This means we cannot define same varibale again like const
let a =10
let a =20
//this will give error
but we can do the same in functions
let a = 10
function test()
{
let a= 20
console.log(a)
}
console.log(a)
test()
output:-
10
20
c) var
This will give the latest valye of the variable with out any error. it will allow duplicates.
var a=10
var a= 20
console.log(a)
Output :- 20
d) String literal
/* const a = {
name: "siddharatha",
surname: "dhumale"
}
a.name = "siddhu"
console.log(a.name) */
var a = "siddhu"
var b = "dhumale"
console.log("First name " + a + " surname " + b)
console.log(`string literal First name ${a} surname ${b}`)
output :-
PS C:\Visual_Source_Code_WorkSpace_NodeJS\nodejsexample> node .\ecmsscript.js
First name siddhu surname dhumale
string literal First name siddhu surname dhumale
6- Prototype
function Person(first, last, age, eyecolor) {
this.firstName = first;
this.lastName = last;
this.age = age;
this.eyeColor = eyecolor;
}
Person.prototype.nationality = "English";
var myFather = new Person("John", "Doe", 50, "blue");
console.log(myFather.nationality)
PS C:\Visual_Source_Code_WorkSpace_NodeJS\nodejsexample> node .\prototype.js
English

7- Module in node.js
Module is similar to package in java. It has collection of component that has unique functionality to be addressed.
Consider modules to be the same as JavaScript libraries.A set of functions you want to include in your application.
Let take example we are creating four component or module add,sub,div and mul for math operation
a) add.js
function add(a, b) {
return a + b
}
module.exports.add = add
b) sub.js
function sub(a, b) {
return a - b
}
module.exports.sub = sub
c) mul.js
function mul(a, b) {
return a * b
}
module.exports.mul = mul
d) divide.js
function divide(a, b) {
return a / b
}
module.exports.divide = divide
e) calculator.js
var add = require('./add')
var sub = require('./sub')
var divide = require('./divide')
var mul = require('./mul')
console.log(add.add(1, 2))
console.log(sub.sub(5, 2))
console.log(divide.divide(8, 2))
console.log(mul.mul(1, 2))
output:-
PS C:\Visual_Source_Code_WorkSpace_NodeJS\nodejsexample\calculator> node .\calculator.js
3
3
4
2

8- Http Module
This is the module used for making http request to fetch the data from the external webservice.
Lets first use for creating simple node http server
a) httpserver.js

first we have to require handle for http module using
var http = require('http');
after that we have to create a server using createServer function from http module
http.createServer()
Now also give listening port to http
http.createServer().listen(4000)
Now lets run this file and see the browser hitting url
http://localhost:4000
you will see you did not get any output on the screen and that is because we did not send any response back to broser. Now lets do that

var http = require('http');
http.createServer(
function (req, res) {
//below res inform what to do with the response.
res.write("hello world")
//below command indicate res is end and ready render the screen on the browser
res.end()
}
).listen(4000)
Now lets run this file and see the browser hitting url
http://localhost:4000
you will see hello world on the screen
Image11
9- Nodemon Installation
https://www.npmjs.com/package/nodemon
Additional when we start the server we did not get anything on the console that indicate that server is started for that we can add console.log as shown below
var http = require('http');
http.createServer(
function (req, res) {
res.setHeader("Content-Type", "html");
//res.setHeader("Content-Type", "text/plain");
res.write("<h1>hello world</h1>")
res.end()
}
).listen(4000, console.log("Server started"))

Now as you can see everytime we changes the node files we always need to restart the server once again to get ride of this we need to install nodemon.
we can install nodemon using below command. Generally it is prefered to install nodemon on global level.
npm install -g nodemon
or for dev mode
npm install --save-dev nodemon

to run the application make changes in package.json like this
"main": "./HttpModule/httpmodule.js",
"scripts": {
"start": "nodemon",
"test": "echo \"Error: no test specified\" && exit 1"
},

and use this command
npm start .\httpmodule.js
Note: If you get below error then follow the solution given below.
PS C:\Visual_Source_Code_WorkSpace_NodeJS\nodejsexample\HttpModule> nodemon
nodemon : File C:\Users\Siddhartha\AppData\Roaming\npm\nodemon.ps1 cannot be loaded. The file C:\Users\Siddhartha\AppData\Roaming\npm\nodemon.ps1 is not digitally
signed. You cannot run this script on the current system. For more information about running scripts and setting execution policy, see about_Execution_Policies at
http://go.microsoft.com/fwlink/?LinkID=135170.
At line:1 char:1
+ nodemon
+ ~~~~~~~
+ CategoryInfo : SecurityError: (:) [], PSSecurityException
+ FullyQualifiedErrorId : UnauthorizedAccess

Solutions:-
1- PS C:\Visual_Source_Code_WorkSpace_NodeJS\nodejsexample\HttpModule> Get-ExecutionPolicy
Unrestricted
2- PS C:\Visual_Source_Code_WorkSpace_NodeJS\nodejsexample\HttpModule> Get-ExecutionPolicy -list
Scope ExecutionPolicy
----- ---------------
MachinePolicy Undefined
UserPolicy Undefined
Process Undefined
CurrentUser Undefined
LocalMachine Unrestricted
3- PS C:\Visual_Source_Code_WorkSpace_NodeJS\nodejsexample\HttpModule> Set-ExecutionPolicy unrestricted
For more information refer to the site
https://www.opentechguides.com/how-to/article/powershell/105/powershel-security-error.html
http://mvsourcecode.com/powershell-ps1-is-not-digitally-signed-you-cannot-run-this-script/
Now start the applicatoin using
PS C:\Visual_Source_Code_WorkSpace_NodeJS\nodejsexample\HttpModule> nodemon .\httpmodule.js
[nodemon] 2.0.4
[nodemon] to restart at any time, enter `rs`
[nodemon] watching path(s): *.*
[nodemon] watching extensions: js,mjs,json
[nodemon] starting `node .\httpmodule.js`
Server started
[nodemon] restarting due to changes...
[nodemon] restarting due to changes...
[nodemon] starting `node .\httpmodule.js`
Server started
10 - File System Module in node.js
Now lets understand the File operation using file module of Nodejs. As we know Nodejs is server side language it has capability to create/delete/update the file present on the server using this modules.
to use this module we need to use package called "fs"
var fs = require('fs');
fs.readFile(__dirname + "/siddhu.txt", "utf-8", (err, data) => {
if (err) {
console.log(err);
}
else {
console.log(data);
}
}
)
PS C:\Visual_Source_Code_WorkSpace_NodeJS\nodejsexample\Files> node .\fileoperation.js
This is siddhu text files used

You can also delete the file using below unlink
fs.unlink(__dirname + "/siddhu.txt", (err, data) => {
if (err) {
console.log(err);
}
else {
console.log("Files deleted:");
}
})
Now lets read the files from the text files and divert it to browser

var http = require('http');
var fs = require('fs');
http.createServer(
function (req, res) {
fs.readFile(__dirname + "/siddhu.txt", "utf-8", (err, data) => {
if (err) {
console.log(err);
}
else {
console.log("Read data:" + data);
res.setHeader("Content-Type", "text/plain");
//res.setHeader("Content-Type", "text/plain");
res.write(data)
res.end()
}
}
)
}
).listen(4000, console.log("Server started"))
Image2
11- Sync and Async function in file system
Difference between Sync and Async is that for Async the programe did not waite for data to come but it execute the next line in the programe.
Let me show you with this exmaple. By defualt all the function in Nodejs FS module is Asyn in nature

a) var fs = require('fs');
fs.readFile(__dirname + "/siddhu.txt", "utf-8", (err, data) => {
if (err) {
console.log(err);
}
else {
console.log(data);
}
}
)
console.log("ASync programing")
If we execute above programe we will get
Output:-
ASync Program
Read data:This is siddhu text files used
As you see above "ASync Program" is printed first before real output of the file that is our programe did not waite for the output to come but directly execute the next line the programe and after that when it get the response from the files it show the files data.
b)
try {
var syncdata = fs.readFileSync(__dirname + "/siddhu.txt")
console.log("Read data:" + syncdata);
console.log("Sync Program")
}
catch (exception) {
console.log(exception)
}
Output:-
Read data:This is siddhu text files used
Sync Program

12- Events, Custom Events and Trigger Custom Event in Node.js
NodeJs is event driven languages. Means we fire the action or event and depending on the type of event of action we perform operations. For that we use event module
var event = require("event")
Let take one example

var events = require('events')
var eventEmitter = new events.EventEmitter()
//Assign the event handler to an event:
eventEmitter.on('scream', () => { console.log("this function is fired using eventemitter") });
//Fire the 'scream' event:
eventEmitter.emit('scream');
OutPut:-
PS C:\Visual_Source_Code_WorkSpace_NodeJS\nodejsexample\events> node .\eventscript.js
this function is fired using eventemitter
We can also write the above code as
var events = require('events')
var eventEmitter = new events.EventEmitter()
/* function printLog() {
console.log("this function is fired using eventemitter")
}
*/
/* var printLog = function () {
console.log("this function is fired using eventemitter")
}
*/
var printLog = () => {
console.log("this function is fired using eventemitter")
}
//Assign the event handler to an event:
eventEmitter.on('scream', printLog)
//Fire the 'scream' event:
eventEmitter.emit('scream');

Now lets to execute the programe that will fire the event and then read the data from the files.

var events = require('events')
var eventEmitter = new events.EventEmitter()
var fs = require('fs');
/* function printLog() {
console.log("this function is fired using eventemitter")
}
*/
/* var printLog = function () {
console.log("this function is fired using eventemitter")
}
*/
var printLog = () => {
console.log("this function is fired using eventemitter")
fs.readFile(__dirname + "/../Files/" + "/siddhu.txt", "utf-8", (err, data) => {
if (err) {
console.log(err);
}
else {
console.log("Read data:" + data);
}
}
)
}
//Assign the event handler to an event:
eventEmitter.on('scream', printLog)
//Fire the 'scream' event:
eventEmitter.emit('scream');

Output:-
PS C:\Visual_Source_Code_WorkSpace_NodeJS\nodejsexample\events> node .\eventscript.js
this function is fired using eventemitter
Read data:This is siddhu text files used
We can also have nested event call i.e event calling the other event call.
var events = require('events')
var eventemitter = new events.EventEmitter()
var firstevent = (a, b) => {
console.log("first event trigger " + a * b)
eventemitter.emit("second_event")
}

var secondevent = () => {
console.log("second event trigger")
eventemitter.emit("third_event")
}
var thirdevent = () => {
console.log("third event trigger")
}
//on is used to listen the event
eventemitter.on("first_event", firstevent)
eventemitter.on("second_event", secondevent)
eventemitter.on("third_event", thirdevent)
//emit is used to fire the event
eventemitter.emit("first_event", 10, 20)

Output:-
PS C:\Visual_Source_Code_WorkSpace_NodeJS\nodejsexample\events> node .\nestedevent.js
first event trigger 200
second event trigger
third event trigger

Friday, June 12, 2020

Redux with ReactJs example for using state container

Redux and React are two different JavaScript language. React is more towards the view part of MVC and redux is third party library that handle state of the application globally.
So let first create a simple react application where in we will have local state which we will increase or decrease the local state with click on Increment and Decrement button
Step 1:- lets first create a new reactJS application using below command
npx create-react-app my-app
Once the application is installed execute the below command and check the ui.
cd my-app
npm start
Image1
Step 2:- We are going to create a simple reactjs application having a counter as number and having two button 1- for increment and 2- decrement
Please find the below code for the same.
import React from 'react'
class Simplereactredux extends React.Component {
constructor(props) {
super(props)

this.state = {
counter: 1

}
this.increment = this.increment.bind(this);
this.decrement = this.decrement.bind(this);
}

increment() {
this.setState({ counter: this.state.counter + 1 })
}

decrement() {
this.setState({ counter: this.state.counter - 1 })
}

render() {
return (
<div>
<h1>This is parent component</h1>
<label > Counter: <span>{this.state.counter}</span> </label>
<br></br>
<button onClick={this.increment}>Increment</button>
<button onClick={this.decrement}>Decrement</button>
</div >
)
}
}

export default Simplereactredux

Image2
Now in above example we had used the normal state i.e. local state defined in class to do the increment and decrement operations.
Now lets move to take this local state to our Redux central state container so that it will be available for all the component to access direclty who had subscribe themself to this store and get notified when there is change in the state with the help of subscriber.

For doing this we will need to packages to be installed in our application
1- redux :- This package will provide us the environment to create a central store where we can keep the global state of the application which can be modified by firing the event or action through reducer.
2- react-redux :- As redux is external thrid party predictable state container management tool for interacting it with the redux we need to create a bridge that connect this two different packages.

Lets now install both of them using below commands
npm install redux --save
npm install react-redux --save
and check your package.json having this two package installed init.

Now as we know in Redux we have three main parts
1- Store
2- Reducer
3- Action
First we will create a reducer which is responsible to perform action as per the action_type on the global state store in the stores.
I am creating a folder inside src folder called as store and will create reducer.js
const intialState = {
counter: 1
}
const reducer = (state = intialState, action) => {
const newState = { ...state }
return newState
}

export default reducer

Now as we are going to use the store as global we need to inject it into the react at the top level or highest level of top level component which is our app.js where we inject out </simplereactredux> component. The package which we will use to inject the global store is Provider from react-redux.
//1- Need to import Provider packages from react-redux to inject the global store for our application.
import { Provider } from 'redux-react'
<Provider>
<Simplereactredux></Simplereactredux>
</Provider>

Now lets create the store using createStore packages of redux
//2- Create the store now that can be used by the react using redux
import myreducer from './store/reducer'
const store = createStore(myreducer)
and finally give this store to our entire React application as shown below
<Provider store={store}>
<Simplereactredux></Simplereactredux>
</Provider>
Now the next step would be to comment all the code that we were using to store the data a local state and need to plugin our store in our component so that we can use the global stores. This need to be done for all the components to map with stores for using this global stores. i.e. mapping the props.
Along with this also note we need to subscribe our react application to redux so that whenever there is a changes in the global state in redux our react application can be notified and also we must be able to fire/dispatch an action/event with action_type from react to the redux to modify the global state from redux.
In container/ReactJs applcation we use either local state or props. As now we are going to use the global state of redux only the option left for us is to use the props concept to get in touch with the Redux from reactjs application/containers.
for this we have follwing fucntion mapDispatchToProps
mapDispatchToProps = (dispatch) => {
return {
increment: () => dispatch({ type: 'action_type_increment' }),
decrement: () => dispatch({ type: 'action_type_decrement' }),
}
}
As shown above in this function we are mapping our button function with this props and further from this method we deliver/fire/dispacth event with action_type i.e. action_type_increment or action_type_decrement.
Now the question is where this action type will go ..yes you are right as per the Redux when ever the action is dispatched/fire from the application it will go to the reducer and depending on the action_type it will perform respective operation on global state.
Additional we also want the subscription of our reactjs application so that when ever there is change in the global state that state can be accessed/refresh at our container or pages. For that also we will need to map it with the props so that is automatically available for us using funtion mapStateToProps

mapStateToProps = (state) => {
return
{
counter: this.state.counter
}
}

Finally we need to contact our container/reactjs application to store and that is done using connect
//below package is used to connect react application or react component with Redux.
import { connect } from 'react-redux'
Use this connect as HOC as shown below
export default connect( mapStateToProps , mapDispatchToProps) (Simplereactredux)

whole code
import React from 'react'
//below package is used to connect react application or react component with Redux.
import { connect } from 'react-redux'
class Simplereactredux extends React.Component {
constructor(props) {
super(props)
this.state = {
// counter: 1
}
/* this.increment = this.increment.bind(this);
this.decrement = this.decrement.bind(this); */
}
/* increment() {
this.setState({ counter: this.state.counter + 1 })
}

decrement() {
this.setState({ counter: this.state.counter - 1 })
}
*/

render() {
return (
<div>
<h1>This is parent component</h1>
<label > Counter: <span>{this.props.counter}</span> </label>
<br></br>
<button onClick={this.props.increment}>Increment</button>
<button onClick={this.props.decrement}>Decrement</button>
</div >
)
}

}
const mapStateToProps = (state) => {
return {
counter: state.counter
}
}
const mapDispatchToProps = (dispatch) => {
return {
increment: () => dispatch({ type: "action_type_increment" }),
decrement: () => dispatch({ type: "action_type_decrement" }),
}
}
// use the connect HOC to connect reactjs component to redux
export default connect(mapStateToProps, mapDispatchToProps)(Simplereactredux)
Image3
Note: You can download the source code from https://github.com/shdhumale/simplereactreduxexample

Thursday, June 11, 2020

Simple Redux example

Some of the follower has asked to explain Redux concept in more simple way as they found below explainination little bit hard to understand.

http://siddharathadhumale.blogspot.com/2020/04/redux-library-and-its-uses-in-java.html

Considering this i am trying to explain Redux with more simple form. I assume if you are not aware of the Redux concept please refer above url.
Redux is the third party extension that can be used as a predictable state container .
Following are the important aspect of the Redux
-> SAR – MA :-
‘- Store :- store the state of the Application as a central repository shared with all the applications.Create store , Getstate – to get the state of the application, susbcribe(listener) for subscrbing and unsubscribing the listener as the state change and dispatch(action) is used to make change in state in the store.
‘- Action :- indicate what need to be done with the state which is readonly. No Direct update is avaialble for the application to change the state in store.
‘- Reducer:- Actully carrier out the change in the state.

Simple_Redux
Lets take a simple example where in we have a varible named as counter whose value is store in the state. Through action we either increment or decrement the counter which in tern perform the increment or decrement of its state value in store. and fially we can get the updated inc/dec value of the counter stored as state in store.
Step :1 - Install redux from npm so that we can create store to accomodate state values. Use below command to install redux.
npm install redux --save
check in package.json file if the redux is added into dependencies. If you do not have package.json create it using command
npm init
Step 2:- First we need to create a store using below command
const { createStore } = require('redux')
const store = createStore()

Step 3:- Now store take Reducer as an argument so lets create a reducer
const myReducer = (state, action) => {
}
We can also define the initial state as shown below
const initialState = {
counter: 1
}
const myReducer = (state = initialState, action) => {
}
Step 4:- Now lets assign this myReducer to our create store
const store = createStore(myReducer)
step 5:- As we did not have any UI applicaton that can fire the event to change the value of the counter inside store we can do it manually by dispatch methond as shown below in which we tell reducer that action is dispatched with its type as increment
store.dispatch({ type: 'increment' })
Step 5:- Now inside reducer we can check this action type and confirm what action need to be done with counter variable that is stored in global or store state
for increment we want to increase the value of counter with 1 and need to update that value in global state in store.
const myReducer = (state = initialState, action) => {
const newState = { ...state }
if (action.type === 'increment') {
//as in react we do not directly modify the state without setState here we will do it by
//creating copy of the state using spread operators
newState.counter = newState.counter + 1
}
return newState
}
Step 5:- Now finally execute the below programe and you will see how we can do the increment and decrement of the counter value which is store as global state in store of redux.
const { createStore } = require('redux')

const initialState = {
counter: 1
}
const myReducer = (state = initialState, action) => {
const newState = { ...state }
if (action.type === 'increment') {
//as in react we do not directly modify the state without setState here we will do it by
//creating copy of the state using spread operators
newState.counter = newState.counter + 1
}
if (action.type === 'decrement') {
//as in react we do not directly modify the state without setState here we will do it by
//creating copy of the state using spread operators
newState.counter = newState.counter - 1
}
return newState
}
const store = createStore(myReducer)
console.log(store.getState())
store.dispatch({ type: 'increment' })
console.log(store.getState())
store.dispatch({ type: 'decrement' })
console.log(store.getState())
Out put
PS C:\Visual_Source_Code_WorkSpace_ReactJSNew\simplereduxexample> node .\simpleredux.js
{ counter: 1 }
{ counter: 2 }
{ counter: 1 }

now the question arise how i would be know automatically that value of global state i.e. counter inside store is changed. We dont want to manually track everytime checking global state change. For this we have beautiful concept of subscriber
store.subscribe(() => {
console.log("Nofied automatically that state is changed:- " + JSON.stringify(store.getState()))
})
and then we can remove all the console log.

const { createStore } = require('redux')
const initialState = {
counter: 1
}
const myReducer = (state = initialState, action) => {
const newState = { ...state }
if (action.type === 'increment') {
//as in react we do not directly modify the state without setState here we will do it by
//creating copy of the state using spread operators
newState.counter = newState.counter + 1
}
if (action.type === 'decrement') {
//as in react we do not directly modify the state without setState here we will do it by
//creating copy of the state using spread operators
newState.counter = newState.counter - 1
}
return newState
}
const store = createStore(myReducer)
store.subscribe(() => {
console.log("Nofied automatically that state is changed:- " + JSON.stringify(store.getState()))
})
//console.log(store.getState())
store.dispatch({ type: 'increment' })
//console.log(store.getState())
store.dispatch({ type: 'decrement' })
//console.log(store.getState())


now lets say we also want to pass a value that will indicate how much we want to do increment and decreament and this value is called payload

i.e.
const myReducer = (state = initialState, action) => {
    const newState = { ...state }
    if (action.type === 'increment') {
        //as in react we do not directly modify the state without setState here we will do it by
        //creating copy of the state using spread operators
        newState.counter = newState.counter + action.val
    }

    if (action.type === 'decrement') {
        //as in react we do not directly modify the state without setState here we will do it by
        //creating copy of the state using spread operators
        newState.counter = newState.counter - action.val
    }
    return newState
}
store.dispatch({ type: 'increment', val:10})


Final code will be 

const { createStore } = require('redux')

const initialState = {
    counter: 1
}
const myReducer = (state = initialState, action) => {
    const newState = { ...state }
    if (action.type === 'increment') {
        //as in react we do not directly modify the state without setState here we will do it by
        //creating copy of the state using spread operators
        newState.counter = newState.counter + action.val
    }

    if (action.type === 'decrement') {
        //as in react we do not directly modify the state without setState here we will do it by
        //creating copy of the state using spread operators
        newState.counter = newState.counter - action.val
    }
    return newState
}

const store = createStore(myReducer)
store.subscribe(() => {
    console.log("Notified automatically that state is changed:- " + JSON.stringify(store.getState()))
})
//console.log(store.getState())
store.dispatch({ type: 'increment', val: 10 })
//console.log(store.getState())
store.dispatch({ type: 'decrement', val: 10 })

//console.log(store.getState())

OutPut :-

PS C:\Visual_Source_Code_WorkSpace_ReactJSNew\simplereduxexample> node .\simpleredux.js
Notified automatically that state is changed:- {"counter":10}

Notified automatically that state is changed:- {"counter":1}

Thursday, June 04, 2020

SOLID Design Principle Concept

Whereever we talk about software development it is mandate to follow certain rules so that we did not get into troble in later aspect of software development. Few of the aspect that we should think before developing any softare is
1- What should be the Architecture we should follow i.e. MVC, MVP, MVVP etc
2- Design Principle
3- Design Pattern :- Which can be classified further into Creational, Behavioural and Structural Design Pattern.
Here we will discuss about the Design Principle. The reason behind using this design principle it helps software to
- Maintainability
- Testability
- Flexibility and extensibility
- Parallel development
- Loose coupling

There are lot of design principle provided my Robert.C.Martin out of which few espically 5 Design principle taken as subset from them by Micael Feathers usig the acronym SOLID. Having said this lets ellaborate this SOLID Acronym
S :- Single Responsibility Principle (SRP)
O :- Open Close Principle (OCP)
L :- Liskov substitution Principle (LSP)
I :- Interface segregation Principle (ISP)
D :- Dependency Inversion Principle (DIP)
Now lets take one by one and understand them in depth
1- S :- Single Responsibility Principle (SRP)
As the name suggest according to this principle each class/interface should be responsible for one and one task/action/activity/. i.e. Each module/class should be responsible over single part of the functionality provided by the software.
Simple way to explain if you we have one login class/interface that will be responsible for loggin only and not for other activities
/**
*
*/
package Interface;
/**
* @author Siddhartha
*
*/
public interface IUser {
Boolean logIn(String userName, String password);
Boolean Registration(String userName, String password);

//notificaiton
boolean sendMail(String emailId);
boolean sendSMS(String phoneNumber);

//Log Error
void Error(String error);


}
As shown above the interface contains method not only for login and registration but also for notification and error which break SRP. As per SRP it should satisfy only one functionality of the software application in our case for login functionality we need only logIn and Registration method rest method we can divide into another interface as shown below i.e.

/**
*
*/
package Interface;
/**
* @author Siddhartha
*
*/
public interface IUser {
Boolean logIn(String userName, String password);
Boolean Registration(String userName, String password);

}
/**
*
*/
package Interface;
/**
* @author Siddhartha
*
*/
public interface INotification {
boolean sendMail(String emailId);
boolean sendSMS(String phoneNumber);

}
/**
*
*/
package Interface;
/**
* @author Siddhartha
*
*/
public interface IError {

void Error(String error);
}

2- I :- Interface segregation Principle (ISP)
As per this principle we should not have bulk Interface i.e. keeping all the method in one interface. In long run modifying this interface result into modifying all the class that implement it even tough if they are not using that methods. Best way is to divide Interface as per the functionaliy. Lets take below example
/**
* @author Siddhartha
*
*/
public interface IUser {
Boolean logIn(String userName, String password);
Boolean Registration(String userName, String password);

//notificaiton
boolean sendMail(String emailId);
boolean sendSMS(String phoneNumber);

//Log Error
void Error(String error);


}
As shown above as the interface contain all the method those class which implement this interface eventhough if they dont want notification of error functionality they have to override the method with empty implementation. Along with this in future if this interface changes then again all the class need to be override the new method in them respectively with even implementing into it which may result into testing of all the module. So best approcah is to divide the interface into small specific functionality interface as we did above i.e. divide IUser into IError and INotifications.
3- O :- Open Close Principle (OCP)
As per this priciple class/module.functions should always be open to be extended but should be closed to be modified at individual level. This means you can develop your class in such a way where other class can extends them and add additional functionality using he current one but should be changed them self to address the new requirement. Lets understand this using simple example.
/**
*
*/
package Classes;
/**
* @author Siddhartha
*
*/
public class OpenClosePrinciple {

public void getBonus(int salary)
{
int bonus = salary*10/100;
System.out.println("bonus:"+bonus);
//return bonus;
}
/**
* @param args
*/
public static void main(String[] args) {
// TODO Auto-generated method stub
OpenClosePrinciple objOpenClosePrinciple = new OpenClosePrinciple();
//For confirm employee

objOpenClosePrinciple.getBonus(1000);
}
}
OutPut:-
bonus:100
In above example we calculate bonus of the confirm employee. Everything working fine now lets say you have different type of employee i.e. confirm, contract, thirdparty and you want to canculate their bonus which is of different % i.e bonus for confirm employee is 10%, bonus for contract employee is 7% and bonus for third party employee is 5%. In this case there is two option either we modify the above class as given below
/**
*
*/
package Classes;
/**
* @author Siddhartha
*
*/
public class OpenClosePrinciple {

int bonus = 0;

public void getBonus(int salary, String employeeType)
{
if("Confirm".equals(employeeType))
{
bonus = salary*10/100;
System.out.println(" Confirm bonus:"+bonus);
}
else if("Contract".equals(employeeType))
{
bonus = salary*7/100;
System.out.println(" Contract bonus:"+bonus);
}
else
{
bonus = salary*5/100;
System.out.println("ThridParty bonus:"+bonus);
}

//return bonus;
}
/**
* @param args
*/
public static void main(String[] args) {
// TODO Auto-generated method stub
OpenClosePrinciple objOpenClosePrinciple = new OpenClosePrinciple();
//For confirm employee

objOpenClosePrinciple.getBonus(1000, "Confirm");
objOpenClosePrinciple.getBonus(1000, "Contract");
objOpenClosePrinciple.getBonus(1000, "ThridParty");
}
}
OutPut :-
Confirm bonus:100
Contract bonus:70
ThridParty bonus:50

Above example is good to go but as per te OCP priciple it is not good to modify the original class functionality. We already had use OpenClosePrinciple and to accomodate new requirement i.e. different type of emplyee we had modified the original class better option would be as give below
/**
*
*/
package Classes;
/**
* @author Siddhartha
*
*/
public abstract class OpenClosePrinciple {


public abstract void getBonus(int salary);

/**
* @param args
*/
/*
* public static void main(String[] args) { // TODO Auto-generated method stub
* OpenClosePrinciple objOpenClosePrinciple = new OpenClosePrinciple(); //For
* confirm employee
*
* objOpenClosePrinciple.getBonus(1000, "Confirm");
* objOpenClosePrinciple.getBonus(1000, "Contract");
* objOpenClosePrinciple.getBonus(1000, "ThridParty");
*
*
* }
*/
}

/**
*
*/
package Classes;
/**
* @author Siddhartha
*
*/
public class ConfirmEmployee extends OpenClosePrinciple {
@Override
public void getBonus(int salary) {
// TODO Auto-generated method stub
int bonus = salary*10/100;
System.out.println(" Confirm bonus:"+bonus);

}
}
/**
*
*/
package Classes;
/**
* @author Siddhartha
*
*/
public class ContractEmployee extends OpenClosePrinciple {
@Override
public void getBonus(int salary) {
// TODO Auto-generated method stub
int bonus = salary*7/100;
System.out.println(" Contract bonus:"+bonus);

}
}
/**
*
*/
package Classes;
/**
* @author Siddhartha
*
*/
public class MainEmployeeClass {
/**
* @param args
*/
public static void main(String[] args) {
// TODO Auto-generated method stub
OpenClosePrinciple objConfirmEmployee = new ConfirmEmployee();
objConfirmEmployee.getBonus(1000);

OpenClosePrinciple objContractEmployee = new ContractEmployee();
objContractEmployee.getBonus(1000);
}
}
OutPut:-
Confirm bonus:100
Contract bonus:70
As in above example we have made the getBonus method as abstract and allowed the different specific class to extend this class overide this method for their specific use we make sure that our abstract class will need not be changed in the future for specific type of employee bonus.
4- L :- Liskov substitution Principle (LSP)
As per this priciple when ever we child class extend parent class in that case Parent class object can be replaced by child class. Little bit confused...
If S is the subtype of Parent class P, then objects of type P may be replaced by the object of Type S. But the catch here is this rule it also state that the new derived class should not produce any exception that is not in the parent class.
In our above example we had implemented partially this principle i.e.
/**
* @author Siddhartha
*
*/
public class MainEmployeeClass {
/**
* @param args
*/
public static void main(String[] args) {
// TODO Auto-generated method stub
OpenClosePrinciple objConfirmEmployee = new ConfirmEmployee();
objConfirmEmployee.getBonus(1000);

OpenClosePrinciple objContractEmployee = new ContractEmployee();
objContractEmployee.getBonus(1000);
}
}
here we have created Object of Child class ConfirmEmployee and ContractEmployee. Also we had replaced completely the original parent class object i.e. OpenClosePrinciple. Lets say we have another Employee type as thirdparty and they are not eligible for bonus. If using above concept if implement the same logic in that case we need to throw an exception as this thridparty employee is not eligible for bonus and this breaks our LSP principle where in derived class should not throw an exception that is not present in the base/parent class.
/**
*
*/
package Classes;
/**
* @author Siddhartha
*
*/
public class ThirdPartyEmployee extends OpenClosePrinciple {
@Override
public void getBonus(int salary) {
// TODO Auto-generated method stub
try {
throw new Exception("Not eligible for bonus");
}
catch(Exception e)
{
e.printStackTrace();
}

}
}
/**
*
*/
package Classes;
/**
* @author Siddhartha
*
*/
public class MainEmployeeClass {
/**
* @param args
*/
public static void main(String[] args) {
// TODO Auto-generated method stub
OpenClosePrinciple objConfirmEmployee = new ConfirmEmployee();
objConfirmEmployee.getBonus(1000);

OpenClosePrinciple objContractEmployee = new ContractEmployee();
objContractEmployee.getBonus(1000);

OpenClosePrinciple objThirdPartyEmployee = new ThirdPartyEmployee();
objThirdPartyEmployee.getBonus(1000);

}
}
OutPut:-
Confirm bonus:100
Contract bonus:70
java.lang.Exception: Not eligible for bonus
at Classes.ThirdPartyEmployee.getBonus(ThirdPartyEmployee.java:16)
at Classes.MainEmployeeClass.main(MainEmployeeClass.java:24)
To over come this best option is to use Interface and use contract as required

/**
*
*/
package Classes;
/**
* @author Siddhartha
*
*/
public abstract class OpenClosePrinciple {


public abstract int getSalary(int salary);

/**
* @param args
*/
/*
* public static void main(String[] args) { // TODO Auto-generated method stub
* OpenClosePrinciple objOpenClosePrinciple = new OpenClosePrinciple(); //For
* confirm employee
*
* objOpenClosePrinciple.getBonus(1000, "Confirm");
* objOpenClosePrinciple.getBonus(1000, "Contract");
* objOpenClosePrinciple.getBonus(1000, "ThridParty");
*
*
* }
*/
}
package Interface;
/**
* @author Siddhartha
*
*/
public interface IEmployeeBonus {
public void getBonusInterface(int salary) ;
}
/**
*
*/
package Classes;
import Interface.IEmployeeBonus;
/**
* @author Siddhartha
*
*/
public class ConfirmEmployee extends OpenClosePrinciple implements IEmployeeBonus{
@Override
public void getBonusInterface(int salary) {
// TODO Auto-generated method stub
int bonus = salary*10/100;
System.out.println(" Confirm bonus:"+bonus);

}
@Override
public int getSalary(int salary) {
// TODO Auto-generated method stub
return salary;
}
}

/**
*
*/
package Classes;
import Interface.IEmployeeBonus;
/**
* @author Siddhartha
*
*/
public class ContractEmployee extends OpenClosePrinciple implements IEmployeeBonus{

@Override
public void getBonusInterface(int salary) {
// TODO Auto-generated method stub
int bonus = salary*7/100;
System.out.println(" Contract bonus:"+bonus);
}
@Override
public int getSalary(int salary) {
// TODO Auto-generated method stub
return salary;
}
}
/**
*
*/
package Classes;
import Interface.IEmployeeBonus;
/**
* @author Siddhartha
*
*/
public class ThirdPartyEmployee extends OpenClosePrinciple implements IEmployeeBonus{

@Override
public void getBonusInterface(int salary) {
// TODO Auto-generated method stub
System.out.println("No bonus for TirdParty Employee");

}
@Override
public int getSalary(int salary) {
// TODO Auto-generated method stub
return salary;
}
}

/**
*
*/
package Classes;
import Interface.IEmployeeBonus;
/**
* @author Siddhartha
*
*/
public class MainEmployeeClass {
/**
* @param args
*/
public static void main(String[] args) {

// To get salary we can have contract as given below

// TODO Auto-generated method stub
OpenClosePrinciple objConfirmEmployee = new ConfirmEmployee();
int ConfirmEmployeeSalary = objConfirmEmployee.getSalary(1000);
System.out.println("ConfirmEmployeeSalary:"+ConfirmEmployeeSalary);


OpenClosePrinciple objContractEmployee = new ContractEmployee();
int ContractEmployeeSalary = objContractEmployee.getSalary(1000);
System.out.println("ContractEmployeeSalary:"+ContractEmployeeSalary);


OpenClosePrinciple objThirdPartyEmployee = new ThirdPartyEmployee();
int ThridPartyEmployeeSalary = objThirdPartyEmployee.getSalary(1000);
System.out.println("ThridPartyEmployeeSalary:"+ThridPartyEmployeeSalary);

//here if we try to access the bonus we will get the exception i.e.
//objConfirmEmployee.getBonusInterface(ConfirmEmployeeSalary);


//To get the bonus use contract of interface
IEmployeeBonus objIEmployeeBonusConfirmEmployee = new ConfirmEmployee();
objIEmployeeBonusConfirmEmployee.getBonusInterface(ConfirmEmployeeSalary);


IEmployeeBonus objIEmployeeBonusContractEmployee = new ContractEmployee();
objIEmployeeBonusContractEmployee.getBonusInterface(ConfirmEmployeeSalary);

IEmployeeBonus objIEmployeeBonusThirdPartyEmployee = new ThirdPartyEmployee();
objIEmployeeBonusThirdPartyEmployee.getBonusInterface(ConfirmEmployeeSalary);
}
}

OutPut:-
ConfirmEmployeeSalary:1000
ContractEmployeeSalary:1000
ThridPartyEmployeeSalary:1000
Confirm bonus:100
Contract bonus:70
No bonus for TirdParty Employee

5- D :- Dependency Inversion Principle (DIP)
As per this priciple higher modules shoule not depends on low-level modules. Both should depends on abstraction. This means interaction of higher module with the lower module shoule be abstract. Best example is in server side we use to make call to DAOIMPL from BO class but this is not good design .
i.e. instead of this
BO--> DAOImpl -->SRVImpl
Use this :- Business object to Data Access Object interface and from Data Access Object interface to its Data Access Object Implementations.
BO--> DAO--> DAOImpl -->SRV --> SRVImpl