Lets now try to use to concept of Service mesh using ISTIO
As per the site ISTIO https://istio.io/
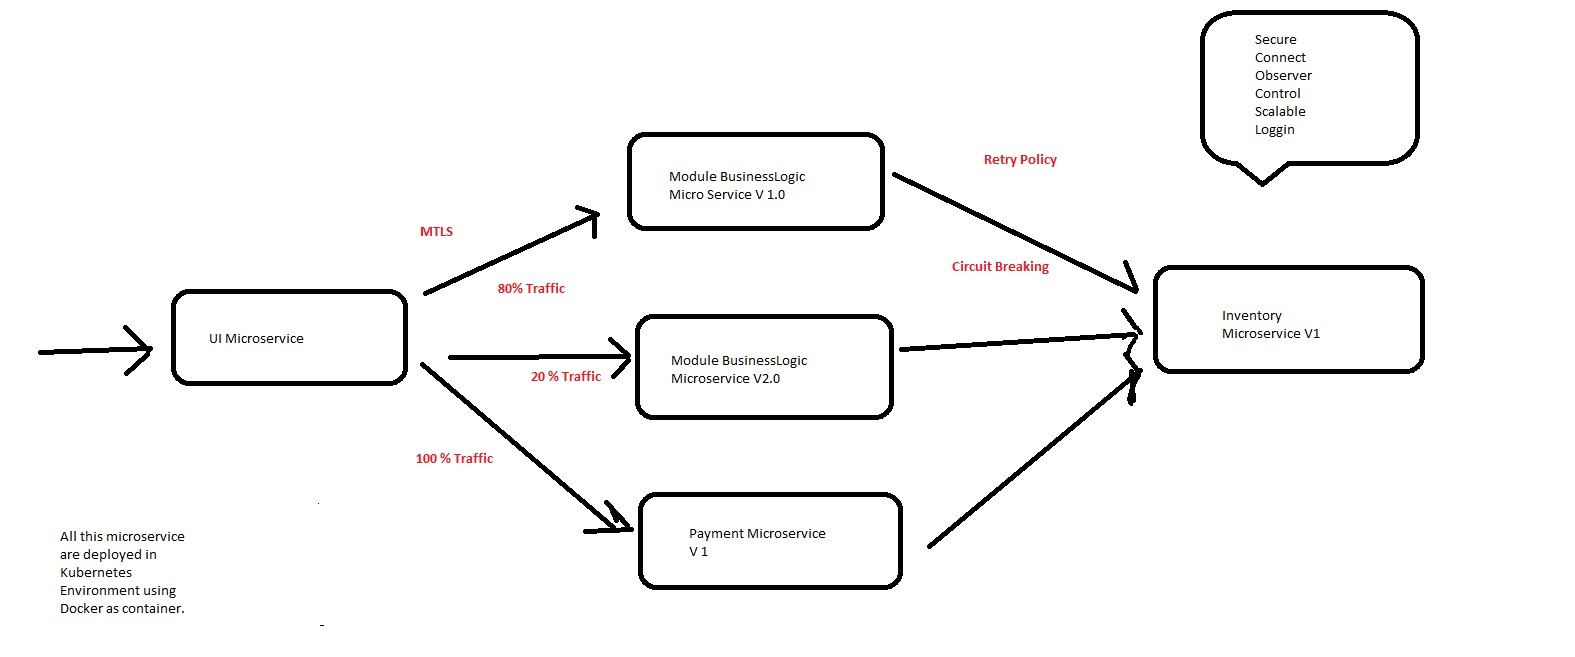
ISTIO makes it easy to create a network of deployed services with load balancing, service-to-service authentication, monitoring, and more, with few or no code changes in service code.
so in short we can do many things that is mandate in Micro service architecture do be done by developer but not the part of Business logic rather than part of network engineering. ISTIO take all this efforts from the developer by using concept like side care pattern and deploy Envoy proxy one to one for each Microservices.
Please refer to https://istio.io/latest/docs/concepts/what-is-istio/ for knowing ISTIO architecture.
Now to work with ISTIO on window lets create its environment stepwise. As we know ISTIO work sith Docker and Kubernetes so lets install this in our window environment.
Please follow below step religiously :-
Step 1- Install Docker
you can install docker for window from belwo location.
https://docs.docker.com/docker-for-windows/install/
https://hub.docker.com/editions/community/docker-ce-desktop-windows/
By default Docker Desktop will add docker to your path. confirm the same using below command
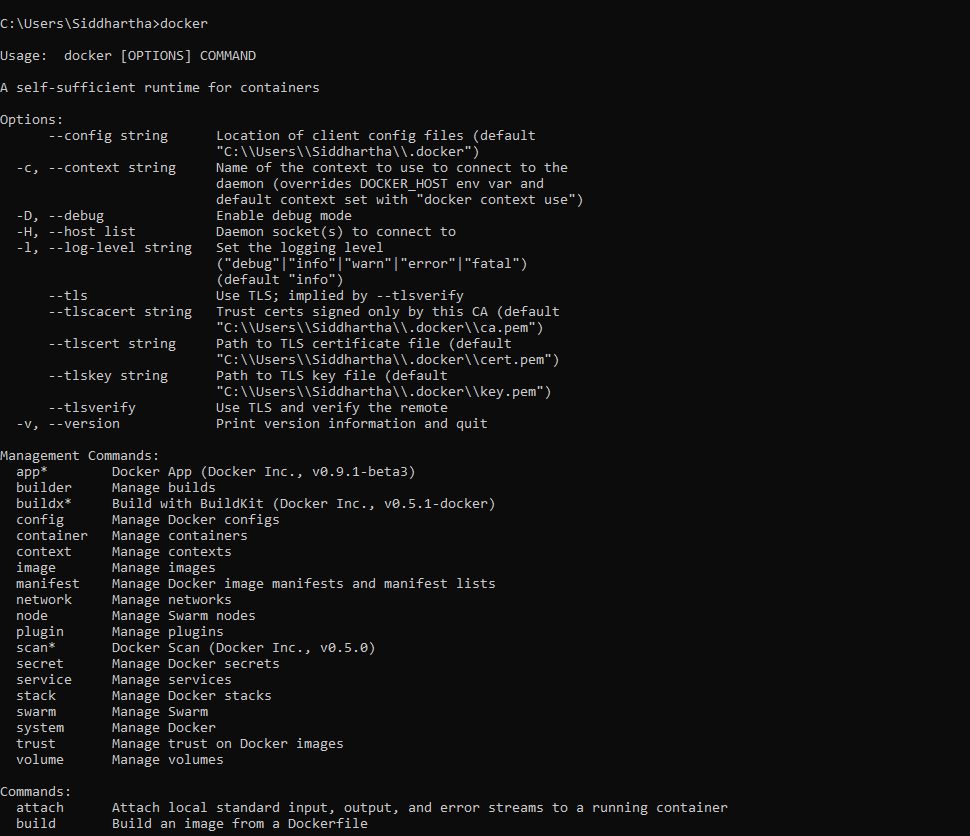
The above will install docker desktop for you in windows machine.
Step 2- Install Minikube and kubectl for kubernetes env
Kubernetes can be used in following different ways
a:- using minikube
b:- using KIND (Kuberenetes in docker)
c:- using docker desktop
d:- using cloud base kubernetes.
As we are using ISTIO for windows we will now deploy the kubernetes in our windows machine. You can do it by two ways
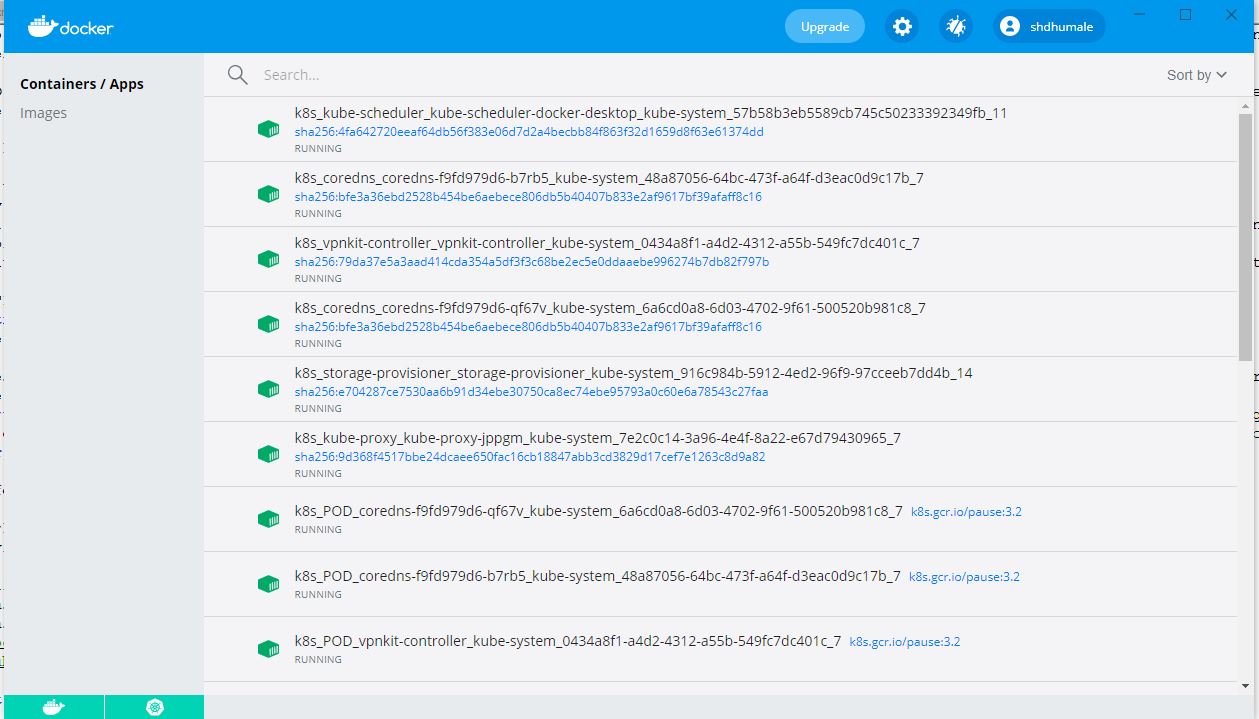
1- Docker Desktop come with inbuild kuberenetes

2- Yon can download the kubectl cli tool from below url
https://v1-18.docs.kubernetes.io/docs/tasks/tools/install-kubectl/
https://storage.googleapis.com/kubernetes-release/release/v1.18.12/bin/windows/amd64/kubectl.exe
Once you download this kubectl add it in your path. Reconfirm using below command

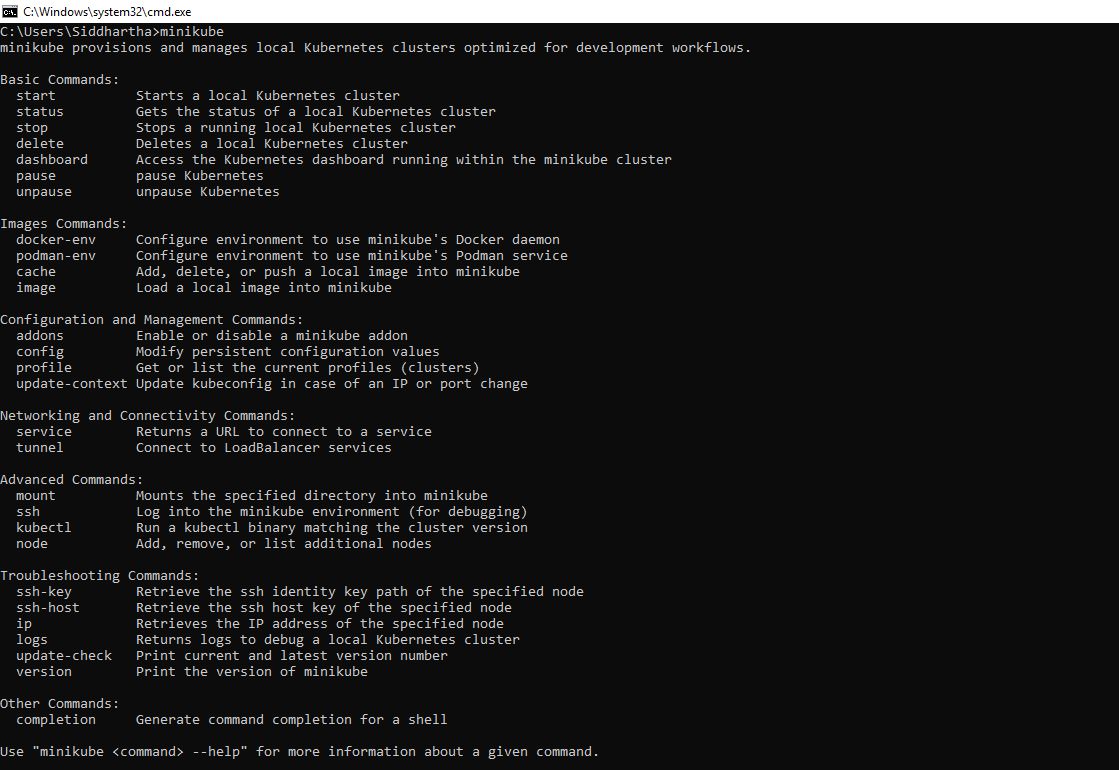
3- you can install Kubernetes using minikube.
download the minikube-installer from below location
https://minikube.sigs.k8s.io/docs/start/
You can either use below chocolate command. for executing below command you need to first install chocolatey from powershell from below url.
https://chocolatey.org/install
choco install minikube
or directly install the exe by downloading from below url. I am using below url to download exe.
https://storage.googleapis.com/minikube/releases/latest/minikube-installer.exe
Add this in your class path and reconfirm using following commands.
Step 3- Setup of ISTIO
Now as our base is ready with installed docker as container engine and Kubernetes (minikube and kubectl cli tool) as an container orchaestra. we are fine to install now ISTIO.
First we will install Core ISTIO and ISTIOD in kubernetes.
Lets start the process ……….
Step 1- Start minikube with some default parameter. As we need some base memory and ram to work with ISTIO so we will start minikube with that parameter you can get this command in below link.
https://istio.io/latest/docs/setup/platform-setup/minikube/
minikube start –memory=16384 –cpus=4
When executing above command it give me error saying you need to use cpus as 2 and memory as 8071
Check the setting in docker desktop it might look like this

Lets change it as per the given below screen shot.


click apply and restart.
Noew execute the command again
minikube start –memory=4000 –cpus=4

Now lets download the ISTIO setup on site https://istio.io/latest/docs/setup/getting-started/ it says you can install ISTIO using CURL command
other way is to go directly to the repository and download the same.
https://github.com/istio/istio/releases/tag/1.9.2
I downloaded the istio-1.9.2-win package. Extract that and keep the folder inside C drive
and inside C:\istio-1.9.2\bin we will get istio command line tool istioctl.
Lets add that in our path and confirm the same using

Step 2:- Now we will install our ISTIO in our minkube cluster
Lets check the name space and pods in our minikube
C:\Users\Siddhartha>kubectl get ns
NAME STATUS AGE
default Active 7d4h
kube-node-lease Active 7d4h
kube-public Active 7d4h
kube-system Active 7d4h
as shown above we did not have any ISTIO namespace
C:\Users\Siddhartha>kubectl get pod
No resources found in default namespace.
Also we did not have any ISTIO pod in the minikube.
This proves that we have empty minikube cluster now lets install ISTIO using this command
C:\Users\Siddhartha>istioctl install
This will install the Istio 1.9.2 profile with [“Istio core” “Istiod” “Ingress gateways”] components into the cluster. Proceed? (y/N) y Istio core installed Istiod installed Ingress gateways installed Installation complete

As shown above this installation will install
Istio core and Istiod that is the demon for istio along with ingress to allow traffic to flow in and out of our minikube through ISTIO.
Now lets check what we get in namespace
C:\Users\Siddhartha>kubectl get ns
NAME STATUS AGE
default Active 7d5h
istio-system Active 2m39s
kube-node-lease Active 7d5h
kube-public Active 7d5h
kube-system Active 7d5h

As shown above we get now istio-system in name space.
Now lets check what we pod we have in this name space istio-system
C:\Users\Siddhartha>kubectl get pod -n istio-system
NAME READY STATUS RESTARTS AGE
istio-ingressgateway-7cc49dcd99-skkcp 1/1 Running 0 3m6s
istiod-db9f9f86-f4l9d 1/1 Running 0 3m14s

Above pod in name space clearly shows that we have two pod one with istiod and one with ingress running in our minikube cluster.
Now we know how the ISTIO work. it inject envoy side car proxy one to one for each MicroService.
Step 3- Configuring or installing M/S
So now lets deploy microservice. for easy use we are using ready made microservice provided by google.
We are using Microservice from the give link.
https://github.com/GoogleCloudPlatform/microservices-demo
Inside this we will have release folder
https://github.com/GoogleCloudPlatform/microservices-demo/tree/master/release
we will need the yml file that contain all the things that are needed to deploy this microservice in our minikube environment.
Lets download that and keep that in our C drive
C:\kubernetes-microservice-yml-files\kubernetes-manifests.yml
Now lets apply this yml file kubernetes-manifests.yml to deploy the microservice using below command.
C:\kubernetes-microservice-yml-files>kubectl apply -f kubernetes-manifests.yml
This will deploy all the microservices in our default name space.

Lets check if the pod is running with this command
C:\kubernetes-microservice-yml-files>kubectl get all
NAME READY STATUS RESTARTS AGE
pod/adservice-f787c8dcd-nkm57 1/1 Running 0 14m
pod/cartservice-67b89ffc69-hc9rs 1/1 Running 4 14m
pod/checkoutservice-75db8bf6f6-ckb9s 1/1 Running 0 14m
pod/currencyservice-68887d98fd-p9hv6 1/1 Running 0 14m
pod/emailservice-5f8fc7dbb4-xprk7 1/1 Running 0 14m
pod/frontend-5c4745dfdb-8mcc4 1/1 Running 0 14m
pod/loadgenerator-86f46dcb88-x52s8 1/1 Running 6 14m
pod/paymentservice-6658569876-4xhxm 1/1 Running 0 14m
pod/productcatalogservice-587f8bc64-5brb8 1/1 Running 0 14m
pod/recommendationservice-78965f984b-wsrx5 1/1 Running 0 14m
pod/redis-cart-74594bd569-vn9h8 1/1 Running 0 14m
pod/shippingservice-6998959488-9rn5g 1/1 Running 0 14m
NAME TYPE CLUSTER-IP EXTERNAL-IP PORT(S) AGE
service/adservice ClusterIP 10.99.105.92 9555/TCP 14m
service/cartservice ClusterIP 10.102.252.178 7070/TCP 14m
service/checkoutservice ClusterIP 10.99.113.179 5050/TCP 14m
service/currencyservice ClusterIP 10.98.150.140 7000/TCP 14m
service/emailservice ClusterIP 10.106.198.87 5000/TCP 14m
service/frontend ClusterIP 10.105.48.17 80/TCP 14m
service/frontend-external LoadBalancer 10.106.46.182 80:30899/TCP 14m
service/kubernetes ClusterIP 10.96.0.1 443/TCP 7d6h
service/paymentservice ClusterIP 10.111.35.56 50051/TCP 14m
service/productcatalogservice ClusterIP 10.103.24.20 3550/TCP 14m
service/recommendationservice ClusterIP 10.101.224.209 8080/TCP 14m
service/redis-cart ClusterIP 10.101.95.41 6379/TCP 14m
service/shippingservice ClusterIP 10.99.200.250 50051/TCP 14m
NAME READY UP-TO-DATE AVAILABLE AGE
deployment.apps/adservice 1/1 1 1 14m
deployment.apps/cartservice 1/1 1 1 14m
deployment.apps/checkoutservice 1/1 1 1 14m
deployment.apps/currencyservice 1/1 1 1 14m
deployment.apps/emailservice 1/1 1 1 14m
deployment.apps/frontend 1/1 1 1 14m
deployment.apps/loadgenerator 1/1 1 1 14m
deployment.apps/paymentservice 1/1 1 1 14m
deployment.apps/productcatalogservice 1/1 1 1 14m
deployment.apps/recommendationservice 1/1 1 1 14m
deployment.apps/redis-cart 1/1 1 1 14m
deployment.apps/shippingservice 1/1 1 1 14m
NAME DESIRED CURRENT READY AGE
replicaset.apps/adservice-f787c8dcd 1 1 1 14m
replicaset.apps/cartservice-67b89ffc69 1 1 1 14m
replicaset.apps/checkoutservice-75db8bf6f6 1 1 1 14m
replicaset.apps/currencyservice-68887d98fd 1 1 1 14m
replicaset.apps/emailservice-5f8fc7dbb4 1 1 1 14m
replicaset.apps/frontend-5c4745dfdb 1 1 1 14m
replicaset.apps/loadgenerator-86f46dcb88 1 1 1 14m
replicaset.apps/paymentservice-6658569876 1 1 1 14m
replicaset.apps/productcatalogservice-587f8bc64 1 1 1 14m
replicaset.apps/recommendationservice-78965f984b 1 1 1 14m
replicaset.apps/redis-cart-74594bd569 1 1 1 14m
replicaset.apps/shippingservice-6998959488 1 1 1 14m
C:\kubernetes-microservice-yml-files>
You can see our all Microservice are installed and running now on their respective pods.
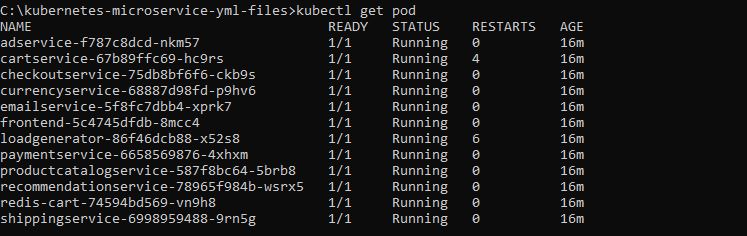
Now if you see above image we have only 1 pod but as we said early Istio inject envoy poxy side car one to one on each and every pod
i.e. in general practise we have
1 pod = 1 microservice(1 container) + 1 Envoy proxy(1 container)
but in above case we only see our micro service running in that pod .. then the question is where is our envoy proxy that istio need to inject.
the reason is we have not told istio to inject envoy proxy to which name space. As we have deploy our all micro service in default name space and ISTIO did not deploy directly envoy proxy to default name space.It does not work like that. We need to deploy our all microservice to one of the name space that has one perticular lable istio-injection-enable and then we need to tell ISTIO will automatically inject envoy proxy into that perticular namespace.
So first we will give a lable to our default name space.
C:\Users\Siddhartha>kubectl get ns default –show-labels
NAME STATUS AGE LABELS
default Active 7d6h
As shown above defualt namespace did not have any label associated with it.
Lets give perticular label to this default namespace using below command
C:\Users\Siddhartha>kubectl label namespace default istio-injection=enabled
namespace/default labeled
Check label is applied properly using below command
C:\Users\Siddhartha>kubectl get ns default –show-labels
NAME STATUS AGE LABELS
default Active 7d6h istio-injection=enabled
Now lets first remove all our microservice from the default namespace and that can be done using below command.
C:\kubernetes-microservice-yml-files>kubectl delete -f kubernetes-manifests.yaml

Reconfirm all pod is deleted
C:\Users\Siddhartha>kubectl get all
NAME TYPE CLUSTER-IP EXTERNAL-IP PORT(S) AGE
service/kubernetes ClusterIP 10.96.0.1 443/TCP 7d6h
Now again execute this command
C:\kubernetes-microservice-yml-files>kubectl apply -f kubernetes-manifests.yml
And now you will see we have 2 container in each pod one for the microservice and one for the envoy proxy as we have attached a label istio-injection=enabled to namespace default.
C:\Users\Siddhartha>kubectl get all
NAME READY STATUS RESTARTS AGE
pod/adservice-f787c8dcd-cws9s 0/2 Pending 0 46s
pod/cartservice-67b89ffc69-vvs4h 0/2 PodInitializing 0 56s
pod/checkoutservice-75db8bf6f6-sgqv2 0/2 PodInitializing 0 60s
pod/currencyservice-68887d98fd-wdj58 0/2 Pending 0 52s
pod/emailservice-5f8fc7dbb4-r77fr 0/2 PodInitializing 0 60s
pod/frontend-5c4745dfdb-q98ph 0/2 PodInitializing 0 60s
pod/loadgenerator-86f46dcb88-4rwrn 0/2 Pending 0 53s
pod/paymentservice-6658569876-dz92z 0/2 Running 0 58s
pod/productcatalogservice-587f8bc64-4rhgh 0/2 Running 0 57s
pod/recommendationservice-78965f984b-664wx 0/2 PodInitializing 0 60s
pod/redis-cart-74594bd569-s99kl 0/2 Pending 0 47s
pod/shippingservice-6998959488-vjg9r 0/2 Pending 0 49s
NAME TYPE CLUSTER-IP EXTERNAL-IP PORT(S) AGE
service/adservice ClusterIP 10.103.77.161 9555/TCP 46s
service/cartservice ClusterIP 10.98.113.117 7070/TCP 56s
service/checkoutservice ClusterIP 10.97.0.248 5050/TCP 64s
service/currencyservice ClusterIP 10.106.171.28 7000/TCP 51s
service/emailservice ClusterIP 10.104.55.38 5000/TCP 65s
service/frontend ClusterIP 10.101.23.136 80/TCP 62s
service/frontend-external LoadBalancer 10.109.228.19 80:32673/TCP 60s
service/kubernetes ClusterIP 10.96.0.1 443/TCP 7d6h
service/paymentservice ClusterIP 10.103.133.202 50051/TCP 59s
service/productcatalogservice ClusterIP 10.110.0.217 3550/TCP 58s
service/recommendationservice ClusterIP 10.102.186.103 8080/TCP 63s
service/redis-cart ClusterIP 10.99.99.29 6379/TCP 48s
service/shippingservice ClusterIP 10.105.6.55 50051/TCP 50s
NAME READY UP-TO-DATE AVAILABLE AGE
deployment.apps/adservice 0/1 1 0 47s
deployment.apps/cartservice 0/1 1 0 58s
deployment.apps/checkoutservice 0/1 1 0 65s
deployment.apps/currencyservice 0/1 1 0 54s
deployment.apps/emailservice 0/1 1 0 65s
deployment.apps/frontend 0/1 1 0 62s
deployment.apps/loadgenerator 0/1 1 0 55s
deployment.apps/paymentservice 0/1 1 0 60s
deployment.apps/productcatalogservice 0/1 1 0 58s
deployment.apps/recommendationservice 0/1 1 0 64s
deployment.apps/redis-cart 0/1 1 0 49s
deployment.apps/shippingservice 0/1 1 0 51s
NAME DESIRED CURRENT READY AGE
replicaset.apps/adservice-f787c8dcd 1 1 0 47s
replicaset.apps/cartservice-67b89ffc69 1 1 0 58s
replicaset.apps/checkoutservice-75db8bf6f6 1 1 0 65s
replicaset.apps/currencyservice-68887d98fd 1 1 0 53s
replicaset.apps/emailservice-5f8fc7dbb4 1 1 0 65s
replicaset.apps/frontend-5c4745dfdb 1 1 0 62s
replicaset.apps/loadgenerator-86f46dcb88 1 1 0 55s
replicaset.apps/paymentservice-6658569876 1 1 0 59s
replicaset.apps/productcatalogservice-587f8bc64 1 1 0 58s
replicaset.apps/recommendationservice-78965f984b 1 1 0 63s
replicaset.apps/redis-cart-74594bd569 1 1 0 48s
replicaset.apps/shippingservice-6998959488 1 1 0 51s
Now lets check one of the service
C:\Users\Siddhartha>kubectl get pod
NAME READY STATUS RESTARTS AGE
adservice-f787c8dcd-cws9s 0/2 Pending 0 4m16s
cartservice-67b89ffc69-vvs4h 1/2 CrashLoopBackOff 4 4m26s
checkoutservice-75db8bf6f6-sgqv2 2/2 Running 0 4m30s
currencyservice-68887d98fd-wdj58 0/2 Pending 0 4m22s
emailservice-5f8fc7dbb4-r77fr 2/2 Running 0 4m30s
frontend-5c4745dfdb-q98ph 2/2 Running 0 4m30s
loadgenerator-86f46dcb88-4rwrn 0/2 Pending 0 4m23s
paymentservice-6658569876-dz92z 2/2 Running 0 4m28s
productcatalogservice-587f8bc64-4rhgh 2/2 Running 0 4m27s
recommendationservice-78965f984b-664wx 2/2 Running 1 4m30s
redis-cart-74594bd569-s99kl 0/2 Pending 0 4m17s
shippingservice-6998959488-vjg9r 0/2 Pending 0 4m19s
C:\Users\Siddhartha>kubectl describe pod frontend-5c4745dfdb-q98ph
You will see we have two containers
1- Envoy proxy container
Init Containers:
istio-init:
Container ID: docker://e0866fbd682c329e1567c19052de9090248bf1f06e55459c338d26f2f90aef57
Image: docker.io/istio/proxyv2:1.9.2
Image ID: docker-pullable://istio/proxyv2@sha256:ee9c153e2f973937befb8af61e7269ab368020b6e7d91b5d891bbbeba55eb266
2- Microservice container
Containers:
server:
Container ID: docker://0fd8fdb0d5d81f558c042a65ad036539865efcf29218b39d6b44a0ac0b483dc0
Image: gcr.io/google-samples/microservices-demo/frontend:v0.2.2
Image ID: docker-pullable://gcr.io/google-samples/microservices-demo/frontend@sha256:b77df64e7c87d3a17c234b11a4440f70ed30dddfdc0b0cd163768fc56b73d2ec
Now we have all things are setup
1- Istio core with Istiod setup
2- We have given the label to default namespace
3- We have installed microservice
Now lets take important aspect of the ISTIO and that is logging in distributed environment.
If you see the download ISTIO C:\istio-1.9.2\samples\addons you will find many yml file that will configure
prometheus, grafana, jaeger, kiali and zipkin
Note:- zipkin yml is inside extra folder i.e. C:\istio-1.9.2\samples\addons\extras
Now lets run this yml files and see on ui how it help us in debugging and monitoring the applications.
Please refer to the below documentation also for more informations.
https://istio.io/latest/docs/tasks/observability/distributed-tracing/
Now lets apply all this kubernetes yml file as shown below
C:\Users\Siddhartha>kubectl apply -f C:\istio-1.9.2\samples\addons
serviceaccount/grafana created
configmap/grafana created
service/grafana created
deployment.apps/grafana created
configmap/istio-grafana-dashboards created
configmap/istio-services-grafana-dashboards created
deployment.apps/jaeger created
service/tracing created
service/zipkin created
service/jaeger-collector created
Warning: apiextensions.k8s.io/v1beta1 CustomResourceDefinition is deprecated in v1.16+, unavailable in v1.22+; use apiextensions.k8s.io/v1 CustomResourceDefinition
customresourcedefinition.apiextensions.k8s.io/monitoringdashboards.monitoring.kiali.io created
serviceaccount/kiali created
configmap/kiali created
clusterrole.rbac.authorization.k8s.io/kiali-viewer created
clusterrole.rbac.authorization.k8s.io/kiali created
clusterrolebinding.rbac.authorization.k8s.io/kiali created
role.rbac.authorization.k8s.io/kiali-controlplane created
rolebinding.rbac.authorization.k8s.io/kiali-controlplane created
service/kiali created
deployment.apps/kiali created
serviceaccount/prometheus created
configmap/prometheus created
clusterrole.rbac.authorization.k8s.io/prometheus created
clusterrolebinding.rbac.authorization.k8s.io/prometheus created
service/prometheus created
deployment.apps/prometheus created

now lets check how many pods we were havig in istio-system name space
C:\Users\Siddhartha>kubectl get pod -n istio-system
NAME READY STATUS RESTARTS AGE
grafana-784c89f4cf-kkcjx 1/1 Running 1 8m8s
istio-ingressgateway-7cc49dcd99-skkcp 1/1 Running 0 72m
istiod-db9f9f86-f4l9d 1/1 Running 0 72m
jaeger-7f78b6fb65-4785w 1/1 Running 0 8m7s
kiali-dc84967d9-jb2dj 1/1 Running 0 7m58s
prometheus-7bfddb8dbf-m2fcw 2/2 Running 0 7m53s
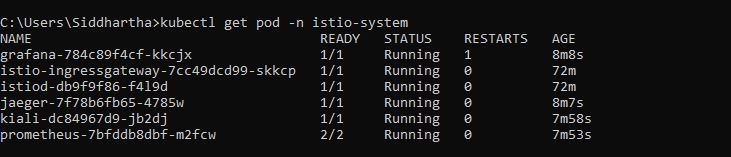
Now as shown above in past we have only 2 pod istiod-db9f9f86-f4l9d and istio-ingressgateway-7cc49dcd99-skkcp but now we have all other pod for respective yml files running in name space istio-system.
Please refer to the documentation and see what these pod do for you in ISTIO. prometheus, kiali, jaeger and grafana
Out of all I personally like Kiali so lets look into it.
first get the service and then do port-forward so that we can access it url.
C:\Users\Siddhartha>kubectl get svc -n istio-system
NAME TYPE CLUSTER-IP EXTERNAL-IP PORT(S) AGE
grafana ClusterIP 10.102.144.24 3000/TCP 8m50s
istio-ingressgateway LoadBalancer 10.109.174.199 15021:32200/TCP,80:31541/TCP,443:30513/TCP,15012:32766/TCP,15443:31086/TCP 72m
istiod ClusterIP 10.99.24.242 15010/TCP,15012/TCP,443/TCP,15014/TCP 73m
jaeger-collector ClusterIP 10.102.38.229 14268/TCP,14250/TCP 8m43s
kiali ClusterIP 10.100.219.249 20001/TCP,9090/TCP 8m39s
prometheus ClusterIP 10.107.248.153 9090/TCP 8m34s
tracing ClusterIP 10.103.152.80 80/TCP 8m46s
zipkin ClusterIP 10.102.34.187 9411/TCP 8m44s
C:\Users\Siddhartha>kubectl port-forward svc/kiali -n istio-system 20001
Forwarding from 127.0.0.1:20001 -> 20001
Forwarding from [::1]:20001 -> 20001

Now open the this url in browser and you will be able to use kiali ui on browser for our deployed microservices.

Just play with it.
In next lecture we will expose all other logging mechanism in details.