1- Set up you Spring MVC application. You will get many SpringMVC online example. For quick movement I had taken ready made SpringFormMVC example from here
https://www.journaldev.com/14476/spring-mvc-example
2- Download ready made spring security example provided by Spring for the same. You can download this example from
https://repo.spring.io/list/release/org/springframework/security/extensions/spring-security-saml/
3- Add following line of code in your application pom.xml from step-2 pom.xml to get all the necessary jar required.
'<!-- Add Spring Web and MVC dependencies -->
'<dependencies>
'<dependency>
'<groupId>org.springframework'</groupId>
'<artifactId>spring-webmvc'</artifactId>
'<version>3.1.2.RELEASE'</version>
'</dependency>
'<dependency>
'<groupId>org.springframework'</groupId>
'<artifactId>spring-web'</artifactId>
'<version>3.1.2.RELEASE'</version>
'</dependency>
'<!-- Servlet -->
'<dependency>
'<groupId>javax.servlet'</groupId>
'<artifactId>servlet-api'</artifactId>
'<version>2.5'</version>
'<scope>provided'</scope>
'</dependency>
'<dependency>
'<groupId>javax.servlet.jsp'</groupId>
'<artifactId>jsp-api'</artifactId>
'<version>2.1'</version>
'<scope>provided'</scope>
'</dependency>
'<dependency>
'<groupId>javax.servlet'</groupId>
'<artifactId>jstl'</artifactId>
'<version>1.2'</version>
'</dependency>
'<dependency>
'<groupId>org.slf4j'</groupId>
'<artifactId>slf4j-log4j12'</artifactId>
'<version>1.6.3'</version>
'<scope>compile'</scope>
'</dependency>
'<dependency>
'<groupId>org.springframework.security.extensions'</groupId>
'<artifactId>spring-security-saml2-core'</artifactId>
'<version>1.0.0.RELEASE'</version>
'<scope>compile'</scope>
'</dependency>
'<dependency>
'<groupId>org.springframework.security'</groupId>
'<artifactId>spring-security-config'</artifactId>
'<version>3.1.2.RELEASE'</version>
'<scope>compile'</scope>
'</dependency>
'<dependency>
'<groupId>org.springframework'</groupId>
'<artifactId>spring-core'</artifactId>
'<version>3.1.2.RELEASE'</version>
'<scope>compile'</scope>
'</dependency>
'<dependency>
'<groupId>org.springframework'</groupId>
'<artifactId>spring-beans'</artifactId>
'<version>3.1.2.RELEASE'</version>
'<scope>compile'</scope>
'</dependency>
'<dependency>
'<groupId>org.springframework'</groupId>
'<artifactId>spring-context'</artifactId>
'<version>3.1.2.RELEASE'</version>
'<scope>compile'</scope>
'</dependency>
'<dependency>
'<groupId>org.springframework'</groupId>
'<artifactId>spring-aop'</artifactId>
'<version>3.1.2.RELEASE'</version>
'<scope>compile'</scope>
'</dependency>
'<dependency>
'<groupId>javax.servlet'</groupId>
'<artifactId>jsp-api'</artifactId>
'<version>2.0'</version>
'<scope>provided'</scope>
'</dependency>
'<dependency>
'<groupId>junit'</groupId>
'<artifactId>junit'</artifactId>
'<version>4.4'</version>
'<scope>test'</scope>
'</dependency>
'</dependencies>
'<build>
'<plugins>
'<plugin>
'<artifactId>maven-compiler-plugin'</artifactId>
'<version>3.6.1'</version>
'<configuration>
'<source>1.8'</source>
'<target>1.8'</target>
'</configuration>
'</plugin>
'<plugin>
'<artifactId>maven-war-plugin'</artifactId>
'<version>3.0.0'</version>
'<configuration>
'<warSourceDirectory>WebContent'</warSourceDirectory>
'</configuration>
'</plugin>
'</plugins>
'<finalName>${project.artifactId}'</finalName> '<!-- added to remove Version from WAR file -->
'</build>
4- Comment all your code in application web.xml and take entry from step- 2 web.xml of example and add it in your application web.xml
'<?xml version="1.0" encoding="UTF-8"?>
'<web-app xmlns:xsi="http://www.w3.org/2001/XMLSchema-instance" xmlns="http://java.sun.com/xml/ns/javaee" xsi:schemaLocation="http://java.sun.com/xml/ns/javaee http://java.sun.com/xml/ns/javaee/web-app_3_0.xsd" id="WebApp_ID" version="3.0">
'<display-name>spring-mvc-example'</display-name>
'<!-- Add Spring MVC DispatcherServlet as front controller -->
'<!-- '<servlet>
'<servlet-name>spring'</servlet-name>
'<servlet-class>
org.springframework.web.servlet.DispatcherServlet
'</servlet-class>
'<init-param>
'<param-name>contextConfigLocation'</param-name>
'<param-value>/WEB-INF/spring-servlet.xml'</param-value>
'</init-param>
'<load-on-startup>1'</load-on-startup>
'</servlet>
'<servlet-mapping>
'<servlet-name>spring'</servlet-name>
'<url-pattern>/'</url-pattern>
'</servlet-mapping> -->
'<context-param>
'<param-name>contextConfigLocation'</param-name>
'<param-value>
/WEB-INF/securityContext.xml
'</param-value>
'</context-param>
'<servlet>
'<servlet-name>saml'</servlet-name>
'<servlet-class>org.springframework.web.servlet.DispatcherServlet'</servlet-class>
'<load-on-startup>1'</load-on-startup>
'</servlet>
'<servlet-mapping>
'<servlet-name>saml'</servlet-name>
'<url-pattern>/saml/web/*'</url-pattern>
'</servlet-mapping>
'<servlet-mapping>
'<servlet-name>saml'</servlet-name>
'<url-pattern>/siddhu/*'</url-pattern>
'</servlet-mapping>
'<filter>
'<filter-name>springSecurityFilterChain'</filter-name>
'<filter-class>org.springframework.web.filter.DelegatingFilterProxy'</filter-class>
'</filter>
'<filter-mapping>
'<filter-name>springSecurityFilterChain'</filter-name>
'<url-pattern>/*'</url-pattern>
'</filter-mapping>
'<listener>
'<listener-class>org.springframework.web.context.ContextLoaderListener'</listener-class>
'</listener>
'<welcome-file-list>
'<welcome-file>/index.jsp'</welcome-file>
'</welcome-file-list>
'<error-page>
'<exception-type>java.lang.Exception'</exception-type>
'<location>/error.jsp'</location>
'</error-page>
'</web-app>
Note: here we had added path url-pattern as /siddhu/* to differentiate our application path.
5- Take complete securityContext.xml of Step-2 application and keep it inside web-inf folder as it is.
6- Take code from your servlet-context.xml and add it in saml.servlet.xml given in next step.
7- Take saml-servlet.xml from step-2 and keep it inside web-inf folder as it is.
Note: depending on your available jsp code please modify bean:property valye in prefix as show below
'<?xml version="1.0" encoding="UTF-8"?>
'<beans:beans
xmlns="http://www.springframework.org/schema/mvc"
xmlns:xsi="http://www.w3.org/2001/XMLSchema-instance"
xmlns:beans="http://www.springframework.org/schema/beans"
xmlns:context="http://www.springframework.org/schema/context"
xsi:schemaLocation="http://www.springframework.org/schema/mvc http://www.springframework.org/schema/mvc/spring-mvc.xsd
http://www.springframework.org/schema/beans http://www.springframework.org/schema/beans/spring-beans.xsd
http://www.springframework.org/schema/context http://www.springframework.org/schema/context/spring-context.xsd">
'<!-- DispatcherServlet Context: defines this servlet's request-processing
infrastructure -->
'<!-- Enables the Spring MVC @Controller programming model -->
'<annotation-driven />
'<context:component-scan
base-package="org.springframework.security.saml.web" />
'<!-- Resolves views selected for rendering by @Controllers to .jsp resources
in the /WEB-INF/views directory -->
'<beans:bean
class="org.springframework.web.servlet.view.InternalResourceViewResolver">
'<!-- '<beans:property name="prefix" value="/WEB-INF/views/" /> '<beans:property
name="suffix" value=".jsp" /> -->
'<beans:property name="prefix" value="/WEB-INF/views/" />
'<beans:property name="suffix" value=".jsp" />
'</beans:bean>
'</beans:beans>
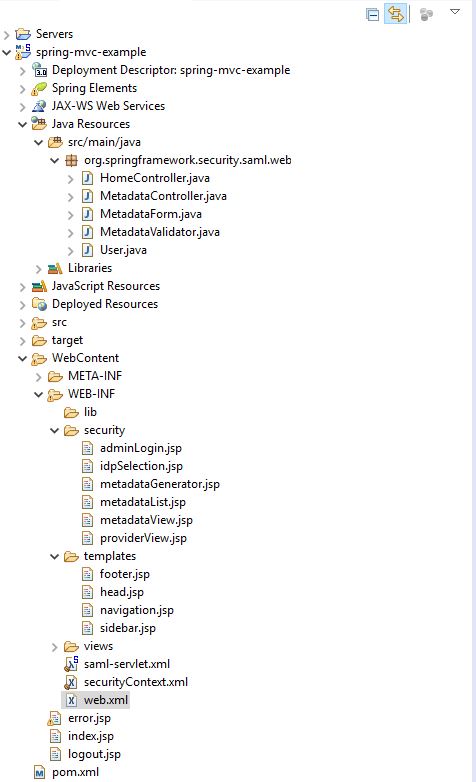
8- Copy all your java file inside saml.web packages
9- Copy security and templates folder from Step-2 example inside your application code.
10- Add index.jsp,error.jsp and logour.jsp from Step-2 inside your application WebContent
11- Deploy your application on Tomcat
12- Take your application meta data using below url
http://localhost:8282/spring-security-saml2-sample/saml/metadata
and Copy the contents to your clipboard.
you can also take the whole SP Meta data form this site.
https://saml-federation.appspot.com/saml/web/metadata
13- Now we need to tell our IDP that this is the SP from where you will get request for authentification and need to confirm if it is valid. For this we need to add this SP Meta data inside our site :https://idp.ssocircle.com/sso/hos/SelfCare.jsp
Update the metadata of your new profile at https://idp.ssocircle.com/sso/hos/ManageSPMetadata.jsp.
13- click on the Add new service provided option to add our SP details in it.
14- Add proper deatails in FQDN as this need to be unique I prefer to add in the format i.e."urn:test:sppringmvc:pune".
In the below given meta data from SP add whole xml which we had copied in Step 12
Save the change and you will see our SP is added in the site as shown below.
Thats all now lets move for testing our action we did till now
1- Logout of SSO Circle Service site. i.e. https://idp.ssocircle.com/sso/UI/Logout
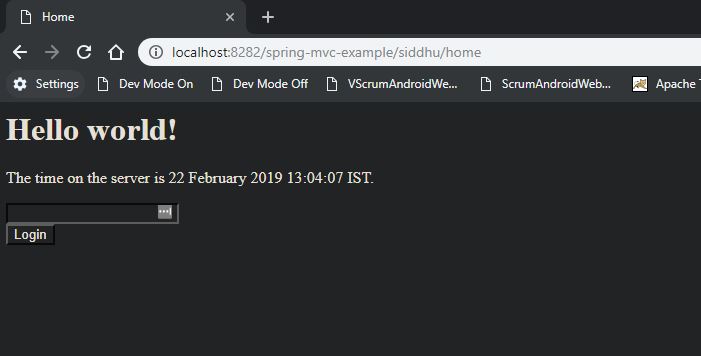
2- Go to http://localhost:8282/spring-mvc-example/siddhu/home
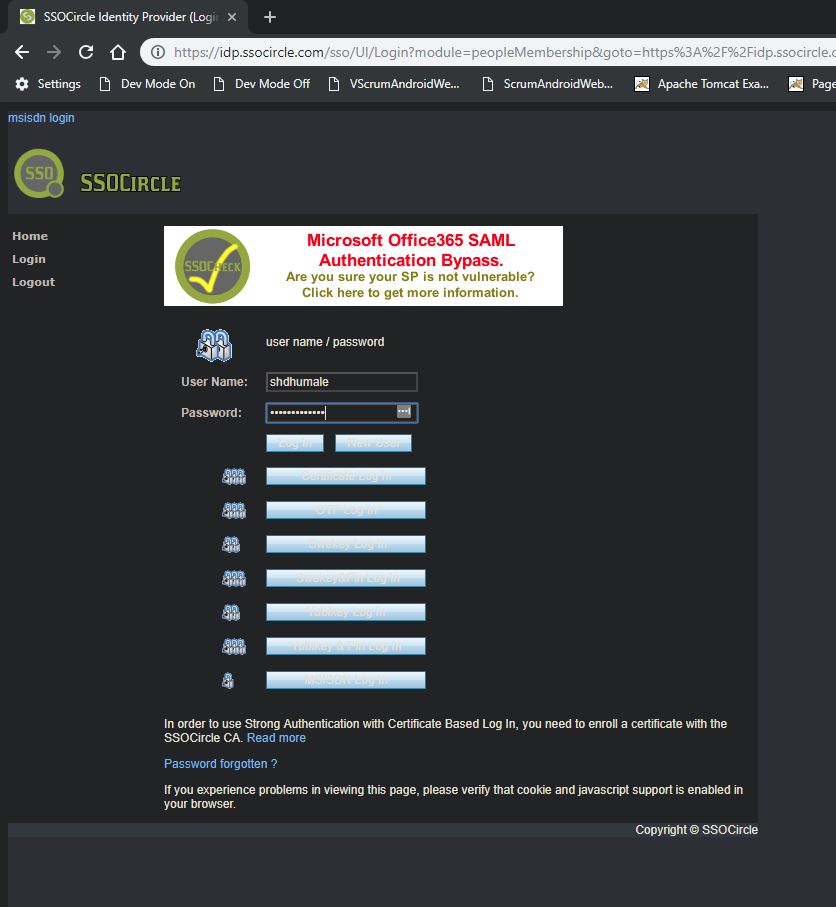
3- As this is first time login the user will be asked or will be redirected to the SSO Circle login.
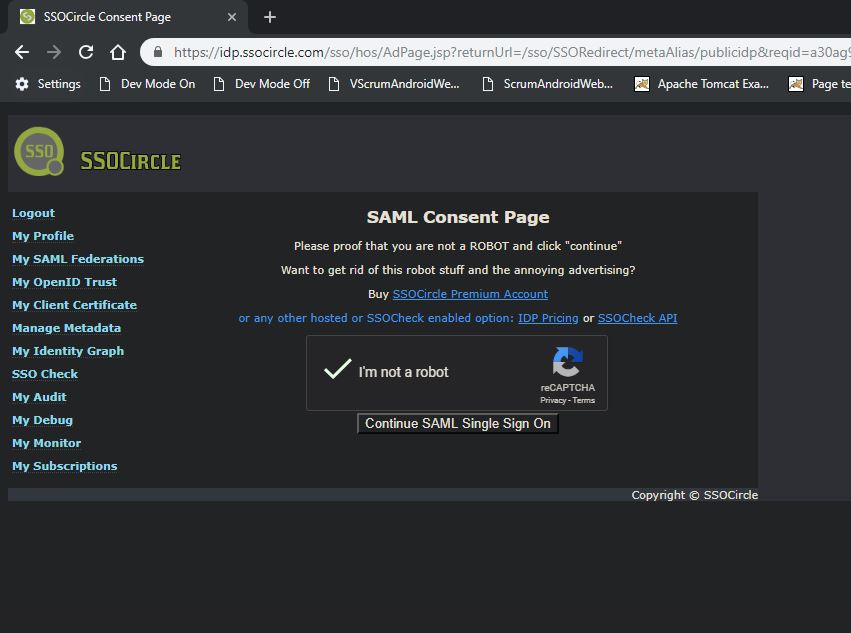
4- Login with our SSO Circle credentials which we had done in past.
5- On successful login we will be redirected to your local service provider page and authenticated. i.e. your url will be local host with the details information


https://www.journaldev.com/14476/spring-mvc-example
2- Download ready made spring security example provided by Spring for the same. You can download this example from
https://repo.spring.io/list/release/org/springframework/security/extensions/spring-security-saml/
3- Add following line of code in your application pom.xml from step-2 pom.xml to get all the necessary jar required.
'<!-- Add Spring Web and MVC dependencies -->
'<dependencies>
'<dependency>
'<groupId>org.springframework'</groupId>
'<artifactId>spring-webmvc'</artifactId>
'<version>3.1.2.RELEASE'</version>
'</dependency>
'<dependency>
'<groupId>org.springframework'</groupId>
'<artifactId>spring-web'</artifactId>
'<version>3.1.2.RELEASE'</version>
'</dependency>
'<!-- Servlet -->
'<dependency>
'<groupId>javax.servlet'</groupId>
'<artifactId>servlet-api'</artifactId>
'<version>2.5'</version>
'<scope>provided'</scope>
'</dependency>
'<dependency>
'<groupId>javax.servlet.jsp'</groupId>
'<artifactId>jsp-api'</artifactId>
'<version>2.1'</version>
'<scope>provided'</scope>
'</dependency>
'<dependency>
'<groupId>javax.servlet'</groupId>
'<artifactId>jstl'</artifactId>
'<version>1.2'</version>
'</dependency>
'<dependency>
'<groupId>org.slf4j'</groupId>
'<artifactId>slf4j-log4j12'</artifactId>
'<version>1.6.3'</version>
'<scope>compile'</scope>
'</dependency>
'<dependency>
'<groupId>org.springframework.security.extensions'</groupId>
'<artifactId>spring-security-saml2-core'</artifactId>
'<version>1.0.0.RELEASE'</version>
'<scope>compile'</scope>
'</dependency>
'<dependency>
'<groupId>org.springframework.security'</groupId>
'<artifactId>spring-security-config'</artifactId>
'<version>3.1.2.RELEASE'</version>
'<scope>compile'</scope>
'</dependency>
'<dependency>
'<groupId>org.springframework'</groupId>
'<artifactId>spring-core'</artifactId>
'<version>3.1.2.RELEASE'</version>
'<scope>compile'</scope>
'</dependency>
'<dependency>
'<groupId>org.springframework'</groupId>
'<artifactId>spring-beans'</artifactId>
'<version>3.1.2.RELEASE'</version>
'<scope>compile'</scope>
'</dependency>
'<dependency>
'<groupId>org.springframework'</groupId>
'<artifactId>spring-context'</artifactId>
'<version>3.1.2.RELEASE'</version>
'<scope>compile'</scope>
'</dependency>
'<dependency>
'<groupId>org.springframework'</groupId>
'<artifactId>spring-aop'</artifactId>
'<version>3.1.2.RELEASE'</version>
'<scope>compile'</scope>
'</dependency>
'<dependency>
'<groupId>javax.servlet'</groupId>
'<artifactId>jsp-api'</artifactId>
'<version>2.0'</version>
'<scope>provided'</scope>
'</dependency>
'<dependency>
'<groupId>junit'</groupId>
'<artifactId>junit'</artifactId>
'<version>4.4'</version>
'<scope>test'</scope>
'</dependency>
'</dependencies>
'<build>
'<plugins>
'<plugin>
'<artifactId>maven-compiler-plugin'</artifactId>
'<version>3.6.1'</version>
'<configuration>
'<source>1.8'</source>
'<target>1.8'</target>
'</configuration>
'</plugin>
'<plugin>
'<artifactId>maven-war-plugin'</artifactId>
'<version>3.0.0'</version>
'<configuration>
'<warSourceDirectory>WebContent'</warSourceDirectory>
'</configuration>
'</plugin>
'</plugins>
'<finalName>${project.artifactId}'</finalName> '<!-- added to remove Version from WAR file -->
'</build>
4- Comment all your code in application web.xml and take entry from step- 2 web.xml of example and add it in your application web.xml
'<?xml version="1.0" encoding="UTF-8"?>
'<web-app xmlns:xsi="http://www.w3.org/2001/XMLSchema-instance" xmlns="http://java.sun.com/xml/ns/javaee" xsi:schemaLocation="http://java.sun.com/xml/ns/javaee http://java.sun.com/xml/ns/javaee/web-app_3_0.xsd" id="WebApp_ID" version="3.0">
'<display-name>spring-mvc-example'</display-name>
'<!-- Add Spring MVC DispatcherServlet as front controller -->
'<!-- '<servlet>
'<servlet-name>spring'</servlet-name>
'<servlet-class>
org.springframework.web.servlet.DispatcherServlet
'</servlet-class>
'<init-param>
'<param-name>contextConfigLocation'</param-name>
'<param-value>/WEB-INF/spring-servlet.xml'</param-value>
'</init-param>
'<load-on-startup>1'</load-on-startup>
'</servlet>
'<servlet-mapping>
'<servlet-name>spring'</servlet-name>
'<url-pattern>/'</url-pattern>
'</servlet-mapping> -->
'<context-param>
'<param-name>contextConfigLocation'</param-name>
'<param-value>
/WEB-INF/securityContext.xml
'</param-value>
'</context-param>
'<servlet>
'<servlet-name>saml'</servlet-name>
'<servlet-class>org.springframework.web.servlet.DispatcherServlet'</servlet-class>
'<load-on-startup>1'</load-on-startup>
'</servlet>
'<servlet-mapping>
'<servlet-name>saml'</servlet-name>
'<url-pattern>/saml/web/*'</url-pattern>
'</servlet-mapping>
'<servlet-mapping>
'<servlet-name>saml'</servlet-name>
'<url-pattern>/siddhu/*'</url-pattern>
'</servlet-mapping>
'<filter>
'<filter-name>springSecurityFilterChain'</filter-name>
'<filter-class>org.springframework.web.filter.DelegatingFilterProxy'</filter-class>
'</filter>
'<filter-mapping>
'<filter-name>springSecurityFilterChain'</filter-name>
'<url-pattern>/*'</url-pattern>
'</filter-mapping>
'<listener>
'<listener-class>org.springframework.web.context.ContextLoaderListener'</listener-class>
'</listener>
'<welcome-file-list>
'<welcome-file>/index.jsp'</welcome-file>
'</welcome-file-list>
'<error-page>
'<exception-type>java.lang.Exception'</exception-type>
'<location>/error.jsp'</location>
'</error-page>
'</web-app>
Note: here we had added path url-pattern as /siddhu/* to differentiate our application path.
5- Take complete securityContext.xml of Step-2 application and keep it inside web-inf folder as it is.
6- Take code from your servlet-context.xml and add it in saml.servlet.xml given in next step.
7- Take saml-servlet.xml from step-2 and keep it inside web-inf folder as it is.
Note: depending on your available jsp code please modify bean:property valye in prefix as show below
'<?xml version="1.0" encoding="UTF-8"?>
'<beans:beans
xmlns="http://www.springframework.org/schema/mvc"
xmlns:xsi="http://www.w3.org/2001/XMLSchema-instance"
xmlns:beans="http://www.springframework.org/schema/beans"
xmlns:context="http://www.springframework.org/schema/context"
xsi:schemaLocation="http://www.springframework.org/schema/mvc http://www.springframework.org/schema/mvc/spring-mvc.xsd
http://www.springframework.org/schema/beans http://www.springframework.org/schema/beans/spring-beans.xsd
http://www.springframework.org/schema/context http://www.springframework.org/schema/context/spring-context.xsd">
'<!-- DispatcherServlet Context: defines this servlet's request-processing
infrastructure -->
'<!-- Enables the Spring MVC @Controller programming model -->
'<annotation-driven />
'<context:component-scan
base-package="org.springframework.security.saml.web" />
'<!-- Resolves views selected for rendering by @Controllers to .jsp resources
in the /WEB-INF/views directory -->
'<beans:bean
class="org.springframework.web.servlet.view.InternalResourceViewResolver">
'<!-- '<beans:property name="prefix" value="/WEB-INF/views/" /> '<beans:property
name="suffix" value=".jsp" /> -->
'<beans:property name="prefix" value="/WEB-INF/views/" />
'<beans:property name="suffix" value=".jsp" />
'</beans:bean>
'</beans:beans>
8- Copy all your java file inside saml.web packages
9- Copy security and templates folder from Step-2 example inside your application code.
10- Add index.jsp,error.jsp and logour.jsp from Step-2 inside your application WebContent
11- Deploy your application on Tomcat
12- Take your application meta data using below url
http://localhost:8282/spring-security-saml2-sample/saml/metadata
and Copy the contents to your clipboard.
you can also take the whole SP Meta data form this site.
https://saml-federation.appspot.com/saml/web/metadata
13- Now we need to tell our IDP that this is the SP from where you will get request for authentification and need to confirm if it is valid. For this we need to add this SP Meta data inside our site :https://idp.ssocircle.com/sso/hos/SelfCare.jsp
Update the metadata of your new profile at https://idp.ssocircle.com/sso/hos/ManageSPMetadata.jsp.
13- click on the Add new service provided option to add our SP details in it.
14- Add proper deatails in FQDN as this need to be unique I prefer to add in the format i.e."urn:test:sppringmvc:pune".
In the below given meta data from SP add whole xml which we had copied in Step 12
Save the change and you will see our SP is added in the site as shown below.
Thats all now lets move for testing our action we did till now
1- Logout of SSO Circle Service site. i.e. https://idp.ssocircle.com/sso/UI/Logout
2- Go to http://localhost:8282/spring-mvc-example/siddhu/home
3- As this is first time login the user will be asked or will be redirected to the SSO Circle login.
4- Login with our SSO Circle credentials which we had done in past.
5- On successful login we will be redirected to your local service provider page and authenticated. i.e. your url will be local host with the details information
