Spring batch is an open source framework for batch processing – execution of a series of jobs.
We can defind Job as combination of Steps and one step can be READ-PROCESS-WRITE task or single operation task (tasklet).
Jobs{ Steps1(READ-PROCESS-WRITE,READ-PROCESS-WRITE,),Step2(tasklet)}
For “READ-PROCESS-WRITE” process, it means “read” data from the resources (csv, xml or database), “process” it and “write” it to other resources (csv, xml and database).
For “single” operation task (tasklet), it means doing single task.
and we can combine steps to create a jobs
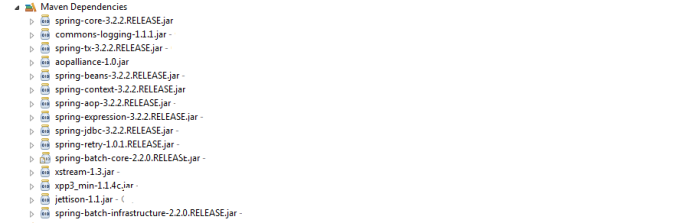
Following are the improtant jar that are needed to get Class and API to perform Spring Batch operation
1- spring-batch-core
2- spring-tx
3- spring-core
4- spring-context
5- spring-retry
Lets consider an example where we want to read an cvs file one by one and put the out put in another file. Finally delete all the cvs files expect the final one which contains data of all cvs files.
Three steps
1- Read the cvs file one by one
2- Write the files in the another files
3- Delete the files.
Step:- Create an Maven project
<!--bean id="jobRepository"
class="org.springframework.batch.core.repository.support.MapJobRepositoryFactoryBean">
<!--property name="transactionManager" ref="transactionManager" />
<!--/bean>
<!--bean id="transactionManager"
class="org.springframework.batch.support.transaction.ResourcelessTransactionManager" />
<!--bean id="myJobLauncher"
class="org.springframework.batch.core.launch.support.SimpleJobLauncher">
<!--property name="jobRepository" ref="jobRepository" />
<!--/bean>
<!--/beans>
(2) job-files.xml
<!--?xml version="1.0" encoding="UTF-8"?>
<!--beans xmlns="http://www.springframework.org/schema/beans"
xmlns:batch="http://www.springframework.org/schema/batch" xmlns:xsi="http://www.w3.org/2001/XMLSchema-instance"
xsi:schemaLocation="http://www.springframework.org/schema/batch
http://www.springframework.org/schema/batch/spring-batch-2.2.xsd
http://www.springframework.org/schema/beans
http://www.springframework.org/schema/beans/spring-beans-3.2.xsd
">
<!--import resource="../config/context.xml" />
<!--bean id="siddhu" class="com.test.siddhu.SpringBatchExample.FileReader" />
<!--bean id="fileDeletingTasklet" class="com.test.siddhu.SpringBatchExample.tasklet.FileDeletingTasklet" >
<!--property name="directory" value="file:csv/inputs/" />
<!--/bean>
<!--job id="readMultipleFileJob" xmlns="http://www.springframework.org/schema/batch">
<!--step id="step1" next="deleteFileDirectory">
<!--tasklet>
<!--chunk reader="multipleFileResourceReader" writer="fileItemWriter"
commit-interval="1" />
<!--/tasklet>
<!--/step>
<!--step id="deleteFileDirectory">
<!--tasklet ref="fileDeletingTasklet" />
<!--/step>
<!--/job>
<!--bean id="multipleFileResourceReader"
class=" org.springframework.batch.item.file.MultiResourceItemReader">
<!--property name="resources" value="file:csv/inputs/siddhu-*.csv" />
<!--property name="delegate" ref="flatFileItemReader" />
<!--/bean>
<!--bean id="flatFileItemReader" class="org.springframework.batch.item.file.FlatFileItemReader">
<!--property name="lineMapper">
<!--bean class="org.springframework.batch.item.file.mapping.DefaultLineMapper">
<!--property name="lineTokenizer">
<!--bean
class="org.springframework.batch.item.file.transform.DelimitedLineTokenizer">
<!--property name="names" value="id, siddhu" />
<!--/bean>
<!--/property>
<!--property name="fieldSetMapper">
<!--bean
class="org.springframework.batch.item.file.mapping.BeanWrapperFieldSetMapper">
<!--property name="prototypeBeanName" value="siddhu" />
<!--/bean>
<!--/property>
<!--/bean>
<!--/property>
<!--/bean>
<!--bean id="fileItemWriter" class="org.springframework.batch.item.file.FlatFileItemWriter">
<!--property name="resource" value="file:csv/outputs/test-siddhu.all.csv" />
<!--property name="appendAllowed" value="false" />
<!--property name="lineAggregator">
<!--bean
class="org.springframework.batch.item.file.transform.DelimitedLineAggregator">
<!--property name="delimiter" value="," />
<!--property name="fieldExtractor">
<!--bean
class="org.springframework.batch.item.file.transform.BeanWrapperFieldExtractor">
<!--property name="names" value="id, siddhu" />
<!--/bean>
<!--/property>
<!--/bean>
<!--/property>
<!--/bean>
<!--/beans>
Step 3:- Add following line of code in App files
package com.test.siddhu.SpringBatchExample;
import org.springframework.batch.core.Job;
import org.springframework.batch.core.JobExecution;
import org.springframework.batch.core.JobParameters;
import org.springframework.batch.core.launch.JobLauncher;
import org.springframework.context.ApplicationContext;
import org.springframework.context.support.ClassPathXmlApplicationContext;
public class App {
public static void main(String[] args) {
App obj = new App();
obj.run();
}
private void run() {
String[] springConfig = { "spring/batch/jobs/job-files.xml" };
ApplicationContext context = new ClassPathXmlApplicationContext(springConfig);
//ApplicationContext context = new ClassPathXmlApplicationContext();
JobLauncher jobLauncher = (JobLauncher) context.getBean("myJobLauncher");
Job job = (Job) context.getBean("readMultipleFileJob");
try {
JobExecution execution = jobLauncher.run(job, new JobParameters());
System.out.println("Exit Status : " + execution.getStatus());
System.out.println("Exit Status : " + execution.getAllFailureExceptions());
} catch (Exception e) {
e.printStackTrace();
}
System.out.println("Done");
}
}
Step 4- Create FileReader class
package com.test.siddhu.SpringBatchExample;
public class FileReader {
int id;
String siddhu;
public int getId() {
return id;
}
public void setId(int id) {
this.id = id;
}
public String getSiddhu() {
return siddhu;
}
public void setSiddhu(String siddhu) {
this.siddhu = siddhu;
}
}
Ste 5 - Create FileDeletingTasklet to delete cvs files
package com.test.siddhu.SpringBatchExample.tasklet;
import java.io.File;
import org.springframework.batch.core.StepContribution;
import org.springframework.batch.core.UnexpectedJobExecutionException;
import org.springframework.batch.core.scope.context.ChunkContext;
import org.springframework.batch.core.step.tasklet.Tasklet;
import org.springframework.batch.repeat.RepeatStatus;
import org.springframework.beans.factory.InitializingBean;
import org.springframework.core.io.Resource;
import org.springframework.util.Assert;
public class FileDeletingTasklet implements Tasklet, InitializingBean {
private Resource directory;
public void afterPropertiesSet() throws Exception {
Assert.notNull(directory, "directory must be set");
}
public RepeatStatus execute(StepContribution contribution, ChunkContext chunkContext) throws Exception {
File dir = directory.getFile();
Assert.state(dir.isDirectory());
File[] files = dir.listFiles();
for (int i = 0; i < files.length; i++) {
boolean deleted = files[i].delete();
if (!deleted) {
throw new UnexpectedJobExecutionException("Could not delete file " + files[i].getPath());
} else {
System.out.println(files[i].getPath() + " is deleted!");
}
}
return RepeatStatus.FINISHED;
}
public Resource getDirectory() {
return directory;
}
public void setDirectory(Resource directory) {
this.directory = directory;
}
/*public void afterPropertiesSet() throws Exception {
// TODO Auto-generated method stub
}
public RepeatStatus execute(StepContribution arg0, ChunkContext arg1) throws Exception {
// TODO Auto-generated method stub
return null;
}*/
}
Note :- when ever you want to see the out out file full of data keep your all files from bk folder to input folder else you will get created cvs file as 0 size.
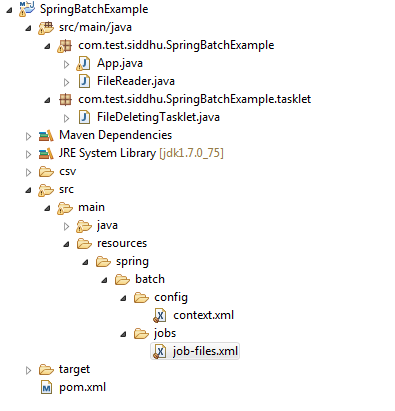
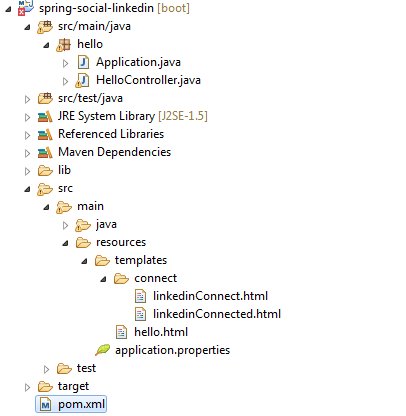
Folder Structure of Project
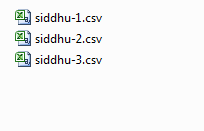
Inside input folder
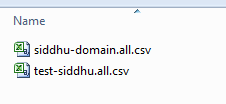
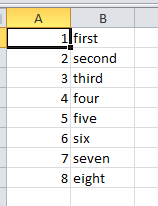
Final output