Tuesday, October 27, 2015

Deploying project war file from Jenkins to Tomcat

Step 0. Prerequisites
I assume that we already Tomcat, Jenkins up and running and have administrator privileges along with to have set up a job in Jenkins that produces a war file.

Step 1. Install Jenkins plugin
Open your favorite browser and navigate to Jenkins. Log in and select “Manage Jenkins” followed by “Manage Plugins”. Select the “Available” tab, locate the “Deploy to container” plugin and install it. site: https://wiki.jenkins-ci.org/display/JENKINS/Deploy+Plugin
Step 2. Edit tomcat-users.xml of Tomcat to create user for
To deploy war file in tomcat we need a tomcat user who has this permission. For that we to add a user with the role manager-script. To do so, edit the file ../conf/tomcat-users.xml and add the following line:
Step 3. Create a new Jenkin Job
In Jenkin we would required to have “Deploy war/ear to a container” this option from “Add post-build action” dropdown button. By Default this option is not available in Jenkin. To have this option we had already deployed “Deploy to container” plugin. site: https://wiki.jenkins-ci.org/display/JENKINS/Deploy+Plugin
Back in Jenkins, go to your job and select “Configure”. Next, scroll down to the bottom of the page to the “Post-build Actions”. Select the option “Deploy war/ear to a container” from the “Add post-build action” dropdown button. Fill in the new fields, e.g.:
jenkins-tomcat
Image_1
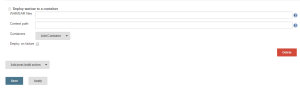
For WAR/EAR files we can use wild cards, e.g. **/*.war.
else we need to give the path like "target/NAME_OF_OUR_WAR_FILE.war"
The context path is the context path part of the URL under which your application will be published in Tomcat. i.e. in our case it is gwt-maven-plugin
Select the appropriate Tomcat version from the Container dropdown box.
Add the user name and password for the manager’s user name and password that we had entered in the tomcat-users.xml file.
The Tomcat URL is the base URL through which your Tomcat instance can be reached.
Image_2

save the configuration
Step 4. Run the Job and check catalina out log and we can see the new build is deployed just access the build and reconfirm everything is working fine.(e.g., http://localhost:8181/gwt-maven-plugin), we should be able to open our freshly deployed application.

Monday, October 26, 2015

Configuring Jenkin tool for check out of Code from SVN and Building Maven GWT application.

Lets now try to configure Maven where in we will first check out the Code from SVN and then run our Maven script to create deployment component.
Step 1:Creat a new Item as shown in the belwo figure
Image1


Step 2:- Add subversion information in it
Image2
Step 3:- Add information for Maven build


Image3


Step 4:- Finally build the iteam as you can see in console out put we will see first the code is check out by SVN from our SVN server and then finally it is build
Image4 Image5

Configuring Jenkin tool for Building Maven GWT application.

We assume that you had already installed JDK, Jenkins and Maven in your build machine. If not please install Maven from https://maven.apache.org/download.cgi
Please refer to the below screen for configuring Maven Build for Jenkin.
Step 1: - First click on New Item and fill the necessary information as shown in below screen
Image_1

Ste2: Click on Ok button and fill the necessary information as shown below:
Image_2
Set actual path of pom.xml
Image_3
Click on save button
Click on Build project and check the out out by clicking on console output.
Image_4 Image_5
If you did not set Maven in the hudson/jenking then you need to set it first time see below screen to do the same.
As you set the path for JDK in same fashion give the path till which maven in installed.

How to Create, Compile and Run GWT applicaiton using Maven and Eclipse

Step 1:- Make sure you had already installed Apache MAVEN in your machine. We can download Apache MAVEN from https://maven.apache.org/download.cgi
Once you installed Apache MAVEN you will be able to see this folder structure.
Image_1

Step 2- Make sure you have installed m2eclipse plugin for Eclipse. Once you installed this in ecplise you will be able to right click and then run and debug the application while running it as Maven projects. In STS IDe it is by default available.
The goal of the m2ec project is to provide a first-class Apache Maven support in the Eclipse IDE, making it easier to edit Maven's pom.xml, run a build from the IDE and much more.
Source: http://eclipse.org/m2e/
Step 3:- Install gwt maven plugin gwt-maven-plugin-2.7.0.jar download the same from the http://mvnrepository.com/artifact/org.codehaus.mojo/gwt-maven-plugin/2.7.0
First we need to install this plugin before using the same in Eclipse. for doing this use this command.
Go to bin folder of your installed maven
C:\apache-maven-3.2.5\bin>mvn install:install-file -DgroupId=org.codehaus.mojo -DartifactId=gwt-maven-plugin -Dversion=2.7.0 -Dpackaging=jar -Dfile=C:/to_delete/gwt-maven-plugin-2.7.0.jar
Image_2
=============You will see following message ===================================
C:\apache-maven-3.2.5\bin>mvn install:install-file -DgroupId=org.codehaus.mojo -DartifactId=gwt-maven-plugin -Dversion=2.7.0 -Dpackaging=jar -Dfile=C:/to_delete/gwt-maven-plugin-2.6.0-rc1.jar
[INFO] Scanning for projects...
[INFO]
[INFO] ------------------------------------------------------------------------
[INFO] Building Maven Stub Project (No POM) 1
[INFO] ------------------------------------------------------------------------
[INFO]
[INFO] --- maven-install-plugin:2.4:install-file (default-cli) @ standalone-pom ---
[INFO] Installing C:\to_delete\gwt-maven-plugin-2.7.0.jar to C:\Users\XXXX\.m2\repository\org\codehaus\mojo\gwt-maven-plugin\2.7.0\gwt-maven-plugin-2.7.0.jar
[INFO] Installing C:\Users\XXXX\AppData\Local\Temp\mvninstall1372865269736446628.pom to C:\Users\XXXX\.m2\repository\org\codehaus\mojo\gwt-maven-plugin\2.7.0\gwt-maven-plugin-2.7.0.pom
[INFO] ------------------------------------------------------------------------
[INFO] BUILD SUCCESS
[INFO] ------------------------------------------------------------------------
[INFO] Total time: 0.995 s
[INFO] Finished at: 2015-10-26T12:25:25+05:30
[INFO] Final Memory: 6M/119M
[INFO] ------------------------------------------------------------------------

Step 4:- Restart your eclipse and create a new MAven Project
right click --> new --> other -->Maven -->Maven Project-->Next-->Select our Maven installed files (refer to the below image)-->Fill all necessary information and
Image_3 Image_4 Image_5
Step 5:- After this project wil be created in Eclipse as shown below
Image_6
Step 6:- In our created project we found that their is no GreetingServiceAsync . We must generate them by triggering a Maven command or let Maven generate them automatically for you.i.e. gwt:generateAsync
right click on proect-->Run configuration --> inside MAven--> see below screen and click run
Image_7
on success we will see this on console prompt
[INFO] Scanning for projects...
[INFO]
[INFO] ------------------------------------------------------------------------
[INFO] Building GWT Maven Archetype 0.0.1-SNAPSHOT
[INFO] ------------------------------------------------------------------------
[INFO]
[INFO] --- gwt-maven-plugin:2.7.0:generateAsync (default-cli) @ gwt-maven-plugin ---
[INFO] ------------------------------------------------------------------------
[INFO] BUILD SUCCESS
[INFO] ------------------------------------------------------------------------
[INFO] Total time: 1.684 s
[INFO] Finished at: 2015-10-26T14:14:16+05:30
[INFO] Final Memory: 12M/150M
[INFO] ------------------------------------------------------------------------

Step 7:- Finally run install command of maven to create build
right click on proect-->Run configuration --> inside MAven--> see below screen and click run
Image_8
we will get this log.
[INFO] ------------------------------------------------------------------------
[INFO] BUILD SUCCESS
[INFO] ------------------------------------------------------------------------
[INFO] Total time: 41.543 s
[INFO] Finished at: 2015-10-26T14:17:03+05:30
[INFO] Final Memory: 27M/195M
[INFO] ------------------------------------------------------------------------

Deploy our build on tomcat and see the screen
Image_9

Friday, October 16, 2015

Installing Visualsvn server, Accessing it with tortoise svn tutorial & eclipse svn integration

Now lets talk about installing SVN Server and Accessing it with Tortois SVN Client and http/https URL. Finally Lets play with SVN Tortoise client with Eclipse on this SVN Server

Visualsvn server is a subversion server used for software versioning and revision control.
Here we will use visualsvn server as subversion server and tortoise svn as client. Finally we will do eclipse svn integration.
Step 1:- Install SVN Server
Download and install visual svn server from below link and given necessary information as on when ask for directory name where all your repositories will be stored.
visualsvn server download link :- https://www.visualsvn.com/server/download/
Step 2:-Configuring and creating our own SVN Server Repsitory
Once you install Visual SVN Server we will be able to see the below screen.
Right click on and select Create New Repository option and follow the wizard. When asked enter your Repsitory Name and at the end of wizard we will get url for now copy that url.
https://My-PC/svn/Siddhu_SVN_Server_Repository

Image_1
Step 3:- Now create project structure for uploading the files.
right click on step1 created repository --> New --> Project Structure

Image_2
Enter project name
Image_3
Finally we will be able to see this structure of our Repository Screen

Image_4
Step 4:- If needed you can also create user that can access your repository i.e. Now Right Click on Users –> Create New User –> Enter all the details and press ok.
From here we had installed our SVN Server and now its time to see are we able to access the repository. For that
https://My-PC/svn/Siddhu_SVN_Server_Repository
We will be able to see this screen

Image_5
Step 5:- Performing check in and check out option with SVN Tortoise Client.
Before staring I preassume that we had already installed Tortose SVN in our window machine. While I was writting this blog latest version was TortoiseSVN 1.9.2 for 64 bit O/S.
Site to download :- http://tortoisesvn.net/downloads.html
Just create a folder in your window machine where we want the code to be check out. At present we dont have anything in the respository so nothing will be copied. Just right click and select SVN check out below url https://My-PC/svn/Siddhu_SVN_Server_Repository/Siddhu_SVN_Server_First_Project and click ok
Image_6
We will see all the three folder in it.

Image_7
Lets add few files in our repository now. Copy some files i.e.txt files in side trunk folder and right click it and select add option in SVN client and then commit it.
We will be able to see this file in
Image_8

Image_9

Image_10
Step 6:- Install SubVersion Eclipse Plugin
First install eclipse plugin from below link.
http://subclipse.tigris.org/
After the installation we will be able to see the SVN repository view. Right Click on this prospective and click on "Repository Location". Fill below url that is created for our project.
https://My-PC/svn/Siddhu_SVN_Server_Repository/
Finally we will be able to see this screen

Image_11
Step 7:- Performing check in and checkout operation using eclipse.
Now lets do the final operation of doing check in and check out from eclipse.
just follow below steps for GWT Project

1- right click --> New -- > Other --> SVN --> Check out project from SVN.
Image_12


2- Select SVN branch
Image_13


3- Select branch and click finish
Image_14

4- Then follow step for GWT project and we will see below screen.
Image_15

For Reference use below site:-
http://www.technonutty.com/2014/05/visual-svn-server-tortoise-svn-eclispse.html

Step to set up Tortoise SVN Repository on Windows Machine

I had used many repository sub version on windows, linux etc but I agree SVN specially Tortose SVN is one of the best among all.
As a repository manager or developer we need to do small changes and we are all set to use our Sub repository system.
Lets now implement force and set our own SVN repository and Project on Window. Please follow belwo step to do the same
Before staring i preassume that we had already installed Tortose SVN in our window machine. While I was writting this blog latest version was TortoiseSVN 1.9.2 for 64 bit O/S.
Site to download :- http://tortoisesvn.net/downloads.html
Step 1:- Let say my project name is GWT_Project. So first create C:\SVN_TORTOISE_REPOSITORY\GWT_Project
Step 2:- Right Click on your GWT_Project and click on "Create Repository here".
Image_1
This converts C:\SVN_TORTOISE_REPOSITORY\GWT_Project into a repository with the following contents.
Image_2
Step 3. Initial import. Somewhere in your hard drive (e.g. in C:\temp) create a directory (e.g. \new) with the following three subdirectories. You can also use your own naming convention i.e. instare of temp give temp_ProjName and instead of new given new_ProjName
C:\temp\new\branches
C:\temp\new\tags
C:\temp\new\trunk
Move the contents of C:\SVN_TORTOISE_REPOSITORY\GWT_Project into the trunk subdirectory (C:\temp\new\trunk).
Now right click on above "new" created folder and select import option.
Image_3
Selelect URL as file:///C:/SVN_TORTOISE_REPOSITORY/GWT_Project
Image_4
Right-click on C:\SVN_TORTOISE_REPOSITORY\GWT_Project and start TortoiseSVN/Repo-browser and you will be able to see your code in trunk.

Step 4. Creating a working directory. This is simple just create your folder and right click and use the option as check out
Image_5

It is done :)...
Explore more for Tortos SVN from belwo sites
http://tortoisesvn.net/