Lets try to build an website using AngularJS2. Generally in website we had top, left, bottm and central part.
We will try to create the same UI with the help of AngularJS2. In addition in this example we will also try to use some of the external ui component.
There are many ui component available with open source for angularjs2. We will try to use Angular Material 2
https://material.angular.io/
- Angular Material 2
- Fuel-UI
- Kendo UI
- ng-bootstrapng-lightning
- ng2-bootstrap
- Onsen UI
- Prime Faces
- Semantic UI
- Vaadin
We are using Tool Like
1- Eclipse
2- Oracle DB
3- SoapUI for mocking SOAP Service
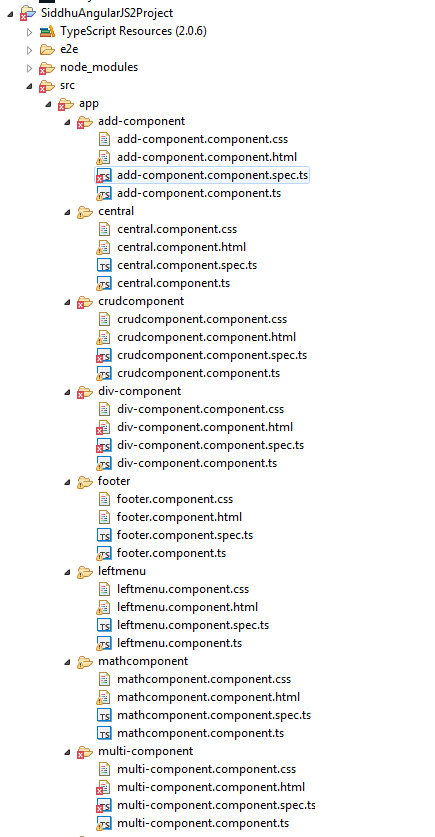
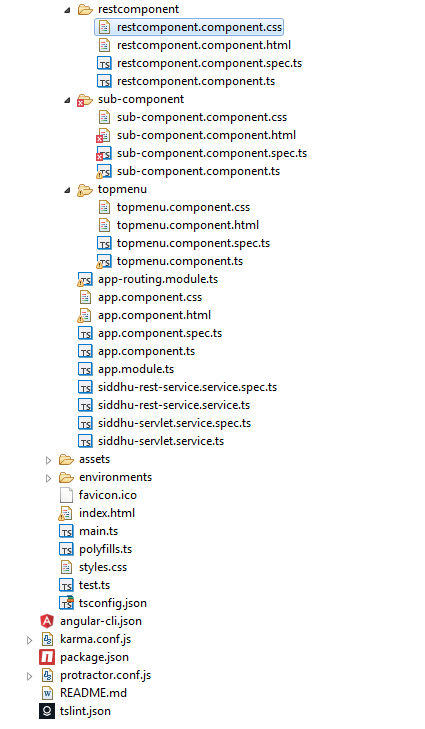
Step 1:- Create an AngularJS2 project using eclipse
STep 2:- Distribute main pages in to following component
1- Top
2- Bottom
3- Left
4- Cetral
As angularjs2 is component base best way is to have sapare component for each above file. We can create above component using eclipse angularjs2 plugin.
Step 3:- Let create items in our left menu i.e we had created three items
1- Math
2- SOAP & REST web service call
3- CURD
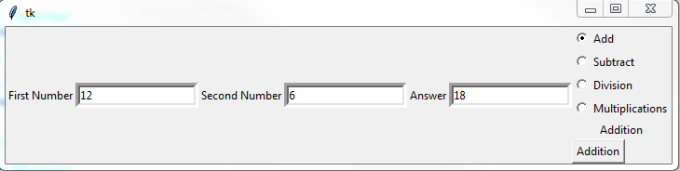
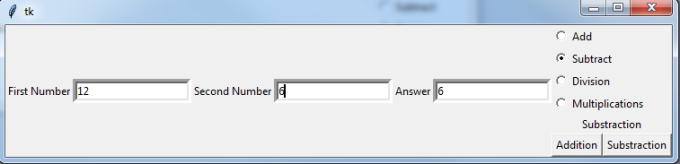
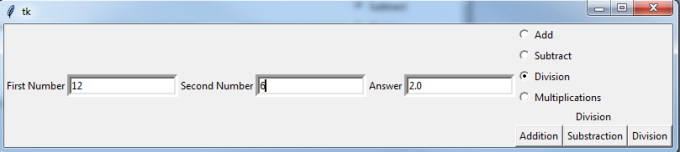
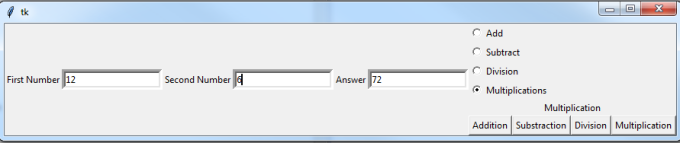
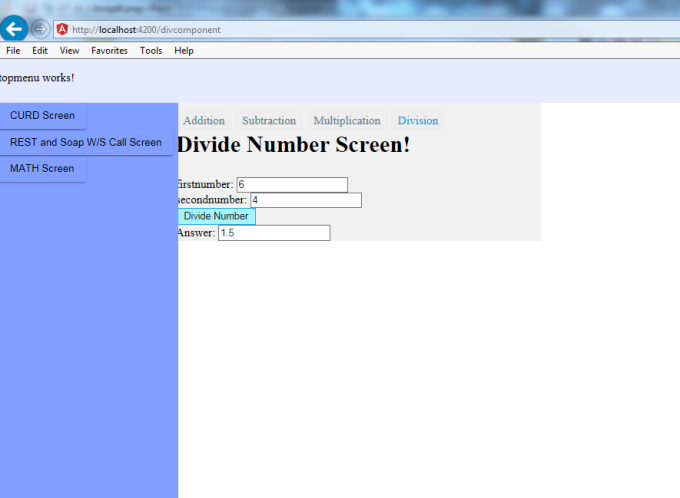
Our intension is when the user click on Math left menu item ..our math screen will be displayed at the central part which contain operation like add, sub, div and multiplication.Similary when the user click on SOAP & REST web service call they will be presented with REST and SOAP w/S call screen at the center.
Step 4:- For REST JSON we are using
http://services.groupkt.com/country/get/all
http://services.groupkt.com/country/get/iso2code/IN
Step 5:- For SOAP we are using SOAPUI tool to mock up our request.
Code:-
1- app.module.ts
import { BrowserModule } from '@angular/platform-browser';
import { NgModule } from '@angular/core';
import { FormsModule } from '@angular/forms';
import { HttpModule } from '@angular/http';
import { AppComponent } from './app.component';
import { TopmenuComponent } from './topmenu/topmenu.component';
import { LeftmenuComponent } from './leftmenu/leftmenu.component';
import { FooterComponent } from './footer/footer.component';
import { CentralComponent } from './central/central.component';
import {MaterialModule} from '@angular/material';
import { AppRoutingModule } from './app-routing.module';
import 'hammerjs';
import { CrudcomponentComponent } from './crudcomponent/crudcomponent.component';
import { AddComponentComponent } from './add-component/add-component.component';
import { SubComponentComponent } from './sub-component/sub-component.component';
import { DivComponentComponent } from './div-component/div-component.component';
import { MultiComponentComponent } from './multi-component/multi-component.component';
import { MathcomponentComponent } from './mathcomponent/mathcomponent.component';
import { SiddhuServletService } from './siddhu-servlet.service';
import { SiddhuRestServiceService } from './siddhu-rest-service.service';
import { RestcomponentComponent } from './restcomponent/restcomponent.component';
@NgModule({
declarations: [
AppComponent,
TopmenuComponent,
LeftmenuComponent,
FooterComponent,
CentralComponent,
CrudcomponentComponent,
AddComponentComponent,
SubComponentComponent,
DivComponentComponent,
MultiComponentComponent,
MathcomponentComponent,
RestcomponentComponent
],
imports: [
BrowserModule,
FormsModule,
HttpModule,
MaterialModule.forRoot(),
AppRoutingModule
],
providers: [SiddhuServletService, SiddhuRestServiceService],
bootstrap: [AppComponent]
})
export class AppModule { }
2- app.component.ts
import { Component } from '@angular/core';
@Component({
selector: 'app-root',
templateUrl: './app.component.html',
styleUrls: ['./app.component.css']
})
export class AppComponent {
title = 'AngularJS2 Example showing Top, Left, Footer and Central Part';
}
3- app.component.html
For code refer to this site
https://shdhumale.wordpress.com/2017/02/06/creating-simple-angularjs2-project-having-topmenu-leftmenu-footer-and-central-part/
4- app.component.css
html, body {
height:100%;
margin:0;
padding:0;
}
.content {
margin-top: 60px;
background: pink;
height: 100%;
width: 500px;
}
5- app-routing.module.ts
import { NgModule } from '@angular/core';
import { RouterModule, Routes } from '@angular/router';
import { CrudcomponentComponent } from './crudcomponent/crudcomponent.component';
import { AddComponentComponent } from './add-component/add-component.component';
import { SubComponentComponent } from './sub-component/sub-component.component';
import { DivComponentComponent } from './div-component/div-component.component';
import { MultiComponentComponent } from './multi-component/multi-component.component';
import { MathcomponentComponent } from './mathcomponent/mathcomponent.component';
import { RestcomponentComponent } from './restcomponent/restcomponent.component';
const routes: Routes = [
{ path: 'crudcomponent', component: CrudcomponentComponent },
{ path: 'addcomponent', component: AddComponentComponent },
{ path: 'subcomponent', component: SubComponentComponent },
{ path: 'divcomponent', component: DivComponentComponent },
{ path: 'multicomponent', component: MultiComponentComponent },
{ path: 'mathcomponent', component: MathcomponentComponent },
{ path: 'restcomponent', component: RestcomponentComponent }
];
@NgModule({
imports: [ RouterModule.forRoot(routes) ],
exports: [ RouterModule ]
})
export class AppRoutingModule {}
- Top Menu
6- topmenu.component.ts
import { Component, OnInit } from '@angular/core';
@Component({
selector: 'app-topmenu',
templateUrl: './topmenu.component.html',
styleUrls: ['./topmenu.component.css']
})
export class TopmenuComponent implements OnInit {
constructor() { }
ngOnInit() {}
}
7- topmenu.component.html
For code refer to this site
https://shdhumale.wordpress.com/2017/02/06/creating-simple-angularjs2-project-having-topmenu-leftmenu-footer-and-central-part/
8- topmenu.component.css
header {
width: 100%;
background: #e6ecff;
position: fixed;
top: 0;
height: 60px !important;
left:0;
}
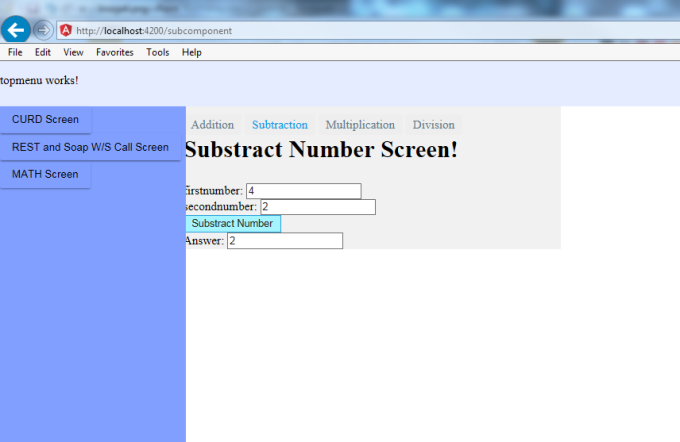
- Sub component
9- sub-component.component.ts
import { Component, OnInit } from '@angular/core';
@Component({
selector: 'app-sub-component',
templateUrl: './sub-component.component.html',
styleUrls: ['./sub-component.component.css']
})
export class SubComponentComponent implements OnInit {
answer : number;
constructor() { }
ngOnInit() {
}
subNumber(firstnumber, secondnumber) {
console.log(firstnumber)
console.log(secondnumber)
var myFirstNumber = +firstnumber
var mySecondNumner = +secondnumber
this.answer = myFirstNumber - mySecondNumner;
console.log(this.answer)
}
getAnswer()
{
return this.answer;
}
}
10- sub-component.component.html
For code refer to this site
https://shdhumale.wordpress.com/2017/02/06/creating-simple-angularjs2-project-having-topmenu-leftmenu-footer-and-central-part/
11- sub-component.component.css
h1 {
font-size: 1.2em;
color: #999;
margin-bottom: 0;
}
h2 {
font-size: 2em;
margin-top: 0;
padding-top: 0;
}
nav a {
padding: 5px 10px;
text-decoration: none;
margin-top: 10px;
display: inline-block;
background-color: #eee;
border-radius: 4px;
}
nav a:visited, a:link {
color: #607D8B;
}
nav a:hover {
color: #039be5;
background-color: #CFD8DC;
}
nav a.active {
color: #039be5;
}
- Rest Component
12- restcomponent.component.ts
import { Component, OnInit } from '@angular/core';
import { SiddhuRestServiceService } from './../siddhu-rest-service.service';
@Component({
selector: 'app-restcomponent',
templateUrl: './restcomponent.component.html',
styleUrls: ['./restcomponent.component.css']
})
export class RestcomponentComponent implements OnInit {
getJSONResponse:string;
getCountryCodeJSONResponse:string;
getSoapWebResponse:string;
constructor(private siddhurestservice: SiddhuRestServiceService) { }
ngOnInit() {
}
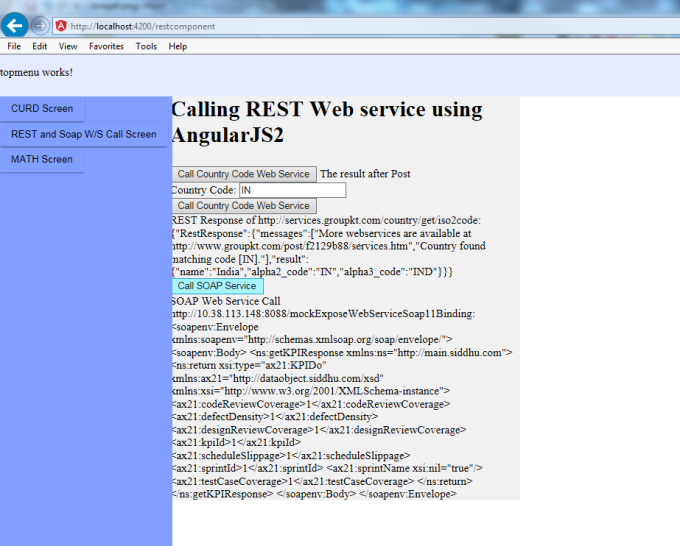
title = 'Calling REST Web service using AngularJS2';
getAllCountry() {
this.siddhurestservice
.getAllCountry().subscribe(
data => this.getJSONResponse = JSON.stringify(data), // put the data returned from the server in our variable
error => console.log("Error HTTP GET Service"), // in case of failure show this message
() => console.log("Job Done Get !")//run this code in all cases
);
}
getIsoofCountry(id : string) {
console.log(id);
this.siddhurestservice
.getIsoofCountry(id).subscribe(
data => this.getCountryCodeJSONResponse = JSON.stringify(data), // put the data returned from the server in our variable
error => console.log("Error HTTP GET Service"), // in case of failure show this message
() => console.log("Job Done Get !")//run this code in all cases
);
}
getSoapResponse() {
this.siddhurestservice
.getSoapResponse().subscribe(
data => this.getSoapWebResponse = data, // put the data returned from the server in our variable
error => console.log("Error HTTP GET Service"), // in case of failure show this message
() => console.log("Job Done Get !")//run this code in all cases
);
}
}
13- restcomponent.component.html
For code refer to this site
https://shdhumale.wordpress.com/2017/02/06/creating-simple-angularjs2-project-having-topmenu-leftmenu-footer-and-central-part/
14- restcomponent.component.css
h1 {
font-size: 1.2em;
color: #999;
margin-bottom: 0;
}
h2 {
font-size: 2em;
margin-top: 0;
padding-top: 0;
}
nav a {
padding: 5px 10px;
text-decoration: none;
margin-top: 10px;
display: inline-block;
background-color: #eee;
border-radius: 4px;
}
nav a:visited, a:link {
color: #607D8B;
}
nav a:hover {
color: #039be5;
background-color: #CFD8DC;
}
nav a.active {
color: #039be5;
}
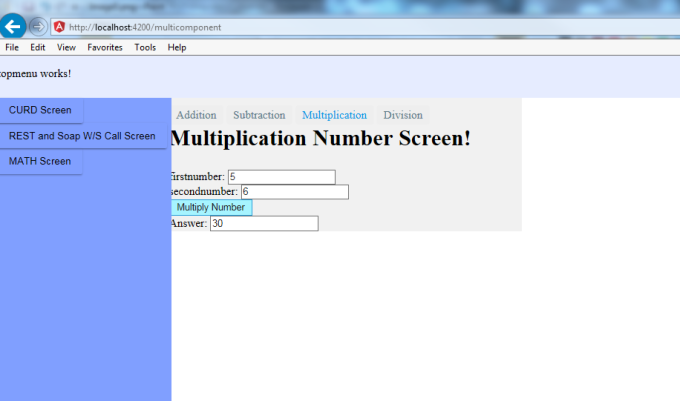
- multi component
15- multi-component.component.ts
import { Component, OnInit } from '@angular/core';
@Component({
selector: 'app-multi-component',
templateUrl: './multi-component.component.html',
styleUrls: ['./multi-component.component.css']
})
export class MultiComponentComponent implements OnInit {
answer : number;
constructor() { }
ngOnInit() {
}
multiNumber(firstnumber, secondnumber) {
console.log(firstnumber)
console.log(secondnumber)
var myFirstNumber = +firstnumber
var mySecondNumner = +secondnumber
this.answer = myFirstNumber * mySecondNumner;
console.log(this.answer)
}
getAnswer()
{
return this.answer;
}
}
16 -multi-component.component.html
For code refer to this site
https://shdhumale.wordpress.com/2017/02/06/creating-simple-angularjs2-project-having-topmenu-leftmenu-footer-and-central-part/
17- multi-component.component.css
h1 {
font-size: 1.2em;
color: #999;
margin-bottom: 0;
}
h2 {
font-size: 2em;
margin-top: 0;
padding-top: 0;
}
nav a {
padding: 5px 10px;
text-decoration: none;
margin-top: 10px;
display: inline-block;
background-color: #eee;
border-radius: 4px;
}
nav a:visited, a:link {
color: #607D8B;
}
nav a:hover {
color: #039be5;
background-color: #CFD8DC;
}
nav a.active {
color: #039be5;
}
- math component
18- mathcomponent.component.ts
import { Component, OnInit } from '@angular/core';
@Component({
selector: 'app-mathcomponent',
templateUrl: './mathcomponent.component.html',
styleUrls: ['./mathcomponent.component.css']
})
export class MathcomponentComponent implements OnInit {
constructor() { }
ngOnInit() {
}
}
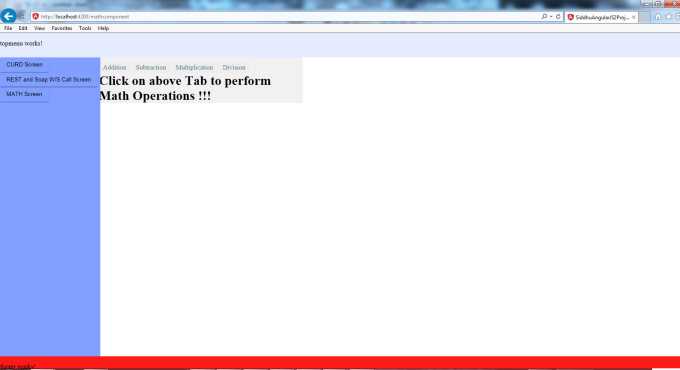
19- mathcomponent.component.html
<!--nav>
<!--a routerLink="/addcomponent" routerLinkActive="active">Addition<!--/a>
<!--a routerLink="/subcomponent" routerLinkActive="active">Subtraction<!--/a>
<!--a routerLink="/multicomponent" routerLinkActive="active">Multiplication<!--/a>
<!--a routerLink="/divcomponent" routerLinkActive="active">Division<!--/a>
<!--/nav>
<!--h2>Click on above Tab to perform Math Operations !!!<!--/h2>
<!--router-outlet><!--/router-outlet>
20- mathcomponent.component.css
h1 {
font-size: 1.2em;
color: #999;
margin-bottom: 0;
}
h2 {
font-size: 2em;
margin-top: 0;
padding-top: 0;
}
nav a {
padding: 5px 10px;
text-decoration: none;
margin-top: 10px;
display: inline-block;
background-color: #eee;
border-radius: 4px;
}
nav a:visited, a:link {
color: #607D8B;
}
nav a:hover {
color: #039be5;
background-color: #CFD8DC;
}
nav a.active {
color: #039be5;
}
- left menu
21 - leftmenu.component.ts
import { Component, OnInit } from '@angular/core';
@Component({
selector: 'app-leftmenu',
templateUrl: './leftmenu.component.html',
styleUrls: ['./leftmenu.component.css']
})
export class LeftmenuComponent implements OnInit {
constructor() { }
ngOnInit() {
}
}
22- leftmenu.component.html
For code refer to this site
https://shdhumale.wordpress.com/2017/02/06/creating-simple-angularjs2-project-having-topmenu-leftmenu-footer-and-central-part/
23- leftmenu.component.css
.sidebar1 {
background: #809fff;
width: 246px;
height: 100%;
top: 60px;
position:fixed;
}
.sidebar1 {
left:0;
}
.example-container {
width: 500px;
}
.example-button-row {
display: flex;
align-items: center;
justify-content: space-around;
}
- Footer
24- footer.component.ts
import { Component, OnInit } from '@angular/core';
@Component({
selector: 'app-footer',
templateUrl: './footer.component.html',
styleUrls: ['./footer.component.css']
})
export class FooterComponent implements OnInit {
constructor() { }
ngOnInit() {
}
}
25- footer.component.html
<!--footer>
<!--p>
footer works!
<!--/p>
<!--/footer>
26- footer.component.css
footer {
width: 100%;
background: #ff1a1a;
position: fixed;
bottom: 0;
height: 30px;
left:0;
}
- div-component
27- div-component.component.ts
import { Component, OnInit } from '@angular/core';
@Component({
selector: 'app-div-component',
templateUrl: './div-component.component.html',
styleUrls: ['./div-component.component.css']
})
export class DivComponentComponent implements OnInit {
answer : number;
constructor() { }
ngOnInit() {
}
divideNumber(firstnumber, secondnumber) {
console.log(firstnumber)
console.log(secondnumber)
var myFirstNumber = +firstnumber
var mySecondNumner = +secondnumber
this.answer = myFirstNumber / mySecondNumner;
console.log(this.answer)
}
getAnswer()
{
return this.answer;
}
}
28- div-component.component.html
For code refer to this site
https://shdhumale.wordpress.com/2017/02/06/creating-simple-angularjs2-project-having-topmenu-leftmenu-footer-and-central-part/
29- div-component.component.css
h1 {
font-size: 1.2em;
color: #999;
margin-bottom: 0;
}
h2 {
font-size: 2em;
margin-top: 0;
padding-top: 0;
}
nav a {
padding: 5px 10px;
text-decoration: none;
margin-top: 10px;
display: inline-block;
background-color: #eee;
border-radius: 4px;
}
nav a:visited, a:link {
color: #607D8B;
}
nav a:hover {
color: #039be5;
background-color: #CFD8DC;
}
nav a.active {
color: #039be5;
}
-Crud Component
30- crudcomponent.component.ts
import { Component, OnInit } from '@angular/core';
import { SiddhuServletService } from './../siddhu-servlet.service';
@Component({
selector: 'app-crudcomponent',
templateUrl: './crudcomponent.component.html',
styleUrls: ['./crudcomponent.component.css']
})
export class CrudcomponentComponent implements OnInit {
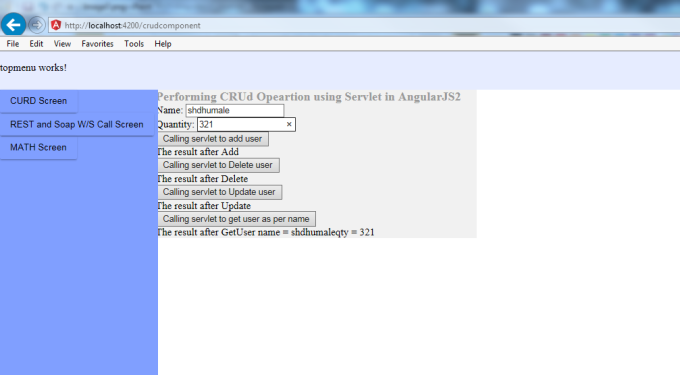
title = 'Performing CRUd Opeartion using Servlet in AngularJS2';
getServletAddResponse:string;
getServletDeleteResponse:string;
getServletUpdateResponse:string;
getServletGetResponse:string;
constructor(private siddhuservletservice: SiddhuServletService) { }
ngOnInit() {
}
addProduct(method:string, name:string, qty:string) {
console.log('updateUser-'+method);
console.log('deleteUser-'+name);
console.log('deleteUser-'+qty);
this.siddhuservletservice
.addProduct(method, name, qty).subscribe(
data => this.getServletAddResponse = data, // put the data returned from the server in our variable
error => console.log("Error HTTP GET Service"), // in case of failure show this message
() => console.log("Add Job Done Get !")//run this code in all cases
);
}
deleteProduct(method:string, name:string, qty:string) {
console.log('updateUser-'+method);
console.log('deleteUser-'+name);
console.log('deleteUser-'+qty);
this.siddhuservletservice
.deleteProduct(method, name).subscribe(
data => this.getServletDeleteResponse = data, // put the data returned from the server in our variable
error => console.log("Error HTTP GET Service"), // in case of failure show this message
() => console.log("Delete Job Done Get !")//run this code in all cases
);
}
updateProduct(method:string, name:string, qty:string) {
console.log('updateUser-'+method);
console.log('updateUser-'+name);
console.log('updateUser-'+qty);
this.siddhuservletservice
.updateProduct(method, name,qty).subscribe(
data => this.getServletUpdateResponse = data, // put the data returned from the server in our variable
error => console.log("Error HTTP GET Service"), // in case of failure show this message
() => console.log("Update Job Done Get !")//run this code in all cases
);
}
getProduct(method:string, name:string) {
console.log('updateUser-'+method);
console.log('deleteUser-'+name);
this.siddhuservletservice
.getProduct(method, name).subscribe(
data => this.getServletGetResponse = data, // put the data returned from the server in our variable
error => console.log("Error HTTP GET Service"), // in case of failure show this message
() => console.log("Get Job Done Get !")//run this code in all cases
);
}
}
31- crudcomponent.component.html
For code refer to this site
https://shdhumale.wordpress.com/2017/02/06/creating-simple-angularjs2-project-having-topmenu-leftmenu-footer-and-central-part/
32- crudcomponent.component.css
h1 {
font-size: 1.2em;
color: #999;
margin-bottom: 0;
}
h2 {
font-size: 2em;
margin-top: 0;
padding-top: 0;
}
nav a {
padding: 5px 10px;
text-decoration: none;
margin-top: 10px;
display: inline-block;
background-color: #eee;
border-radius: 4px;
}
nav a:visited, a:link {
color: #607D8B;
}
nav a:hover {
color: #039be5;
background-color: #CFD8DC;
}
nav a.active {
color: #039be5;
}
- Central
33- central.component.ts
import { Component, OnInit } from '@angular/core';
@Component({
selector: 'app-central',
templateUrl: './central.component.html',
styleUrls: ['./central.component.css']
})
export class CentralComponent implements OnInit {
constructor() { }
ngOnInit() {
}
}
34- central.component.html
For code refer to this site
https://shdhumale.wordpress.com/2017/02/06/creating-simple-angularjs2-project-having-topmenu-leftmenu-footer-and-central-part/
35- central.component.css
#scrollable2 {
background:#f1f1f1;
height: 100%;
min-width: 300px;
margin-left: 47%;
margin-right: 100px;
width:100%;
}
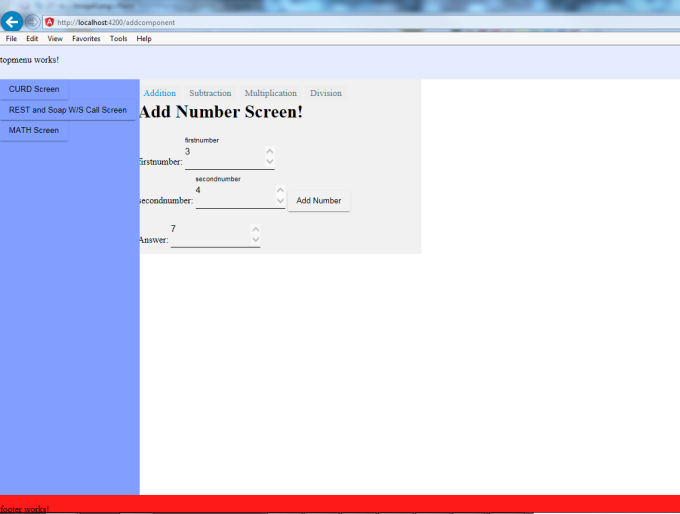
- add-component
36- add-component.component.ts
import { Component, OnInit } from '@angular/core';
//import { NumberEnter } from './number-enter';
@Component({
selector: 'app-add-component',
templateUrl: './add-component.component.html',
styleUrls: ['./add-component.component.css']
})
export class AddComponentComponent implements OnInit {
answer : number;
constructor() { }
ngOnInit() {
}
addNumber(firstnumber, secondnumber) {
console.log(firstnumber)
console.log(secondnumber)
var myFirstNumber = +firstnumber
var mySecondNumner = +secondnumber
this.answer = myFirstNumber + mySecondNumner;
console.log(this.answer)
}
getAnswer()
{
return this.answer;
}
}
37- add-component.component.html
For code refer to this site
https://shdhumale.wordpress.com/2017/02/06/creating-simple-angularjs2-project-having-topmenu-leftmenu-footer-and-central-part/
38- add-component.component.css
h1 {
font-size: 1.2em;
color: #999;
margin-bottom: 0;
}
h2 {
font-size: 2em;
margin-top: 0;
padding-top: 0;
}
nav a {
padding: 5px 10px;
text-decoration: none;
margin-top: 10px;
display: inline-block;
background-color: #eee;
border-radius: 4px;
}
nav a:visited, a:link {
color: #607D8B;
}
nav a:hover {
color: #039be5;
background-color: #CFD8DC;
}
nav a.active {
color: #039be5;
}
39- siddhu-servlet.service.ts
import { Injectable } from '@angular/core';
import {Http, Response, Headers, Request, RequestOptions, RequestMethod, URLSearchParams} from '@angular/http';
import { Observable } from 'rxjs/Observable';
import 'rxjs/add/operator/map';
import 'rxjs/add/operator/toPromise';
import 'rxjs/Rx';
@Injectable()
export class SiddhuServletService {
private getServletUrl = 'http://localhost:8181/CRUDUsingAngularJS/AngularJSServlet'; // URL to web api
constructor(private _http: Http) {
}
//To Add User in the database.
addProduct(method: string, name: string, qty: string){
let params: URLSearchParams = new URLSearchParams();
params.set('method', method);
params.set('name', name);
params.set('qty', qty);
//const url = `${this.getServletUrl}/${id}`;
return this._http.get(this.getServletUrl, {
search: params
})
.map(response => response.text());
}
//To Delete in the database.
deleteProduct(method: string, name: string){
// const deleteServlerURL = `${this.getServletUrl}/${name}`;
let params: URLSearchParams = new URLSearchParams();
params.set('method', method);
params.set('name', name);
return this._http.get(this.getServletUrl, {
search: params
})
.map(response => response.text());
}
//To Update in the database.
updateProduct(method: string, name: string,qty: string){
let params: URLSearchParams = new URLSearchParams();
params.set('method', method);
params.set('name', name);
params.set('qty', qty);
return this._http.get(this.getServletUrl, {
search: params
})
.map(response => response.text());
}
//To getUser from id from the database.
getProduct(method: string, name: string){
//const getUserServlerURL = `${this.getServletUrl}/${name}`;
let params: URLSearchParams = new URLSearchParams();
params.set('method', method);
params.set('name', name);
return this._http.get(this.getServletUrl, {
search: params
})
.map(response => response.text());
}
}
40- siddhu-rest-service.service.ts
import { Injectable } from '@angular/core';
import {Http, Response, Headers, Request, RequestOptions, RequestMethod, URLSearchParams} from '@angular/http';
import { Observable } from 'rxjs/Observable';
import 'rxjs/add/operator/map';
import 'rxjs/add/operator/toPromise';
import 'rxjs/Rx';
@Injectable()
export class SiddhuRestServiceService {
private headers = new Headers({'Content-Type': 'application/json'});
private getAllUrl = 'http://services.groupkt.com/country/get/all'; // URL to web api
private getISOCode = 'http://services.groupkt.com/country/get/iso2code';
private getSoapResponseurl = 'http://10.38.113.148:8088/mockExposeWebServiceSoap11Binding';
private body:
string = `<!--soapenv:Envelope xmlns:soapenv="http://schemas.xmlsoap.org/soap/envelope/" xmlns:main="http://main.siddhu.com">
<!--soapenv:Header/>
<!--soapenv:Body>
<!--main:getKPI>
<!--main:sprintId>1<!--/main:sprintId>
<!--/main:getKPI>
<!--/soapenv:Body>
<!--/soapenv:Envelope>`;
constructor(private _http: Http) {
}
// getAllCountry(): Promise<{}> {
getAllCountry(){
/* console.log(this._http.get(this.getAllUrl)
.toPromise()
.then(response => response.json())
.catch(this.handleError));*/
// .map(response => response.json()));
/* return this._http.get(this.getAllUrl)
.toPromise()
.then(response => response.json().data)
.catch(this.handleError);*/
return this._http.get(this.getAllUrl)
.map(response => response.json());
}
// getIsoofCountry(id: string): Promise<{}> {
getIsoofCountry(id: string) {
const url = `${this.getISOCode}/${id}`;
/* console.log(this._http.get(url)
.toPromise()
.then(response => response.json())
.catch(this.handleError));*/
/*return this._http.get(url)
.toPromise()
.then(response => response.json().data)
.catch(this.handleError);*/
return this._http.get(url)
.map(response => response.json());
}
/* getSoapResponse(){
return this._http.get(this.getSoapResponseurl)
.map(response => response);
return this._http.get(this.getSoapResponseurl).map(res => {
let xmlresult = res.text();
console.log(xmlresult);
console.log(res.text());
return xmlresult;
});
}*/
getSoapResponse(){
let options = new RequestOptions({
method: RequestMethod.Post,
url: this.getSoapResponseurl,
body: this.body
});
return this._http.request(new Request(options))
.map(this.extractData);
}
private extractData(res: Response) {
let body = res.text();
console.log(res.toString());
console.log(body);
return body;
}
private handleError(error: any) {
console.error(error);
return Observable.throw(error.json().error || 'Server error');
}
//using promise
/*
* getHeroes(): Promise {
return this.http.get(this.heroesUrl)
.toPromise()
.then(response => response.json().data as Hero[])
.catch(this.handleError);
}
getHero(id: number): Promise {
const url = `${this.heroesUrl}/${id}`;
return this.http.get(url)
.toPromise()
.then(response => response.json().data as Hero)
.catch(this.handleError);
}
*/
}
For proper ui we had used AngularJS Material design in only one screen of add functionality
Screen shot:-