Friday, January 10, 2020

Elastic Search

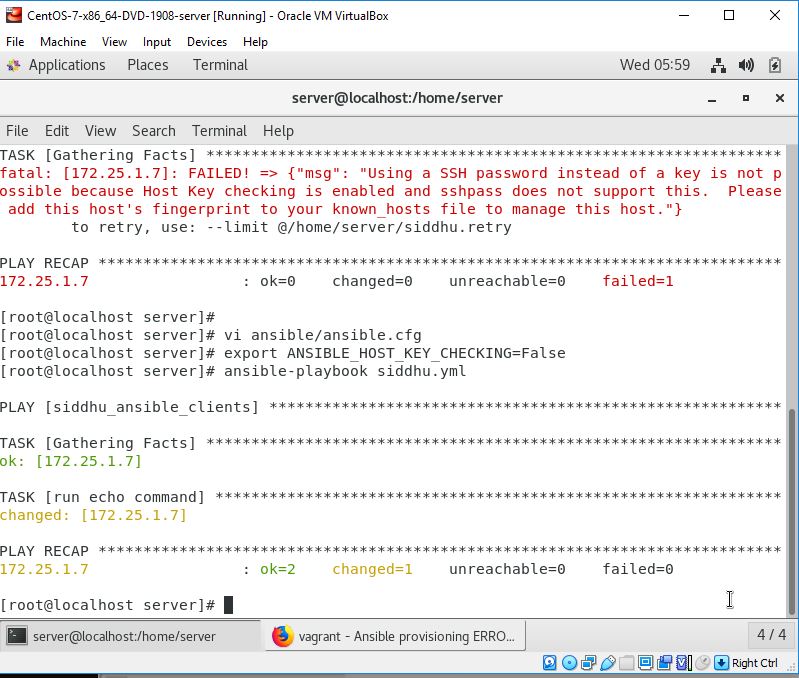
Searching data from UI is one of the main functionality of any application. In case of usig RDBMS as DB for small amount of data we can handle it with SQL query. But when we move to bigdata or nosql DB in that case we need some mechanism through which we can perform Search operation with less cost on performance.
For this purpose we have a beautiful Lucene API. Lucene is created by the founder of Hadoop DB. Lucene is a search engine packaged together in a set of jar files. There are many such search which was build taking base Lucene as base/core heart of search engine Elastic , Solr etc are one of them.
In this blog item we will discuss about Elastic Search engine. But before going in details lets discuss something related to nosql DB. As the name suggest NOSQL DB means this type of DB cannot be queried using query language. In this type of DB data is stored in form of Document and hence it is called as document-base database. This means data is stored in form of document i.e. JSON or XML as documents.
When we discuss about the NOSQL for searching we use Indexing concept.
Index concept is similar to what we have in SQL DB. As you might be knowing we have index in every book. When ever we want to search for any particular topic we find that in index page and then from there we find its particular page. This way it become easy for us to find the required information easily. Same concept is used in performing Index in SQL and NOSQL.
Indexing means -- > Page to words
Inverted indexing means --> Word to Pages
In case of document-base NOSQL with in term of data model DATA is stored in form of documents. Index is made on that documents and each document is made of many fields
in short
Index --> Many documents --> Fields
Further Documents can be classified logical into groups called as Mapping type using Mapping Definitions
Documents --> Mapping Type --> Using Mann Mapping Types
In simple language related to SQL we Index is a database, Type is a table, Documents is record in that table and Fields is table column.
Now lets discuss about Elastic Search. Elastic search engine work on Lucene engine or jar files. It provide additional functionality over the top of Lucene engine. Elastic search comes into the market in late 2010 and with in few years has capture its position on top 3 search engine. It store the data in the form of JSON. It provide rich JAVA REST API to access and perform CRUD operation on data stored as JSON document form. Lets see below example in which we perform CRUD operation on the elastic search.

1- you need to download Elastic search from https://www.elastic.co/downloads/elasticsearch
Download appropriate version depending on your O/S we are using Windows and hence downloading https://artifacts.elastic.co/downloads/elasticsearch/elasticsearch-7.5.1-windows-x86_64.zip
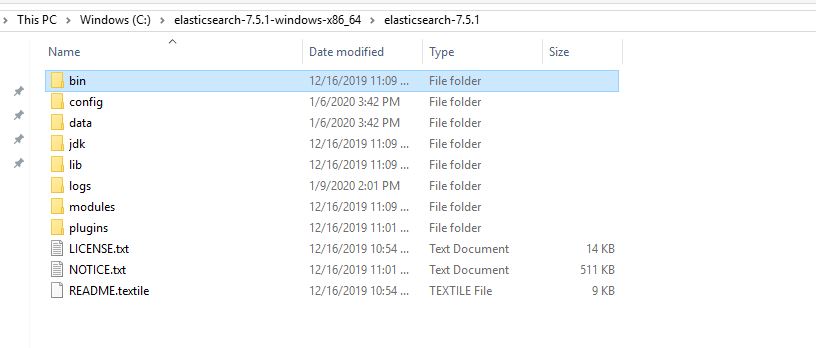
2- Unzip and you will get follwing folder

Image1
3- Set Environment Variable:-
PATH = C:\elasticsearch-7.5.1-windows-x86_64\elasticsearch-7.5.1\bin
4- Start the Engine using below commands
C:\elasticsearch-7.5.1-windows-x86_64\elasticsearch-7.5.1\bin\elasticsearch.bat
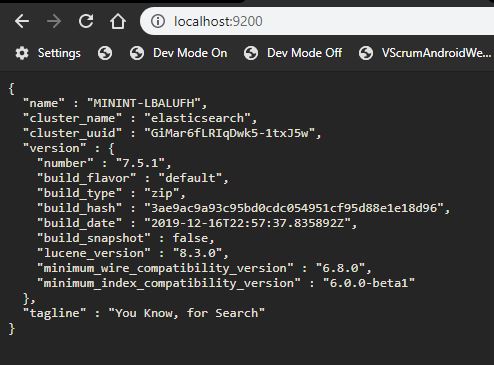
Once the server is started hit this url on the browser http://localhost:9200 and you will get below screen.
Image2
Now lets try to perform some of the CRUD operation on Elastic Search engine using POSTMAN tool. AS we know we can fire http REST API call using Postman and can get and manupulate response properly. You can also use SoapUi if needed for the same.
Few this that we need to upderstand when making query using REST call we need to follow fews rules
1- Our request should always follow this patter
http://myserver:portnumber/index/type

Additional Index must be in lower case, otherwise it throws an Exception.

In terms of RDBMS:-
Index= Database
type=Table
document= one single row in that table
field = table column


We also need to know few of the basic ElasticSearch Commands
HTTP Request Type Usage
GET To get/select/read data from ElasticSearch engine
POST To create/update data to ElasticSearch engine
PUT To create/update data to ElasticSearch engine
DELETE To delete existing data from ElasticSearch engine
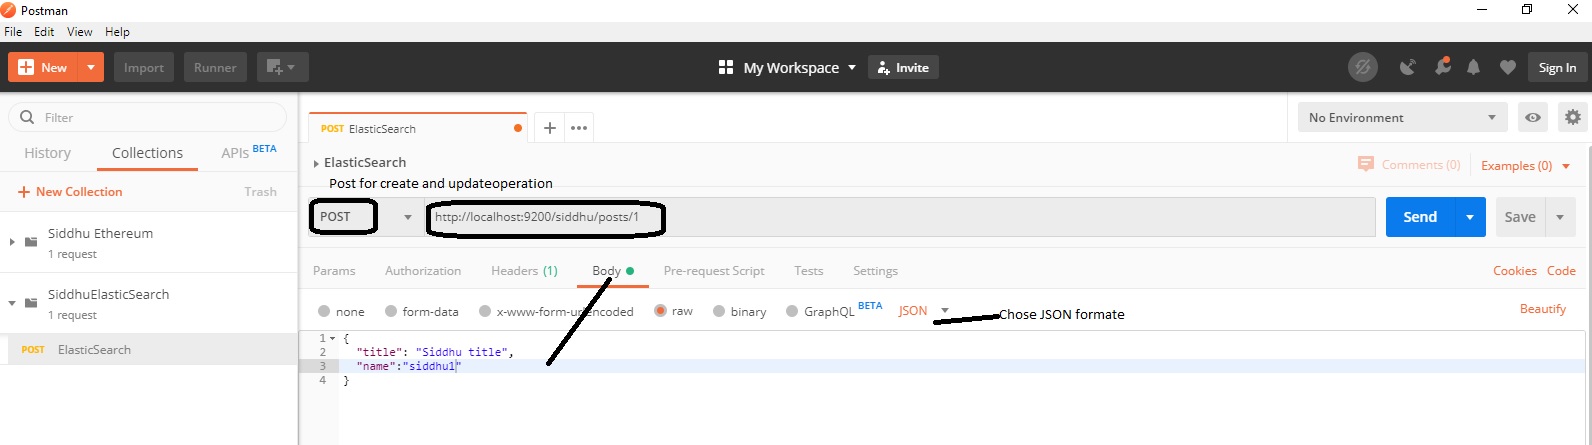
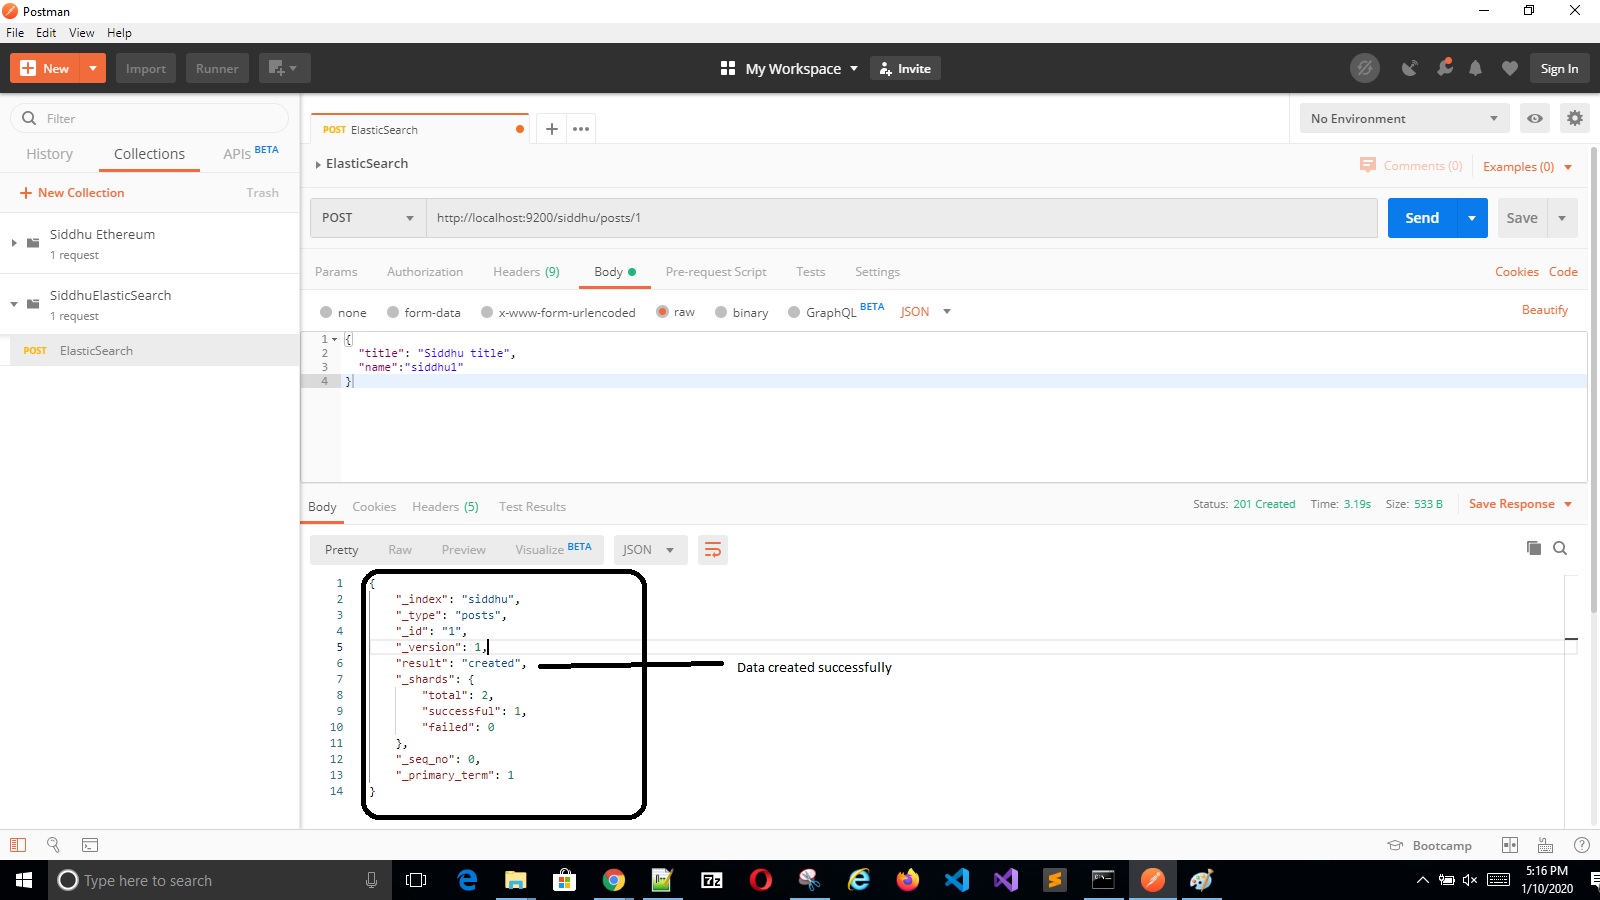
'- Create operation :-
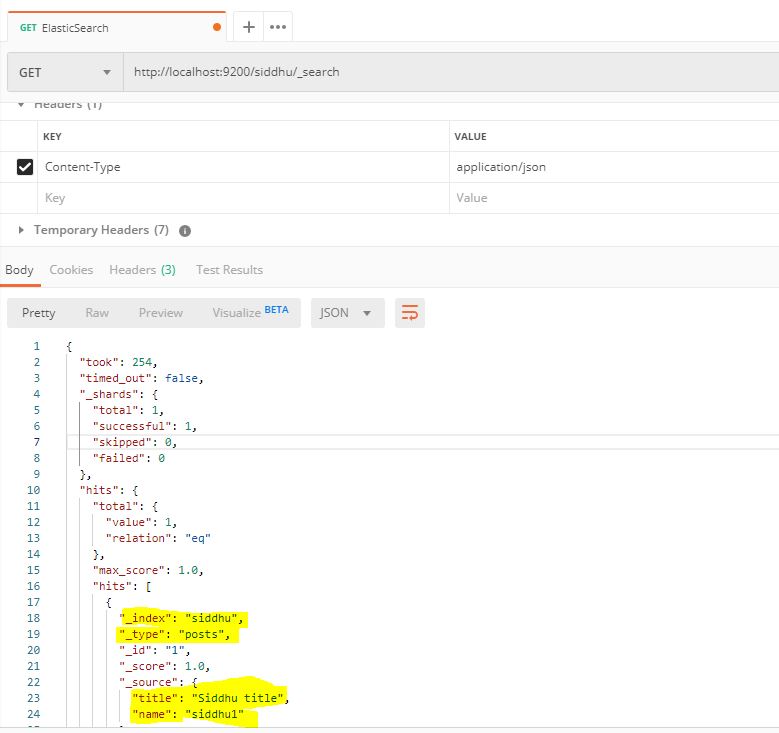
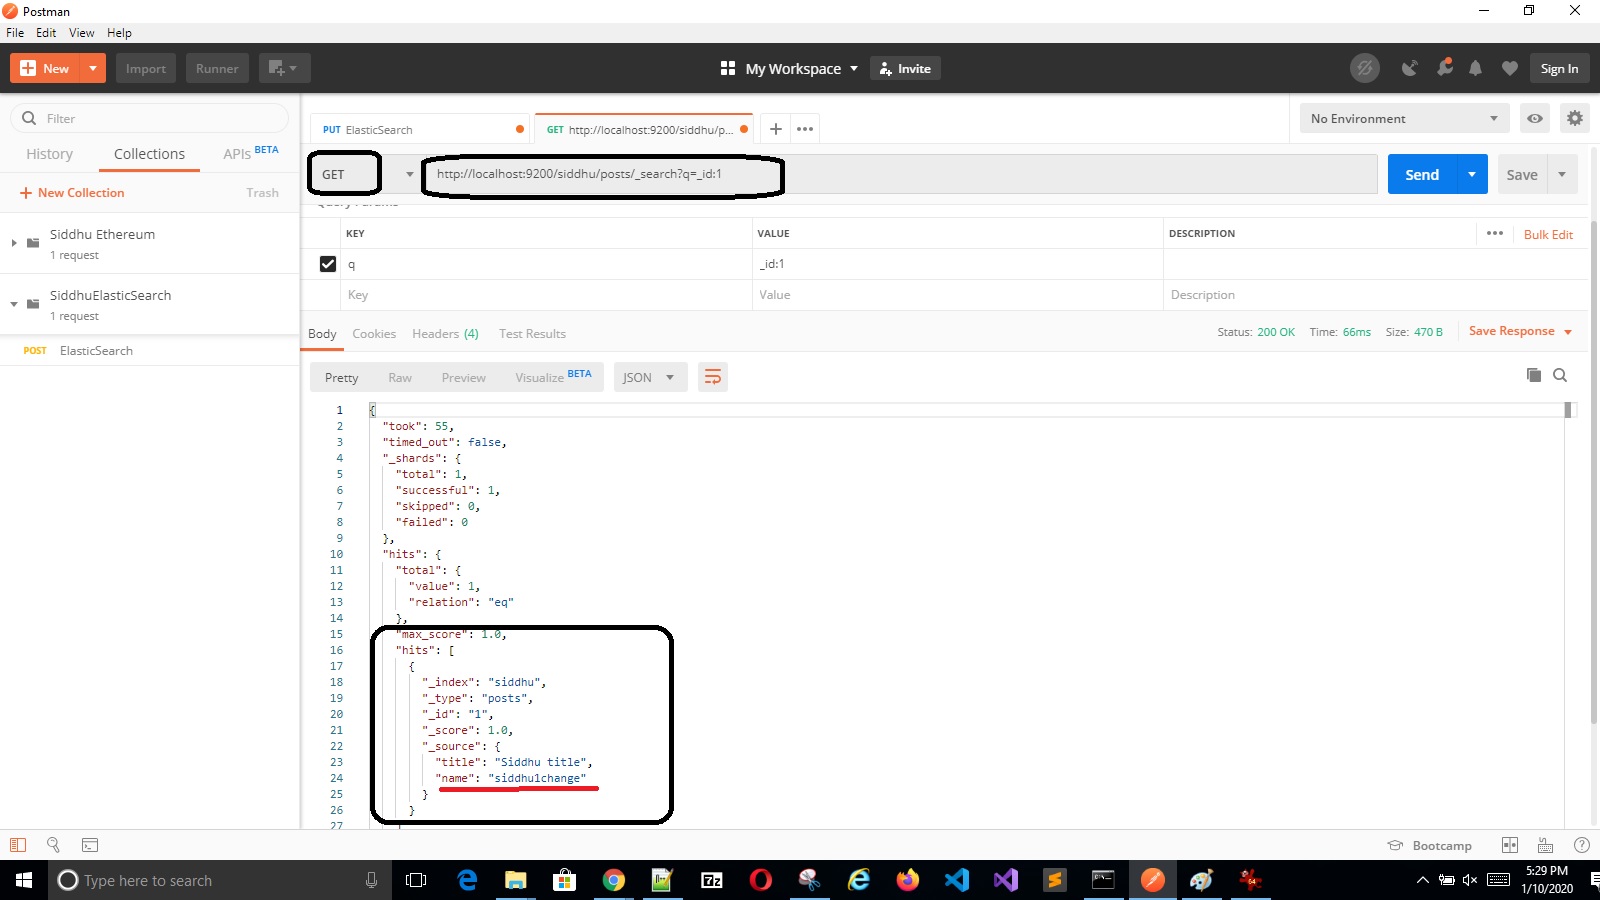
Image3Image4Image5
'- Read operation:-
To read data we should use “_search” at the end of the read API URL.

Image6.jpg
'- Update Operation
Image7
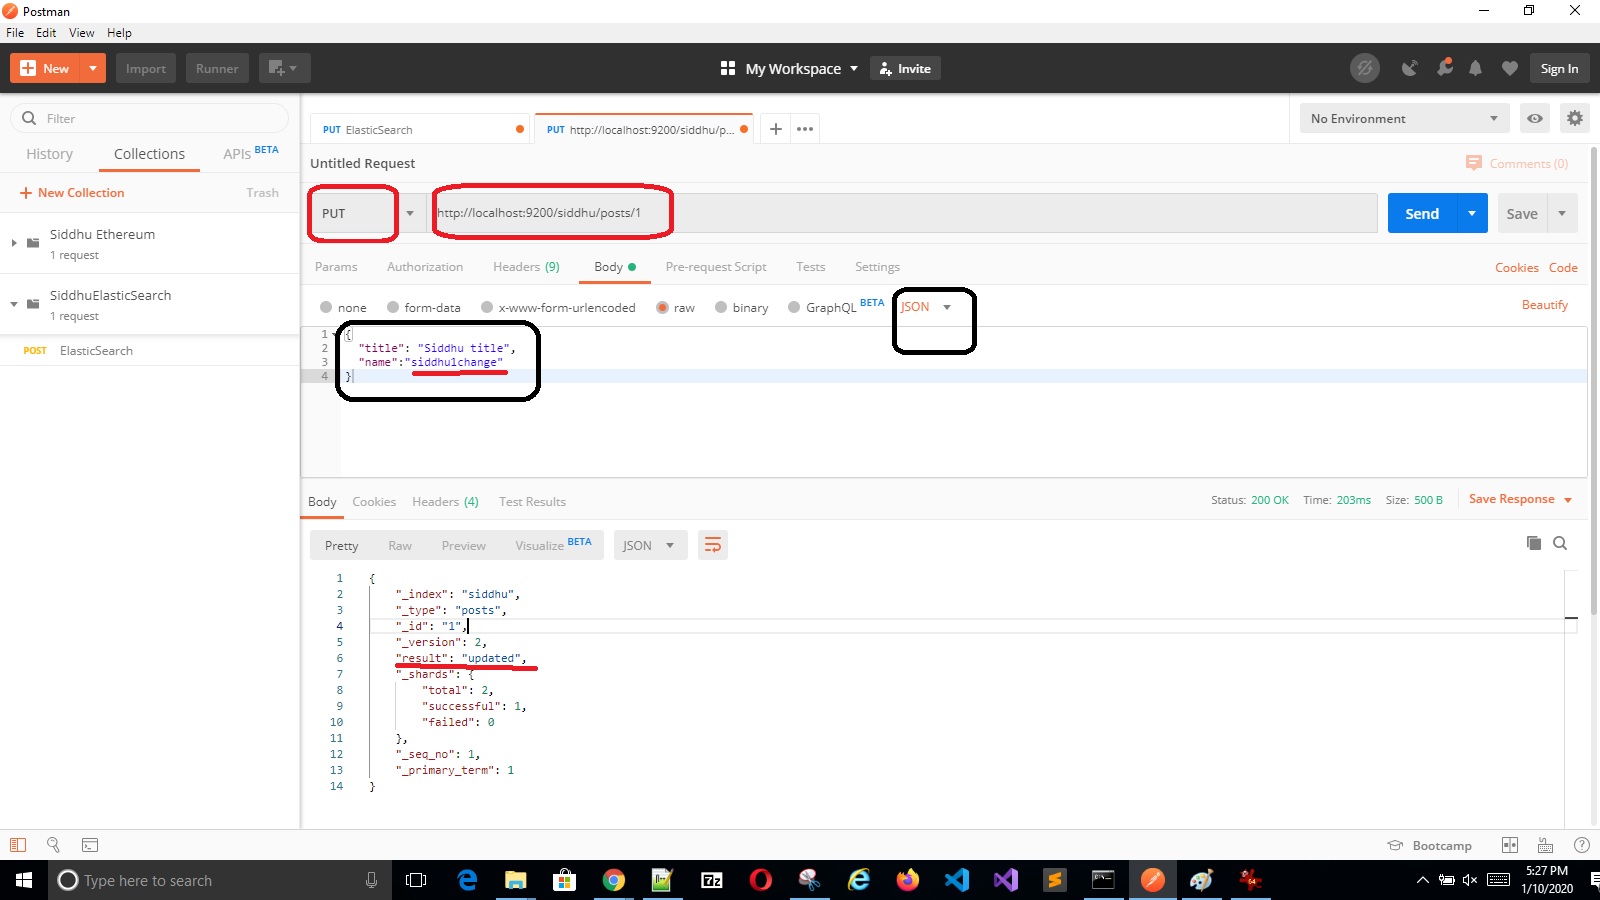
Verifying the data is updated
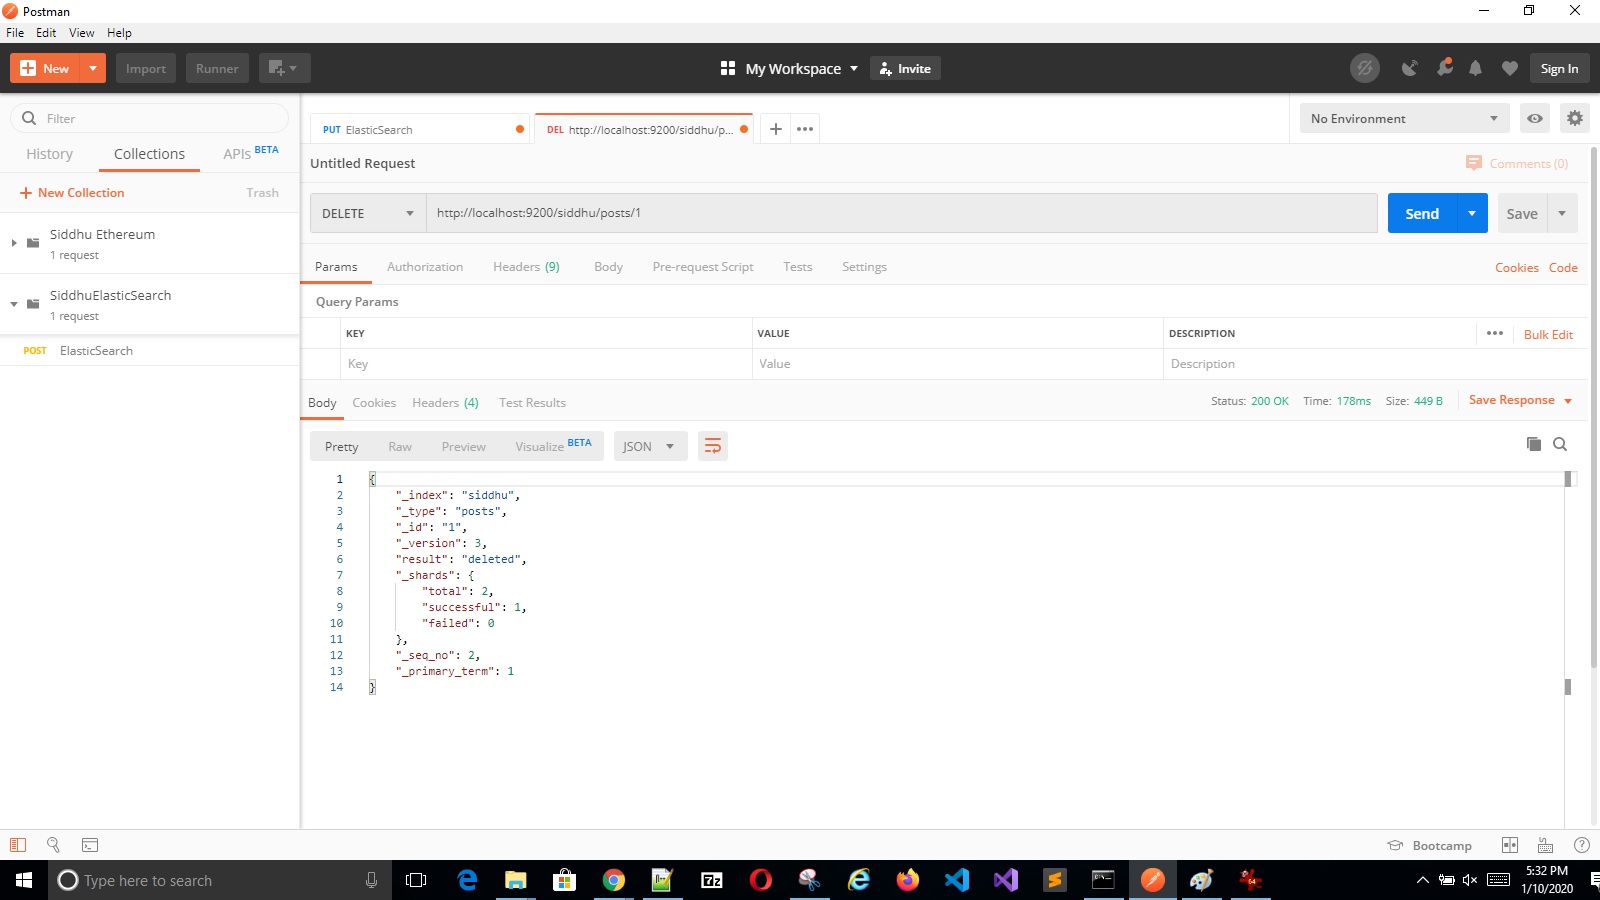
Image8.jpg
'- Delete Operation
Image9

Refer below URL:-
https://www.elastic.co/webinars/getting-started-elasticsearch?baymax=optimize&elektra=product-elasticsearch&storm=hero&rogue=watch-video
https://www.elastic.co/guide/en/elasticsearch/reference/current/index.html

Wednesday, January 08, 2020

Ansible using Oracle Virtual box

Please follow below given step religiously else VM installation will not be as per requirement and everytime new instance creation will take time
'- Installation of Oracle Virtual box, download site https://www.virtualbox.org/wiki/Downloads or https://download.virtualbox.org/virtualbox/6.1.0/VirtualBox-6.1.0-135406-Win.exe as we are using windows so VirtualBox-6.1.0-135406-Win.exe
'- Centos os ISO image download, download site:- https://wiki.centos.org/Download we are using Centos 7 version of ISO CentOS-7-x86_64-DVD-1908.iso having size 4.5 GB.
'- As we will requiring two machine one server where Ansbile will be installed and client where we want to execute module we need to create main network NAT so that two machine can have different ip and can ping each other
Please follow below given steps
1- File -->preference
Image1Image2
2- Now let create our 2 virtual machine one for server where we will install our Ansible and another our client we will connect using ssh and execute out module
Ansible - Controller machine or server or Localmachine [Ansible will be installed on this box] and Ansible- client machine use the same step for both the virtual machine.
Please follow below step to create Controller machine
Image3Image4Image5Image6Image7Image8Image9Image10

Now lets do configuration of this newly created machine by clicking on setting

Image11Image12Image13Image14Image15Image16Image17
'- After installation machine and it is up check following things. [Note make sure to chose GNOME package in Centos for better UI]


'- it can access internet, if no internet configuration ifup command. and check we get the internet using ping google.com

'- Check the list of the files above folder contains and find the one that is needed by your i.e. ifcfg-eth0 or ifcfg-eth03 etc
No_Internet1

'- Open this files i.e. vi /etc/sysconfig/network-scripts/ifcfg-eth03 and check if ONBOOT="yes"

No_Internet2

ifup.JPG
'- check both server and client machine has different ip using ifconfig
'- Check both of them can ping each other and have ssh access to eachother.Atleast server or controller machine can do ssh on client machine
Image18
'- install ansible , configure host, create yml files
To insall ansible use below command
yum install ansible -y
let the installation be complete
'- now lets modify the host file also called as inventory in ansible to inform where is the client and how to connect it
#siddhu.yml
---
- hosts: siddhu_ansible_clients
tasks:
- name: run echo command
command: /bin/echo hello world
Image19Image20
'- now create a simple yml file lets call it as siddhu.yml with following commands line

Image21Image22
'- Finally run the below command and check if our ansible is able to connect the client and execute the code properly

Image23
Note :- If you get below error then apply the solution given in the screen

error1

Monday, January 06, 2020

Ansible IT automation Engine

Ansible is IT automation provisioning tool. It is used for Orchestra :- for maintain Sequence of S/W installation, Configuration management:-to maintain all the system are maintained in consistent desired stage other tool used for the same is puppet and chef, in Provisioning :- Software installation on many other system at the same time , and Deploy :- To deploy the S/W packages.
To understand Ansible it is mandate to know how ansible work and what is ansible architecture
Ansible architecture:-
Ansible is software/automation engine that need to be installed. The machine on which we installed ansible is called as Controller machine or local machine. Additional all the other machine on which we connect using ansible and execute our code/module are called client machine or host machine When we deploy ansible we get following items
1- Ansible Automation Engine:- This is the base of ansbile. All the functionality which we execute using ansible is control by this engine.
2- Inventory - This is the simple file which contain the list of host on which we want to connect from ansible using ssh, kerberos, plugin etc and execute module.
3- Playbook:- IT is the collection of Play which in terns is a collection of Task and it contains modules, API and plugins.As stated above it is written in YAML language and is collection of plays and task. In YAML we have HOST, variables, Task and handlers
3- Modules - this are the core part of the ansible. This contains files written in YAML- yet another mark up language and is responsible for execution the code written in it on client machine. Once the code is executed module from the client machine is removed by the Ansible engine.
In short If Ansible modules are the tools in your workshop, playbooks are your instruction manuals, and your inventory of hosts are your raw material.
4- API - This is the API which is generally used when we want Ansible to be executed by another language rather than plan old prompt. i.e. using API we can execute Ansible from python.This API enables us to use Ansible programmatically through Python.
5- Plugin - Plugin is special type of module. it is of type like action plugin , cache plugin, connection plugin (used to connect Docker directly) and callback plugin. Best use of action plugin is lets say we want to execute something on control machine before execution module on the client machine this can be done using action plugin. We can also build out our plugin.

Advantage of Ansible
Agentless:- Nothing is required to install on client machine.
Idempotent:-Same thing run always same without any error.
Simple:- Written in YAML and hence similar to english language to understand
Automated reporting:- Provide reporting of all jobs run for audit purpose.
Flexible:- Easy to install and scalable with any system.
Efficient:- As nothing is installed on client so space utilization is good and highly secure and speedy

Ansible

Sunday, January 05, 2020

Hibernate ORM with JAVA Example

Hibernate is ORM = Object Relation Mapping tool. This means in Hibernate we map our RDBMS Database table in Object i.e. JAVA object Class.
JAVA Object --> ORM/Hibernate --> RDBMS.
Supporting DB:- Oracle, MySQL, DB2, Sybase SQL Server, HSQL Database Engine etc
It is the provider for JPA= JAVA Persistance API.
Image1
Hibernate can be used easily with JAVA application as a JPA Provider. We just need required jar to be added in the class path of the application. We can download the jar from the below given site
http://hibernate.org/orm/releases/
Once you download and unzip the latest version you will be able to see the below screen we generally required jar from required folder inside lib folder of the download
hibernate-release-5.4.10.Final\lib\required
Image2Image3
Now lets see the important aspect of Hibernate i.e. configuration, Seesion Factory , Session, Query language, Criteria Language etc.
1- Configuration:-
Hibernate can be configure in two ways 1- Using xml file 2- using property files. I prefer to use XML files. for configufation of the hibernate we gernerally use hibernate.cfg.xml. Few of the parameter that we need to keep in mind while configurations are

- hibernate.dialect :- use to generate appropriate SQL for chosend DB.
- hibernate.connection.driver_class- this is driver class used to connect DB.
- hibernate.connection.url - this is JDBC url to connect
- hibernate.connection.username and hibernate.connection.password - this is connection username and password
2- Session factory :- This is very important class for hibernate. It is created only once when the application is loaded and its function is to provide the access to session class instance used in the hibernate extensively. Depending on the number of *.cfg.xml files we create single respective session factory instance and destroy once the server is down of application is removed. This is thread safe object as it is created once.


3- Session :- This is another important object which is used to create a physical DB connection. It works under the hood of Session factory class. Session is the base and main class of hibernate.It perform operation like getting connection , begining the transection executing the query and finally closing it. It is MANDATE to close the session object of kill it once the work is done. Session object is created and killed as per the which of the developer and should be always killed as this is not thread safe object. It has some inbuild function such as beginTransaction(), cancelQuery(), createQuery(String queryString), createSQLQuery(String queryString), delete() etc

4- Persistance class :- This is the java class that represent the Database table. We can say in can be in one of the state in applications. Genereally in persistance class in java we keep the name of the class as similar to DB Table name and its field as same as Table field name. It is just pojo with getter and setter method.

transient - A new instance of a persistent class not associated with a Session and hence has nothing to do with DB.
persistent - After assiociating with Session this object become persistent i.e. they now represent database
detached - after closing the Hibernate Session, the persistent instance will become a detached instance.

5- Mapping files :- This are terms as *.hbm.xml. We keep the name * as name of the DB table name. Lets see few of details of this files

<?xml version = "1.0" encoding = "utf-8"?>
<!DOCTYPE hibernate-mapping PUBLIC
"-//Hibernate/Hibernate Mapping DTD//EN"
"http://www.hibernate.org/dtd/hibernate-mapping-3.0.dtd">
<hibernate-mapping>
<class name = "SiddhuClass" table = "SIDDHUCLASS">

<meta attribute = "class-description">
Optional and this give information of what this class contains.
</meta>

<id name = "idClass" type = "int" column = "IDCOLUMN">
<generator class="native"/>
</id>

<property name = "firstNameClass" column = "FIRST_NAME_COLUMN" type = "string"/>
<property name = "LastNameClass" column = "LAST_NAME_COLUMN" type = "string"/>

</class>
</hibernate-mapping>
All Hibernate Mapping files start with hibernate-mapping tag. Class tag gives the mapping between the java object and DB table name here SIDDHUCLASS is DB table and SiddhuClass is java class. meta tag is optional and can be used to give to give information of what this class contains.id tag is used for primary key idClass is java idClass field and IDCOLUMN is DB tabel PK column name. type define the Hibernate data type. This is different from JAVA and DB table type.generator tag is used to tell that PK is auto generated using native methods. property tag gives the information of the other field.
Before going lets see few of the type i.e. Hibernate type that is used to map between JAVA dn DB data type.integer, integer, long, shot, float, character, sting etc.
Now lets see the working example
1- First create a table with name SIDDHUCLASS
create table SIDDHUCLASS (
IDCOLUMN INT NOT NULL,
FIRST_NAME_COLUMN VARCHAR(20) default NULL,
LAST_NAME_COLUMN VARCHAR(20) default NULL,
PRIMARY KEY (IDCOLUMN)
);
2- configuration files
we are usign oracle and hence using oracledriver, with dialect Oracle10gDialect. show_sql will show your query in log this is important to do debug.
<?xml version = "1.0" encoding = "utf-8"?>
<!DOCTYPE hibernate-configuration SYSTEM
"http://www.hibernate.org/dtd/hibernate-configuration-3.0.dtd">
<hibernate-configuration>
<session-factory>
<property name="hibernate.connection.driver_class">oracle.jdbc.driver.OracleDriver</property>
<property name="hibernate.connection.url">jdbc:oracle:thin:@localhost:1521:xe</property>
<property name="hibernate.connection.username">root</property>
<property name="hibernate.connection.password">root</property>
<property name="hibernate.dialect">org.hibernate.dialect.Oracle10gDialect</property>
<property name="show_sql">true</property>
<mapping resource="SiddhuClass.hbm.xml"></mapping>
</session-factory>
</hibernate-configuration>
3- hbm file
<?xml version = "1.0" encoding = "utf-8"?>
<!DOCTYPE hibernate-mapping PUBLIC
"-//Hibernate/Hibernate Mapping DTD//EN"
"http://www.hibernate.org/dtd/hibernate-mapping-3.0.dtd">
<hibernate-mapping>
<class name = "com.siddhu.SiddhuClass" table = "SIDDHUCLASS">
<meta attribute = "class-description">
Optional and this give information of what this class contains.
</meta>
<id name = "idClass" type = "int" column = "IDCOLUMN">
</id>
<property name = "firstNameClass" column = "first_name_Column" type = "string"/>
<property name = "LastNameClass" column = "last_name_column" type = "string"/>
</class>
</hibernate-mapping>
4- Lets create pojo persistance class as shown below
package com.siddhu;
public class SiddhuClass {
private int idClass;
private String firstNameClass;
private String LastNameClass;
public SiddhuClass() {}
public SiddhuClass(int id,String fname, String lname) {
this.idClass = id;
this.firstNameClass = fname;
this.LastNameClass = lname;
}
public int getIdClass() {
return idClass;
}
public void setIdClass(int idClass) {
this.idClass = idClass;
}
public String getFirstNameClass() {
return firstNameClass;
}
public void setFirstNameClass(String firstNameClass) {
this.firstNameClass = firstNameClass;
}
public String getLastNameClass() {
return LastNameClass;
}
public void setLastNameClass(String lastNameClass) {
LastNameClass = lastNameClass;
}
}
5- Main OperateSiddhuClass class to show all the CRUD operation
package com.siddhu;
import java.util.List;
import java.util.Date;
import java.util.Iterator;
import org.hibernate.HibernateException;
import org.hibernate.Session;
import org.hibernate.Transaction;
import org.hibernate.SessionFactory;
import org.hibernate.cfg.Configuration;
public class OperateSiddhuClass {
private static SessionFactory factory;
public static void main(String[] args) {
try {
factory = new Configuration().configure().buildSessionFactory();
} catch (Exception ex) {
throw new ExceptionInInitializerError(ex);
}
OperateSiddhuClass objOperateSiddhuClass = new OperateSiddhuClass();
// Add records in database
Integer siddhuID1 = objOperateSiddhuClass.createSiddhu(1,"Siddhu1", "Dhumale1");
Integer siddhuID2 = objOperateSiddhuClass.createSiddhu(2,"Siddhu2", "Dhumale2");
// List records
objOperateSiddhuClass.showSiddhuValues();
//Update records
objOperateSiddhuClass.updateSiddhu(siddhuID1, "sername change");
//Delete operation
objOperateSiddhuClass.deleteSiddhu(siddhuID2);

}
//To create Data in Table
public Integer createSiddhu(int id, String firstName, String lastName){
Session session = factory.openSession();
Transaction tx = null;
Integer siddhuID = null;
try {
tx = session.beginTransaction();
SiddhuClass siddhu = new SiddhuClass(id, firstName, lastName);
siddhuID = (Integer) session.save(siddhu);
tx.commit();
} catch (HibernateException e) {
if (tx!=null) tx.rollback();
e.printStackTrace();
} finally {
session.close();
}
return siddhuID;
}
//To read data from table
public void showSiddhuValues( ){
Session session = factory.openSession();
Transaction tx = null;
try {
tx = session.beginTransaction();
List siddhuValues = session.createQuery("FROM SiddhuClass").list();
for (Iterator iterator = siddhuValues.iterator(); iterator.hasNext();){
SiddhuClass siddhu = (SiddhuClass) iterator.next();
System.out.print("First Name: " + siddhu.getFirstNameClass() + " Last Name: " + siddhu.getLastNameClass());
}
tx.commit();
} catch (HibernateException e) {
if (tx!=null) tx.rollback();
e.printStackTrace();
} finally {
session.close();
}
}
//To update
public void updateSiddhu(Integer siddhuId, String newLastName){
Session session = factory.openSession();
Transaction tx = null;
try {
tx = session.beginTransaction();
SiddhuClass siddhu = (SiddhuClass)session.get(SiddhuClass.class, siddhuId);
siddhu.setLastNameClass(newLastName);
session.update(siddhu);
tx.commit();
} catch (HibernateException e) {
if (tx!=null) tx.rollback();
e.printStackTrace();
} finally {
session.close();
}
}
//To Delete
public void deleteSiddhu(Integer siddhuId){
Session session = factory.openSession();
Transaction tx = null;
try {
tx = session.beginTransaction();
SiddhuClass siddhu = (SiddhuClass)session.get(SiddhuClass.class, siddhuId);
session.delete(siddhu);
tx.commit();
} catch (HibernateException e) {
if (tx!=null) tx.rollback();
e.printStackTrace();
} finally {
session.close();
}
}
}

Image4Image5Image6

Same above example we can also do using Annotation instead of hbm file. but personaly i prefer to use hbm files for more clarity.

Additional also refer to the HQL- Hibernate query languge aspect of the hibernate. In this we use to query java object rather than DB table and hence irrespective of any DB changes this will always work because we are acting on JAVA object and has nothing to do with DB table. In HQL we had select, where, order , group by , named parameter, delete etc.

Also have some eye on Criteria query where in we use class such as Restrictions and Projections class to operate on the JAVA class object . Restrictions give us api like greater than gt, smaller then st, like, isnull, isemplty etc ...Projections give us inbuild function like max, count, min , sum, rowcount etc

Hibernate also allowed to use the native query i.e. direct db query to be executed from the java class using public SQLQuery createSQLQuery(String sqlString) throws HibernateException.

Caching :- this is important part of the hibernate. There are three type of cache

1- First level:- This is by default cache provided by the Hibernate. Developer has nothing to do with this cache and it is used by hibernate for performance of the application.
2- Second level:- This is cache which developer can play. Many third party cache are available such as EHCache, JBoss cache etc. Refer to teh online example for the same. PLEASE USE THIS CACHE IF IT EXTREME USEFUL ELSE IT WILL DEGRADE PREFORMACE.
3- Query cache:- this is used when we are sure our DB table is not changed frequently. in this cache we store the data of the query and time stamp of the DB table modificaiton in HArd disk. When ever request come for the same query we give the date to application from Cache if the Time stamp is not modified else we make a new call.

Hibernate also support batch processing as it is requird if we are working with huge record. If we dont take the batch concept in practise performing CRUD with more than 1 lac of record will make your application and DB down very soon.