Friday, November 30, 2018

Creating custom Pipe and Directive in AngularJS6

1- Create your custom pipe using command ng g p change
2- This will create a change.pipe.ts and make its corresponding entries in module.ts file inside declarations[]
3- We can over ride transform(value: any, ...args) to perform our custom behaviour by implementing pipe
transform(value: any, ...args): any {
console.log(value, args);
if(args[0])
{
return value = value + 'first value is ture';
}
else if(args[1] === "singlequote")
{
return value = value + "'";
}
else{
return value;
}

}
4- In html file
{{"this is formated with custom pipes" | change : true : "singlequote"}}
1- Create your custom directive using command ng g d siddhucustome
2- Override the constructor
@Directive({
selector: '[appSiddhucustome]'
})
export class SiddhucustomeDirective {
constructor(eL: ElementRef) {
eL.nativeElement.style.color = 'green';
eL.nativeElement.style.background = 'black';
}
}
3- In html
<!--p appSiddhucustome>
this is custome directive example.
<!--/p>

Wednesday, November 28, 2018

How to use Route Guard

Route Guard :- this is the concept in AngularJS which allows the developer to fix/assist Guard on the router. i.e. This Guard will first check if the user is access right to route if yes then he will be allowed to go to that url else we can take action agains it.
Lets try to understand using exmple
Step 1- Let s first create guard using ng command i.e. ng generate guard Auth or ng g g auth
Step 2- we will find following file create in our project
import { AuthService } from './auth.service';
import { Injectable } from '@angular/core';
import { CanActivate, ActivatedRouteSnapshot, RouterStateSnapshot } from '@angular/router';
import { Observable } from 'rxjs';
@Injectable({
providedIn: 'root'
})
export class AuthGuard implements CanActivate {
public flag : boolean;
constructor()
{
}
canActivate(
next: ActivatedRouteSnapshot,
state: RouterStateSnapshot): Observable<boolean> | Promise<boolean> | boolean {
return true;
}
}
Step 3- configure this in our app.module.ts
providers: [ AuthService, AuthGuard],
{
path:'admin',
component:AdminComponent,
canActivate: [AuthGuard]
},
Step 4- as we can see this Guard return true so we can access /admin url by both the way i.e. using direct hit http://localhost:4200/admin or by going through programatically.
Now let see if we only want the user to get it access through programitically and not by direct hit to url i.e. http://localhost:4200/admin
To do this we had done following changes
1- On successful call to Service.ts we call this method of Auth.Guard.ts
this.myAuth.setFlagValue(true);
2- In AuthGuard.ts we have added following this method
setFlagValue(value : boolean)
{
this.flag = value;
}
and canActivate(
next: ActivatedRouteSnapshot,
state: RouterStateSnapshot): Observable<boolean> | Promise<boolean> | boolean {
//return true;
return this.flag;
}

So now when we go through programe we will be able to go to /admin url else when we hit the direct url we fails.

Note:- Code is available at
https://github.com/shdhumale/AJS6_Tutorial_Project.git

Tuesday, November 27, 2018

How to configure GIT in Visual Source Code for AJS6

Step 1:- Create your Repository on GItHiub https://github.com and take its *.git url.

Step 2:- Clone that repository
2.1 - using Torpoise GIT (As I am using Window) or
2.2 - you can use the Ctr + Shift+P and Git:clone command to create a clone directly from VSC. Our project name in GIT is AJS6_Tutorial_Project.git.

Step 3:- Now create AJS6 dummy project using command ng new my-app
i.e.
C:\VSC_WorkSpace_Angular6\AJS6_Tutorial_Project>npm install -g @angular/cli
C:\VSC_WorkSpace_Angular6\AJS6_Tutorial_Project>ng new my-app

Step 4:- Now import this folder inside your VSC and you will find all the items need to be check in empty repository

Image1

Step 5:- Start development and perform check in / check out option using VSC.

Image2


Image3

How to do proxy configuration in AngularJS project

1- In package.json change the start

"start": "ng serve --proxy-config proxyconfig.json",

2- Create one file called as proxyconfig.json

{
"/api":{
"target":"http://localhost:2303/",
"secure":false,
"changeOrigin":true
}
}

3- In serive now instead of calling whole url i.e. http://localhost:2303 use this one /api
return this.myHtpClient.get('/api');

4- do npm start or ng serve one more time

Note: If you see the chrome F12 network we will find the URL that is displayed to the end user is http://localhost:4200 rather than http://localhost:2303. This is the way we can do proxy configuration.

HTTP REST call using AngularJS6

1- We need to first import HttpClientModule in app.module.ts
import { HttpClientModule} from '@angular/common/http';
imports: [
BrowserModule,
AppRoutingModule,
FormsModule,
HttpClientModule
],
2- In service use import HttpClient

import { HttpClient} from '@angular/common/http';

and use below code to call Rest Service
return this.myHtpClient.get('http://localhost:2303/');
3- Calling above service from our Ts file
constructor(private myService : RecordService) {

}
ngOnInit() {
this.myService.getData().subscribe(data => {
//this will populate data on the screen.
this.myArrayData = data;
});
}

Note: You can download the code from belwo given git
https://github.com/shdhumale/AngularJS6.git
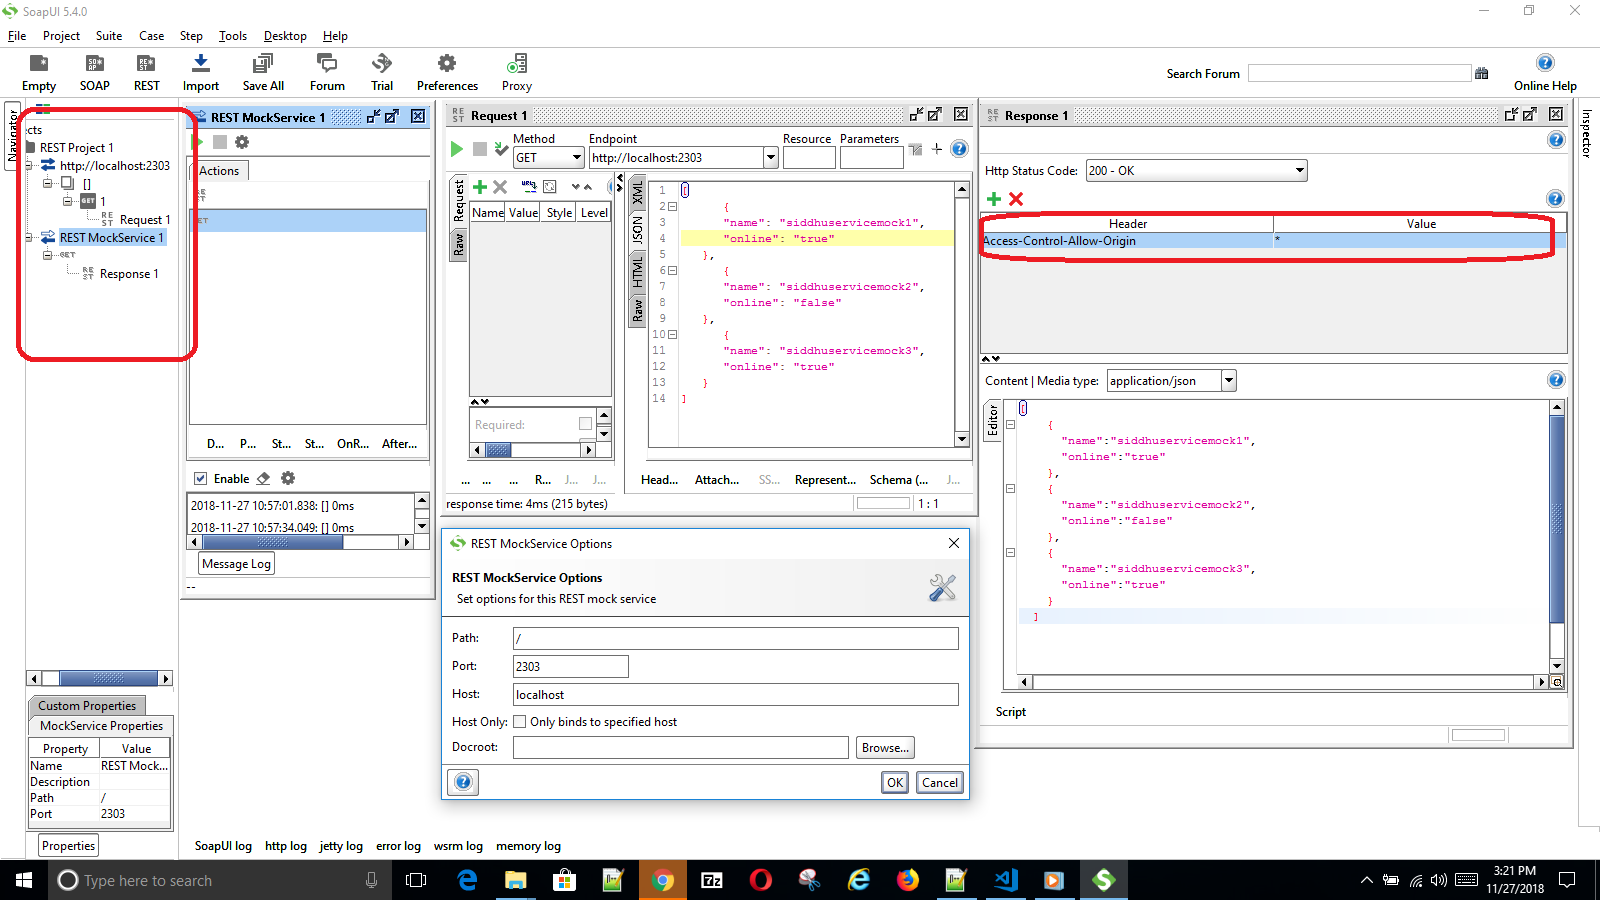
SOAP to expose Rest Service
Please add Access-Control-Allow-Origin *
SOAP

Monday, November 26, 2018

How to set AngularJS debug in Visual source Code

1- Install NodeJs and NPM from respective site
NodeJS = https://nodejs.org/en/download/
NPM = https://www.npmjs.com/get-npm
After installation make sure to both are installed properly using node -v and npm -v command
2- Create your first AngularJS project using following link
https://angular.io/guide/quickstart
3- Install Debugger for Chrome using visual source code
use Ctrl + Shift +X or simply click on the left icon and type "Debugger for Chrome" and install the plugin


Image1


3- Configure chrome in your debug setting using below image


Image2


4- Put your debug pointer and Start your application using ng serve and start debuging using F5 or start debug command and you will be able to debug the application live on visual source code.


Image3