Simple Spring Web Flow Example
Spring Webflow we can develop a guided navigation in the application. We can define web flow as a colection of steps for single execution of Business logic. Either the whole Business logic get exectued or it gets fails if any of the intermediate step fails. Webflow consist of many steps called states.
In a typicall Example we can define following work flow
State can be broadly classfied into follwing aspects
1- Start State :- Stating phase of the Spring Web flow
2- View State :- This is the view phase in which End user is typically displayed the screen on this they perform certain action.
3- Action State :- This is the action state on which end user perform certain action on the screen.
4- End state :- Ending phase of the Spring Web flow
Start State -- > Display Login --> User Action on screen --> Success --> Show Success Login Screen
S tart State -- > Display Login --> User Action on screen --> --> Failure --> Show Error screen -- > Both End
Entering a state typically results in a view screen being displayed to the user. On that view, user perform some events and that event are handled by the state. These events can trigger transitions to other states which result in view navigations. Spreing Web-Flow is based on top of Spring MVC and hence provides all the goodies of Spring MVC plus the added control over the transitions.
Now Lets start the example
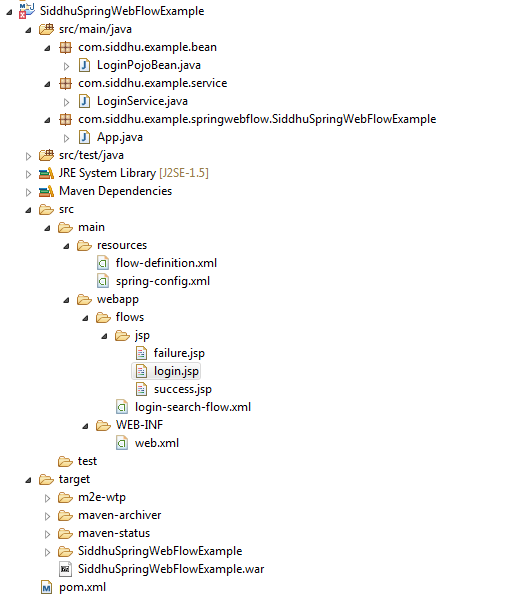
Step 1:- First create a pojo class that will help us to handle the form data of the screen which is enterted by end user
package com.siddhu.example.bean;
import java.io.Serializable;
public class LoginPojoBean implements Serializable
{
/**
*
*/
private static final long serialVersionUID = 1L;
public String getuName() {
return uName;
}
public void setuName(String uName) {
this.uName = uName;
}
public String getPword() {
return pword;
}
public void setPword(String pword) {
this.pword = pword;
}
@Override
public String toString() {
return "LoginBean [uName=" + uName + ", pword=" + pword + "]";
}
private String uName;
private String pword;
}
Step 2:- Define the Service class which will perform action event/action state i.e. authenticate the user. After Authentication and based on the authenticateUser method ouput , web-flow will decide the view to be rendered to the end user.
Service class basically define our Action State. We use Annotation mark to declare class as service this will help the Spring Bean Factory to pick the service class at run time as per the configuration done in xml.
package com.siddhu.example.service;
import org.springframework.stereotype.Service;
import com.siddhu.example.bean.LoginPojoBean;
@Service
public class LoginService
{
public String authenticateUser(LoginPojoBean loginBean)
{
String userName = loginBean.getuName();
String password = loginBean.getpWord();
if(userName.equals("Siddhu") && password.equals("siddhu"))
{
return "true";
}
else
{
return "false";
}
}
}
Step 3:- After implementation of action state we need to define and implement business flow. Flow will allow our user to navigate as per the bussiness need and help in completion of a single task in the context of the application. Generally in this flow is collection of multiple view and serive class and executed in accordence with the cofiguration given in xml files. Flow help the user to move too forward or backword as per the business logic. We use xml configuration for defining the business flow
login-search-flow.xml:-
<!--?xml version="1.0" encoding="UTF-8"?>
<!--flow xmlns="http://www.springframework.org/schema/webflow"
xmlns:xsi="http://www.w3.org/2001/XMLSchema-instance"
xsi:schemaLocation="http://www.springframework.org/schema/webflow
http://www.springframework.org/schema/webflow/spring-webflow-2.4.xsd">
<!--var name="loginPojoBean" class="com.siddhu.example.bean.LoginPojoBean" />
<!--view-state id="displayLoginView" view="jsp/login.jsp" model="loginPojoBean">
<!--transition on="performLogin" to="performLoginAction" />
<!--/view-state>
<!--action-state id="performLoginAction">
<!--evaluate expression="loginService.authenticateUser(loginPojoBean)" />
<!--transition on="true" to="displaySuccess" />
<!--transition on="false" to="displayError" />
<!--/action-state>
<!--view-state id="displaySuccess" view="jsp/success.jsp" model="loginPojoBean"/>
<!--view-state id="displayError" view="jsp/failure.jsp" />
<!--/flow>
In above code we first define the pojobean class which accumulate user screen data on which we need to play business logic. i.e. loginPojoBean.
The first view in the flow becomes the default view which is shown to the end user. In our case it is jsp/login.jsp which will be displayed to the end user first time. Once the user perform operation of entering user id and password and submits the request, flow moves to action-state tag to determine dynamically which view should be rendered. i.e. when user enter submit button it will find performLoginAction action tag and evaluate this method loginService.authenticateUser(loginPojoBean).
Depending on the out put of authenticateUser i.e. true or false respective state id view will be displayed i.e. if the out put is true then displaySuccess view-state id having view="jsp/success.jsp" will be displayed else view-state id="displayError" view="jsp/failure.jsp" will be displayed.
We need to understand here that there are two parameter which are mandatory and necessary to be included in coding of view during development and that parameter is _eventId and _flowExecutionKey.
We had added the same in our login.jsp
<!--input type="hidden" name="_eventId" value="performLogin">
<!--input type="hidden" name="_flowExecutionKey" value="${flowExecutionKey}" />
we are using value="performLogin" in our login-search-flow.xml file <!--transition on="performLogin" to="performLoginAction" />
Step 4:- Now once we had define our business logic, Flow in terms of xml we need to configure of hook our flow with the system where we want to implement Spring Web flow. By hooking our flow Spring container by default take care of all other parts.
This is done in below xml files.
flow-definition.xml:-
<!--?xml version="1.0" encoding="UTF-8"?>
<!--beans xmlns="http://www.springframework.org/schema/beans"
xmlns:xsi="http://www.w3.org/2001/XMLSchema-instance" xmlns:flow="http://www.springframework.org/schema/webflow-config"
xsi:schemaLocation="http://www.springframework.org/schema/webflow-config
http://www.springframework.org/schema/webflow-config/spring-webflow-config-2.4.xsd
http://www.springframework.org/schema/beans
http://www.springframework.org/schema/beans/spring-beans-3.0.xsd">
<!--bean class="org.springframework.webflow.mvc.servlet.FlowHandlerMapping">
<!--property name="flowRegistry" ref="loginSearchFlowRegistry" />
<!--/bean>
<!--bean class="org.springframework.webflow.mvc.servlet.FlowHandlerAdapter">
<!--property name="flowExecutor" ref="loginSearchFlowExecutor" />
<!--/bean>
<!--flow:flow-executor id="loginSearchFlowExecutor" flow-registry="loginSearchFlowRegistry" />
<!--flow:flow-registry id="loginSearchFlowRegistry">
<!--flow:flow-location id="loginSearchFlow" path="/flows/login-search-flow.xml" />
<!--/flow:flow-registry>
<!--/beans>
Above files define two main aspect of Apring Web Flow
1- flowExecutor :- As the name suggest it will help in arranging the flow while referring to flowRegistry
2- flowRegistry :- This will tell the application which xml file need to be referred while performing the flow logic.i.e. in our case loginSearchFlowRegistry refer to /flows/login-search-flow.xml
Additionally if we look into the above xml we will find two main class FlowHandlerMapping and FlowHandlerAdapter. These are the two core class of spring Web flow. FlowHandlerMapping is responsible for creating the appropriate URLs for all the flows defined in the application. FlowHandlerAdapter encapsulates the actual flow and delegates the specific flows to be handled by the Spring Flow Controllers
Step 5:- Finally we need to inform spring container to take our hook and perform operation as per define in the flow xml. For this we define spring-config.xml. It contains the basic information for the spring container for tasks like rendering the views, bean declarations and includes the flow-definition.xml file for the container to load.
spring-config.xml:-
<!--?xml version="1.0" encoding="UTF-8"?>
<!--beans xmlns="http://www.springframework.org/schema/beans"
xmlns:context="http://www.springframework.org/schema/context"
xmlns:xsi="http://www.w3.org/2001/XMLSchema-instance" xmlns:flow="http://www.springframework.org/schema/webflow-config"
xsi:schemaLocation="
http://www.springframework.org/schema/webflow-config
http://www.springframework.org/schema/webflow-config/spring-webflow-config-2.4.xsd
http://www.springframework.org/schema/beans
http://www.springframework.org/schema/beans/spring-beans-3.0.xsd
http://www.springframework.org/schema/context
http://www.springframework.org/schema/context/spring-context-3.0.xsd">
<!--context:component-scan base-package="com.siddhu.example" />
<!--bean
class="org.springframework.web.servlet.view.InternalResourceViewResolver">
<!--property name="prefix" value="/jsp/" />
<!--property name="suffix" value=".jsp" />
<!--/bean>
<!--import resource="flow-definition.xml"/>
<!--/beans>
Code for display
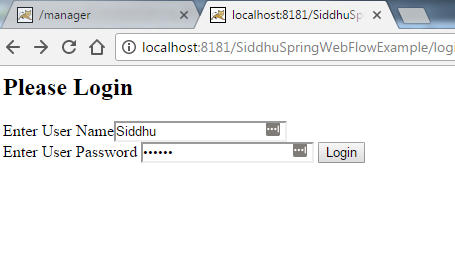
login.jsp:-
<!--%@ page isELIgnored="false" %>
<!--html>
<!--body>
<!--h2>Please Login<!--/h2>
<!--form method="post" action="${flowExecutionUrl}">
<!--input type="hidden" name="_eventId" value="performLogin">
<!--input type="hidden" name="_flowExecutionKey" value="${flowExecutionKey}" />
Enter User Name<!--input type="text" name="uName" maxlength="40"><!--br>
Enter User Password <!--input type="password" name="pWord" maxlength="40">
<!--input type="submit" value="Login" />
<!--/form>
<!--/body>
<!--/html>
Success.jsp:-
<!--%@ page language="java" contentType="text/html; charset=ISO-8859-1"
pageEncoding="ISO-8859-1"%>
<!--%@ page isELIgnored ="false" %>
<!--!DOCTYPE html PUBLIC "-//W3C//DTD HTML 4.01 Transitional//EN" "http://www.w3.org/TR/html4/loose.dtd">
<!--html>
<!--head>
<!--meta http-equiv="Content-Type" content="text/html; charset=ISO-8859-1">
<!--title>Login Successful<!--/title>
<!--/head>
<!--body>
Welcome ${loginBean.userName}!!
<!--/body>
<!--/html>
Failure.jsp
<!--%@ page language="java" contentType="text/html; charset=ISO-8859-1"
pageEncoding="ISO-8859-1"%>
<!--%@ page isELIgnored ="false" %>
<!--!DOCTYPE html PUBLIC "-//W3C//DTD HTML 4.01 Transitional//EN" "http://www.w3.org/TR/html4/loose.dtd">
<!--html>
<!--head>
<!--meta http-equiv="Content-Type" content="text/html; charset=ISO-8859-1">
<!--title>Invalid Credentials<!--/title>
<!--/head>
<!--body>
Invalid User Name or Password. Please try again!
<!--/body>
<!--/html>
Pom.xml:-
<!--project xmlns="http://maven.apache.org/POM/4.0.0" xmlns:xsi="http://www.w3.org/2001/XMLSchema-instance"
xsi:schemaLocation="http://maven.apache.org/POM/4.0.0 http://maven.apache.org/xsd/maven-4.0.0.xsd">
<!--modelVersion>4.0.0<!--/modelVersion>
xsi:schemaLocation="http://maven.apache.org/POM/4.0.0 http://maven.apache.org/xsd/maven-4.0.0.xsd">
<!--modelVersion>4.0.0<!--/modelVersion>
<!--groupId>com.siddhu.example.springwebflow<!--/groupId>
<!--artifactId>SiddhuSpringWebFlowExample<!--/artifactId>
<!--version>0.0.1-SNAPSHOT<!--/version>
<!--packaging>war<!--/packaging>
<!--artifactId>SiddhuSpringWebFlowExample<!--/artifactId>
<!--version>0.0.1-SNAPSHOT<!--/version>
<!--packaging>war<!--/packaging>
<!--name>SiddhuSpringWebFlowExample<!--/name>
<!--url>http://maven.apache.org<!--/url>
<!--url>http://maven.apache.org<!--/url>
<!--properties>
<!--project.build.sourceEncoding>UTF-8<!--/project.build.sourceEncoding>
<!--/properties>
<!--project.build.sourceEncoding>UTF-8<!--/project.build.sourceEncoding>
<!--/properties>
<!--dependencies>
<!--dependency>
<!--groupId>junit<!--/groupId>
<!--artifactId>junit<!--/artifactId>
<!--version>3.8.1<!--/version>
<!--scope>test<!--/scope>
<!--/dependency>
<!--dependency>
<!--groupId>org.springframework.webflow<!--/groupId>
<!--artifactId>spring-webflow<!--/artifactId>
<!--version>2.4.2.RELEASE<!--/version>
<!--/dependency>
<!--/dependencies>
<!--build>
<!--finalName>SiddhuSpringWebFlowExample<!--/finalName>
<!--/build>
<!--dependency>
<!--groupId>junit<!--/groupId>
<!--artifactId>junit<!--/artifactId>
<!--version>3.8.1<!--/version>
<!--scope>test<!--/scope>
<!--/dependency>
<!--dependency>
<!--groupId>org.springframework.webflow<!--/groupId>
<!--artifactId>spring-webflow<!--/artifactId>
<!--version>2.4.2.RELEASE<!--/version>
<!--/dependency>
<!--/dependencies>
<!--build>
<!--finalName>SiddhuSpringWebFlowExample<!--/finalName>
<!--/build>
<!--/project>


1 comment:
Important classes
FlowHandlerMapping – This is a HandlerMapping that creates a URL from the ids registered in the flow registry. It returns a FlowHandler if a matching id is found in the flow registry.
FlowHandler – This is a controller helper that has the reference to the actual flow. It handles the execution of the flow, its outcomes and exceptions.
FlowHandlerAdapter – This is the HandlerAdapter for web flows. It delegates work to the mapped FlowHandler.
FlowExecutor – This is the central class of the Flow and is the facade for the actual flow. It manages creating of new flows or resuming existing flows. It is an entry into the Spring web flow system.
FlowDefinition – This class stores the definition of the flow. It contains the set of states that form part of the flow. Each flow has one start state.
FlowRegistry – This class contains all the flow definitions.
Reference :- https://www.studytrails.com/frameworks/spring/spring-web-flow/
Post a Comment