Step 1:- First download Apache Axis latest version from below site
https://axis.apache.org/axis2/java/core/download.html

Step 2- Open Eclipse I am using Eclipse Java EE Luna 4.4.1

Step -3- Go to window->preference->Web Service and click Axis Preference and set the path where we had extracted our download from
https://axis.apache.org/axis2/java/core/download.html and click Apply and ok button.
https://axis.apache.org/axis2/java/core/download.html and click Apply and ok button.

Step -3 Create Dynamic Web Project and import our class which we want to expose as a webservice.
File -> New -> Web Project
File -> New -> Web Project

Give name of the project and set the configuration as shown in the below figure.

Make sure to click on Modify button of custom configuration and click on Axis as shown in below image and click Ok

Click on Finish Button
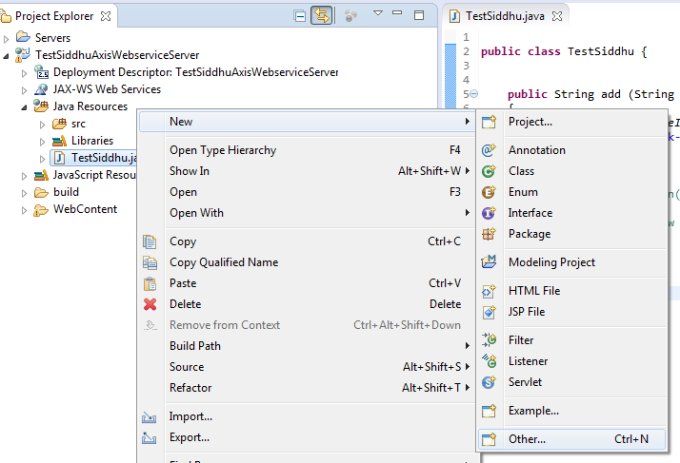
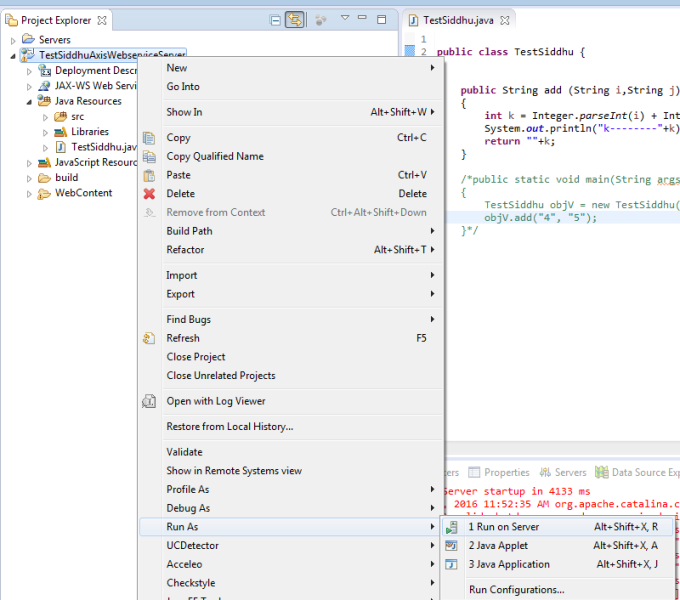
Step -4 Create New Class as shown in belwo image

public class TestSiddhu {
public String add (String i,String j)
{
int k = Integer.parseInt(i) + Integer.parseInt(j);
System.out.println("k--------"+k);
return ""+k;
}
/*public static void main(String args[])
{
TestSiddhu objV = new TestSiddhu();
objV.add("4", "5");
}*/
{
TestSiddhu objV = new TestSiddhu();
objV.add("4", "5");
}*/
}

Step -5 Lets assume we want our add method to be exposed as web service
Riht click --> JAVA Class --> New --> Other and select Web Service
Riht click --> JAVA Class --> New --> Other and select Web Service

click Next and follow below sequence.

Click on Apache Axis
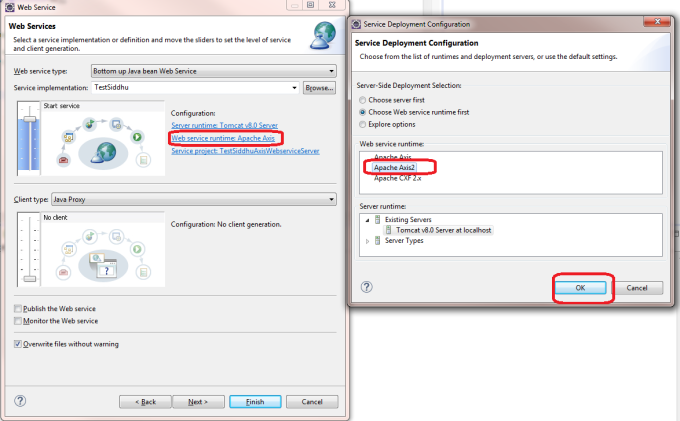

Click on start Button


Click Finish

Note: Close your Tomcat and run your created application on tomcat once again
Click on Next button

Click finish

You will be able to see this screen

click on Service and you will get this page

click on siddhu and see you are able to access WSDL file as shown below

Step 5- Now lets create Client that will consume our Exposed WSDL.
Create and new Dynamic web project with name TestSiddhuAxisWebserviceClient similar to our TestSiddhuAxisWebserviceServer Project


http://localhost:8181/TestSiddhuAxisWebserviceServer/services/TestSiddhu?wsdl

clieck on next

Click on finish and you will see two class 1- *Stub and 1- *Handler created
Lets create our main method in client code and consume the same.
package org.apache.ws.axis2;
public class SiddhuMainClass {
public static void main(String args[])
{
try {
TestSiddhuStub obTestSiddhuStub = new TestSiddhuStub();
org.apache.ws.axis2.TestSiddhuStub.Add objAdd = new org.apache.ws.axis2.TestSiddhuStub.Add();
objAdd.setI("3");
objAdd.setJ("4");
obTestSiddhuStub.add(objAdd);
} catch (Exception e) {
// TODO Auto-generated catch block
e.printStackTrace();
}
}
}
and Execute the programe

Note :- You can use the same concept for creating and cosming Apache CXF Web service. Only need to download Apache CXF JAR and add the path to window-->preference-->Web Service of Eclipse
No comments:
Post a Comment