I had used many repository sub version on windows, linux etc but I agree SVN specially Tortose SVN is one of the best among all.
As a repository manager or developer we need to do small changes and we are all set to use our Sub repository system.
Lets now implement force and set our own SVN repository and Project on Window. Please follow belwo step to do the same
Before staring i preassume that we had already installed Tortose SVN in our window machine. While I was writting this blog latest version was TortoiseSVN 1.9.2 for 64 bit O/S.
Site to download :- http://tortoisesvn.net/downloads.html
Site to download :- http://tortoisesvn.net/downloads.html
Step 1:- Let say my project name is GWT_Project. So first create C:\SVN_TORTOISE_REPOSITORY\GWT_Project
Step 2:- Right Click on your GWT_Project and click on "Create Repository here".

Step 2:- Right Click on your GWT_Project and click on "Create Repository here".

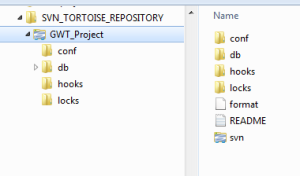
This converts C:\SVN_TORTOISE_REPOSITORY\GWT_Project into a repository with the following contents.

Step 3. Initial import. Somewhere in your hard drive (e.g. in C:\temp) create a directory (e.g. \new) with the following three subdirectories. You can also use your own naming convention i.e. instare of temp give temp_ProjName and instead of new given new_ProjName
C:\temp\new\branches
C:\temp\new\tags
C:\temp\new\trunk
C:\temp\new\tags
C:\temp\new\trunk
Move the contents of C:\SVN_TORTOISE_REPOSITORY\GWT_Project into the trunk subdirectory (C:\temp\new\trunk).
Now right click on above "new" created folder and select import option.


Selelect URL as file:///C:/SVN_TORTOISE_REPOSITORY/GWT_Project

Right-click on C:\SVN_TORTOISE_REPOSITORY\GWT_Project and start TortoiseSVN/Repo-browser and you will be able to see your code in trunk.
Step 4. Creating a working directory. This is simple just create your folder and right click and use the option as check out

It is done :)...
Explore more for Tortos SVN from belwo sites
http://tortoisesvn.net/
http://tortoisesvn.net/
No comments:
Post a Comment