Now lets talk about installing SVN Server and Accessing it with Tortois SVN Client and http/https URL. Finally Lets play with SVN Tortoise client with Eclipse on this SVN Server
Visualsvn server is a subversion server used for software versioning and revision control.
Here we will use visualsvn server as subversion server and tortoise svn as client. Finally we will do eclipse svn integration.
Step 1:- Install SVN Server
Download and install visual svn server from below link and given necessary information as on when ask for directory name where all your repositories will be stored.
Download and install visual svn server from below link and given necessary information as on when ask for directory name where all your repositories will be stored.
visualsvn server download link :- https://www.visualsvn.com/server/download/
Step 2:-Configuring and creating our own SVN Server Repsitory
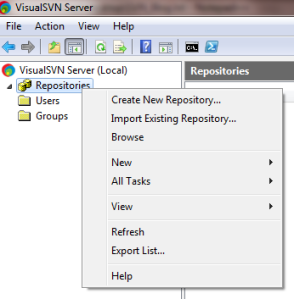
Once you install Visual SVN Server we will be able to see the below screen.
Right click on and select Create New Repository option and follow the wizard. When asked enter your Repsitory Name and at the end of wizard we will get url for now copy that url.
https://My-PC/svn/Siddhu_SVN_Server_Repository
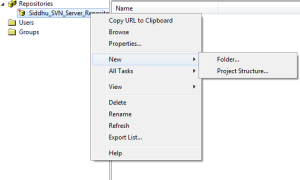
right click on step1 created repository --> New --> Project Structure
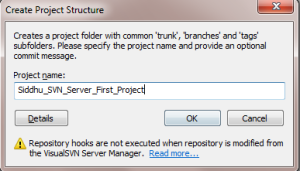
Enter project name
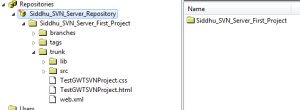
Finally we will be able to see this structure of our Repository Screen
Step 4:- If needed you can also create user that can access your repository i.e. Now Right Click on Users –> Create New User –> Enter all the details and press ok.
From here we had installed our SVN Server and now its time to see are we able to access the repository. For that
https://My-PC/svn/Siddhu_SVN_Server_Repository
https://My-PC/svn/Siddhu_SVN_Server_Repository
We will be able to see this screen
Step 5:- Performing check in and check out option with SVN Tortoise Client.
Before staring I preassume that we had already installed Tortose SVN in our window machine. While I was writting this blog latest version was TortoiseSVN 1.9.2 for 64 bit O/S.
Site to download :- http://tortoisesvn.net/downloads.html
Site to download :- http://tortoisesvn.net/downloads.html
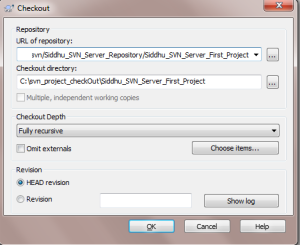
Just create a folder in your window machine where we want the code to be check out. At present we dont have anything in the respository so nothing will be copied. Just right click and select SVN check out below url https://My-PC/svn/Siddhu_SVN_Server_Repository/Siddhu_SVN_Server_First_Project and click ok
We will see all the three folder in it.
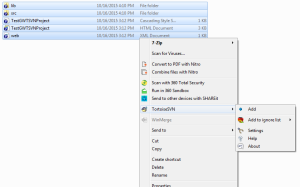
Lets add few files in our repository now. Copy some files i.e.txt files in side trunk folder and right click it and select add option in SVN client and then commit it.
We will be able to see this file in
We will be able to see this file in
Step 6:- Install SubVersion Eclipse Plugin
First install eclipse plugin from below link.
http://subclipse.tigris.org/
First install eclipse plugin from below link.
http://subclipse.tigris.org/
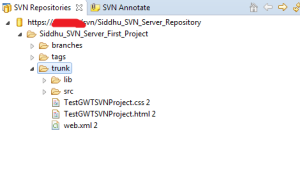
After the installation we will be able to see the SVN repository view. Right Click on this prospective and click on "Repository Location". Fill below url that is created for our project.
https://My-PC/svn/Siddhu_SVN_Server_Repository/
https://My-PC/svn/Siddhu_SVN_Server_Repository/
Finally we will be able to see this screen
Step 7:- Performing check in and checkout operation using eclipse.
Now lets do the final operation of doing check in and check out from eclipse.
just follow below steps for GWT Project
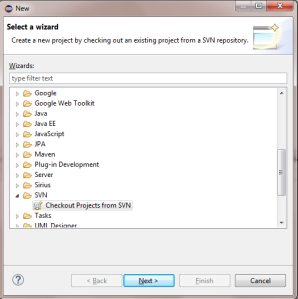
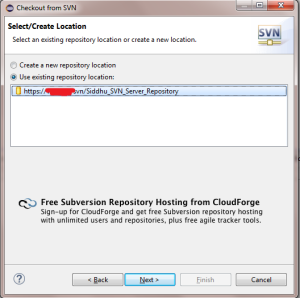
1- right click --> New -- > Other --> SVN --> Check out project from SVN.
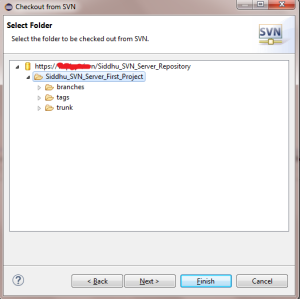
2- Select SVN branch
3- Select branch and click finish
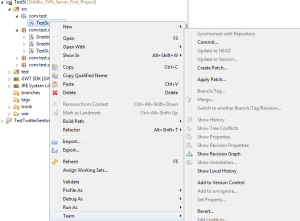
4- Then follow step for GWT project and we will see below screen.
For Reference use below site:-
http://www.technonutty.com/2014/05/visual-svn-server-tortoise-svn-eclispse.html






No comments:
Post a Comment