Wednesday, December 28, 2016

How to get ride of access-control-allow-origin error

If you are getting access-control-allow-origin error while calling webservice using *.js (i.e. node.js/angular.js) follow below step to resolve it

Step 1:- access-control-allow-origin error means server need to send response with below value in response


Access-Control-Allow-Origin: *
Access-Control-Allow-Headers: origin, x-requested-with, content-type
Access-Control-Allow-Methods: PUT, GET, POST, DELETE, OPTIONS

Make sure if you are calling web service add above parameter as header in response.


Step 2:- Make following changes in Tomcat on which your application is installed.

Add filer in web.xml of tomcat where your Angularjs or nodejs application resides.
<!--filter>
  <!--filter-name>header<!--/filter-name>
  <!--filter-class>com.thetransactioncompany.cors.CORSFilter<!--/filter-class>
<!--/filter>
<!--filter-mapping>
  <!--filter-name>header<!--/filter-name>
  <!--url-pattern>/*<!--/url-pattern>
<!--/filter-mapping>

Add this in Maven or if required copy this jar along with its dependend jar and place it in lib folder of Tomcat


<!--dependency>
    <!--groupId>com.thetransactioncompany<!--/groupId>
    <!--artifactId>cors-filter<!--/artifactId>
    <!--version>1.3.2<!--/version>
<!--/dependency>

Thursday, December 22, 2016

Spring Batch Example

Spring batch is an open source framework for batch processing – execution of a series of jobs.
We can defind Job as combination of Steps and one step can be READ-PROCESS-WRITE task or single operation task (tasklet).
Jobs{ Steps1(READ-PROCESS-WRITE,READ-PROCESS-WRITE,),Step2(tasklet)}
For “READ-PROCESS-WRITE” process, it means “read” data from the resources (csv, xml or database), “process” it and “write” it to other resources (csv, xml and database).
For “single” operation task (tasklet), it means doing single task.
and we can combine steps to create a jobs
Following are the improtant jar that are needed to get Class and API to perform Spring Batch operation
1- spring-batch-core
2- spring-tx
3- spring-core
4- spring-context
5- spring-retry
image_1

Lets consider an example where we want to read an cvs file one by one and put the out put in another file. Finally delete all the cvs files expect the final one which contains data of all cvs files.
Three steps
1- Read the cvs file one by one
2- Write the files in the another files
3- Delete the files.
Step:- Create an Maven project


<!--bean id="jobRepository"
class="org.springframework.batch.core.repository.support.MapJobRepositoryFactoryBean">
<!--property name="transactionManager" ref="transactionManager" />
<!--/bean>

<!--bean id="transactionManager"
class="org.springframework.batch.support.transaction.ResourcelessTransactionManager" />

<!--bean id="myJobLauncher"
class="org.springframework.batch.core.launch.support.SimpleJobLauncher">
<!--property name="jobRepository" ref="jobRepository" />
<!--/bean>

<!--/beans>
(2) job-files.xml
<!--?xml version="1.0" encoding="UTF-8"?>
<!--beans xmlns="http://www.springframework.org/schema/beans"
xmlns:batch="http://www.springframework.org/schema/batch" xmlns:xsi="http://www.w3.org/2001/XMLSchema-instance"
xsi:schemaLocation="http://www.springframework.org/schema/batch 
http://www.springframework.org/schema/batch/spring-batch-2.2.xsd
http://www.springframework.org/schema/beans 
http://www.springframework.org/schema/beans/spring-beans-3.2.xsd
">

<!--import resource="../config/context.xml" />

<!--bean id="siddhu" class="com.test.siddhu.SpringBatchExample.FileReader" />

<!--bean id="fileDeletingTasklet" class="com.test.siddhu.SpringBatchExample.tasklet.FileDeletingTasklet" >
<!--property name="directory" value="file:csv/inputs/" />
<!--/bean>

<!--job id="readMultipleFileJob" xmlns="http://www.springframework.org/schema/batch">
<!--step id="step1" next="deleteFileDirectory">
<!--tasklet>
<!--chunk reader="multipleFileResourceReader" writer="fileItemWriter"
commit-interval="1" />
<!--/tasklet>
<!--/step>
<!--step id="deleteFileDirectory">
<!--tasklet ref="fileDeletingTasklet" />
<!--/step>
<!--/job>

<!--bean id="multipleFileResourceReader"
class=" org.springframework.batch.item.file.MultiResourceItemReader">
<!--property name="resources" value="file:csv/inputs/siddhu-*.csv" />
<!--property name="delegate" ref="flatFileItemReader" />
<!--/bean>

<!--bean id="flatFileItemReader" class="org.springframework.batch.item.file.FlatFileItemReader">

<!--property name="lineMapper">
<!--bean class="org.springframework.batch.item.file.mapping.DefaultLineMapper">

<!--property name="lineTokenizer">
<!--bean
class="org.springframework.batch.item.file.transform.DelimitedLineTokenizer">
<!--property name="names" value="id, siddhu" />
<!--/bean>
<!--/property>
<!--property name="fieldSetMapper">
<!--bean
class="org.springframework.batch.item.file.mapping.BeanWrapperFieldSetMapper">
<!--property name="prototypeBeanName" value="siddhu" />
<!--/bean>
<!--/property>
<!--/bean>
<!--/property>

<!--/bean>

<!--bean id="fileItemWriter" class="org.springframework.batch.item.file.FlatFileItemWriter">

<!--property name="resource" value="file:csv/outputs/test-siddhu.all.csv" />
<!--property name="appendAllowed" value="false" />
<!--property name="lineAggregator">
<!--bean
class="org.springframework.batch.item.file.transform.DelimitedLineAggregator">
<!--property name="delimiter" value="," />
<!--property name="fieldExtractor">
<!--bean
class="org.springframework.batch.item.file.transform.BeanWrapperFieldExtractor">
<!--property name="names" value="id, siddhu" />
<!--/bean>
<!--/property>
<!--/bean>
<!--/property>

<!--/bean>

<!--/beans>
Step 3:- Add following line of code in App files
package com.test.siddhu.SpringBatchExample;
import org.springframework.batch.core.Job;
import org.springframework.batch.core.JobExecution;
import org.springframework.batch.core.JobParameters;
import org.springframework.batch.core.launch.JobLauncher;
import org.springframework.context.ApplicationContext;
import org.springframework.context.support.ClassPathXmlApplicationContext;
public class App {
public static void main(String[] args) {
App obj = new App();
obj.run();
}

private void run() {
String[] springConfig = { "spring/batch/jobs/job-files.xml" };
ApplicationContext context = new ClassPathXmlApplicationContext(springConfig);
//ApplicationContext context = new ClassPathXmlApplicationContext();
JobLauncher jobLauncher = (JobLauncher) context.getBean("myJobLauncher");
Job job = (Job) context.getBean("readMultipleFileJob");
try {
JobExecution execution = jobLauncher.run(job, new JobParameters());
System.out.println("Exit Status : " + execution.getStatus());
System.out.println("Exit Status : " + execution.getAllFailureExceptions());
} catch (Exception e) {
e.printStackTrace();
}
System.out.println("Done");
}
}

Step 4- Create FileReader class
package com.test.siddhu.SpringBatchExample;
public class FileReader {
int id;
String siddhu;
public int getId() {
return id;
}
public void setId(int id) {
this.id = id;
}
public String getSiddhu() {
return siddhu;
}
public void setSiddhu(String siddhu) {
this.siddhu = siddhu;
}
}
Ste 5 - Create FileDeletingTasklet to delete cvs files
package com.test.siddhu.SpringBatchExample.tasklet;
import java.io.File;
import org.springframework.batch.core.StepContribution;
import org.springframework.batch.core.UnexpectedJobExecutionException;
import org.springframework.batch.core.scope.context.ChunkContext;
import org.springframework.batch.core.step.tasklet.Tasklet;
import org.springframework.batch.repeat.RepeatStatus;
import org.springframework.beans.factory.InitializingBean;
import org.springframework.core.io.Resource;
import org.springframework.util.Assert;
public class FileDeletingTasklet implements Tasklet, InitializingBean {
private Resource directory;

public void afterPropertiesSet() throws Exception {
Assert.notNull(directory, "directory must be set");
}

public RepeatStatus execute(StepContribution contribution, ChunkContext chunkContext) throws Exception {
File dir = directory.getFile();
Assert.state(dir.isDirectory());
File[] files = dir.listFiles();
for (int i = 0; i < files.length; i++) {
boolean deleted = files[i].delete();
if (!deleted) {
throw new UnexpectedJobExecutionException("Could not delete file " + files[i].getPath());
} else {
System.out.println(files[i].getPath() + " is deleted!");
}
}
return RepeatStatus.FINISHED;
}
public Resource getDirectory() {
return directory;
}
public void setDirectory(Resource directory) {
this.directory = directory;
}
/*public void afterPropertiesSet() throws Exception {
// TODO Auto-generated method stub

}
public RepeatStatus execute(StepContribution arg0, ChunkContext arg1) throws Exception {
// TODO Auto-generated method stub
return null;
}*/
}
Note :- when ever you want to see the out out file full of data keep your all files from bk folder to input folder else you will get created cvs file as 0 size.

Folder Structure of Project
image_3


Inside input folder
image_6
Final output


image_4
image_5

Tuesday, December 20, 2016

Flow for Struts2

- Lets say in JSP we allow user to click on url

<!--li><!--s:url var="url" namespace="/test" action="myedit"/><!--s:a href="%{url}">Test<!--/s:a><!--/li>

Action called as myedit will be fired which exist under test namespace

- Search for corrresponding struts.xml and find name space with key word test and inside that namespace find action name as myedit

<!--package name="test" extends="default" namespace="/test">

<!--action name="myedit" class="siddhu.action.TestAction">
<!--result>/WEB-INF/myapplication/editTest.jsp<!--/result>
<!--interceptor-ref name="params" />
<!--interceptor-ref name="basicStack"/>
<!--/action>

- This indicate that result file editTest.jsp will be displayed to the end user.

- Open editTest.jsp and lets assume we had button that save the value user enter into the text field i.e

<!--s:form action="save">
<!--s:textfield label="Name" name="testModel.name"/>
<!--s:submit value="Save" cssClass="btn btn-primary"/>
<!--/s:form>

Above code suggest on form submission save action is called. Refer to the save action in struts.xml

<!--action name="save" class="siddhu.action.TestAction" method="save">
<!--result name="input">/WEB-INF/myapplication/editTest.jsp<!--/result>
<!--result type="redirect">list.action<!--/result>
<!--/action>

above code suggest when user fire save action save method of corresponding TestAction class is called

- Now to map the textfield with action we need to have a model class that store the data of the form that is entered by the end users
- Let say it is TestModel class with getter and setter for the field name
- In TestAction action class make sure to create the instance of private TestModel testName; This is the place where tagging of field on jsp and action take place. In Strut1 it was form class which was helping us for the same. Use prepare() method for the same.

- Perform what ever operation we want to perform in TestAction action save() method 
Note: this testModel in above line must match with the text of <!--s:textfield label="Name" name="testModel.name"/> in jsp and also the name of field in jsp and model need to be same

Monday, December 12, 2016

Spring Social Example to access LinkedIn API.

1) Install STS from the below given site. Chose your OS dependend IDE version.
https://spring.io/tools/sts/all
2) Create a simple Maven JAVA project with following details


org.springframework.social
spring-social
1.1.4.RELEASE

>
3) Modify your pom.xml as given below
<!--project xmlns="http://maven.apache.org/POM/4.0.0" xmlns:xsi="http://www.w3.org/2001/XMLSchema-instance"
xsi:schemaLocation="http://maven.apache.org/POM/4.0.0 http://maven.apache.org/xsd/maven-4.0.0.xsd">
<!--modelVersion>4.0.0<!--/modelVersion>
<!--groupId>org.springframework.social<!--/groupId>
<!--artifactId>spring-social-linkedin<!--/artifactId>
<!--version>1.0.0.RELEASE<!--/version>
<!--packaging>jar<!--/packaging>
<!--name>spring-social-linkedin<!--/name>
<!--url>http://maven.apache.org<!--/url>
<!--parent>
<!--groupId>org.springframework.boot<!--/groupId>
<!--artifactId>spring-boot-starter-parent<!--/artifactId>
<!--version>1.4.2.RELEASE<!--/version>
<!--/parent>
<!--dependencies>
<!--dependency>
<!--groupId>org.springframework.boot<!--/groupId>
<!--artifactId>spring-boot-starter-thymeleaf<!--/artifactId>
<!--/dependency>
<!--dependency>
<!--groupId>org.springframework.social<!--/groupId>
<!--artifactId>spring-social-linkedin<!--/artifactId>
<!--/dependency>
<!--/dependencies>
<!--properties>
<!--java.version>1.8<!--/java.version>
<!--/properties>
<!--build>
<!--plugins>
<!--plugin>
<!--groupId>org.springframework.boot<!--/groupId>
<!--artifactId>spring-boot-maven-plugin<!--/artifactId>
<!--/plugin>
<!--/plugins>
<!--/build>
<!--/project>
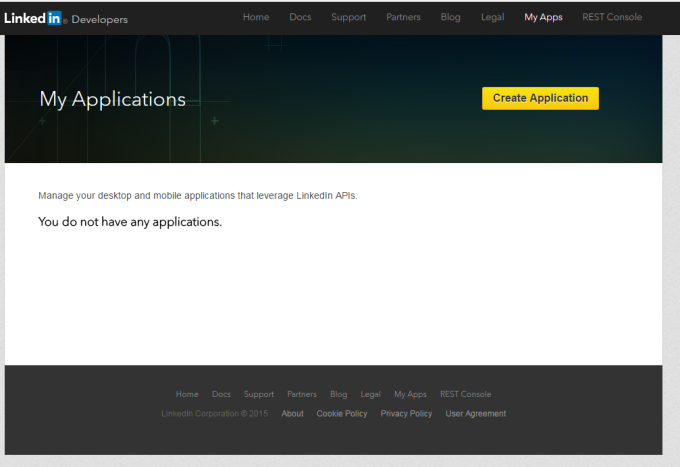
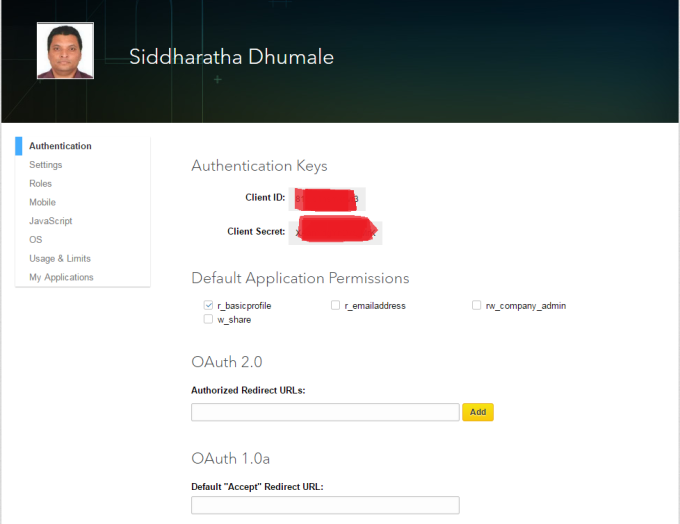
4) Register or create your Twitter application as given below
https://www.linkedin.com/developer/
from here we will get two things Client ID and Client Secret. This is used to call the Linked API.

image1image2

6) Make sure your application project folder structure look like the same. You can all download the zip from this site
image8
Make sure that you remove {{}} brackets from application.properties as shown in the below figure
image9
7) Build your Maven project and run the application
image3
If you get below error
image4
Make sure the make following changes

image5
Rerun the application and click on connect you will get his screen add password and click allow access

image6image7


package hello;
import org.springframework.boot.SpringApplication;
import org.springframework.boot.autoconfigure.SpringBootApplication;
@SpringBootApplication
public class Application {
public static void main(String[] args) {
SpringApplication.run(Application.class, args);
}
}

package hello;
import javax.inject.Inject;
import org.springframework.social.connect.UserProfile;
import org.springframework.social.linkedin.api.LinkedIn;
import org.springframework.social.linkedin.api.LinkedInProfile;
import org.springframework.stereotype.Controller;
import org.springframework.ui.Model;
import org.springframework.web.bind.annotation.RequestMapping;
import org.springframework.web.bind.annotation.RequestMethod;
@Controller
@RequestMapping("/")
public class HelloController {
private LinkedIn linkedin;
UserProfile userProfile;
@Inject
public HelloController(LinkedIn linkedin) {
this.linkedin = linkedin;
}
@RequestMapping(method=RequestMethod.GET)
public String helloLinkedIn(Model model) {
try {
if (!linkedin.isAuthorized()) {
return "redirect:/connect/linkedin";
}}catch (NullPointerException e){
return "redirect:/connect/linkedin";
}
LinkedInProfile profile = linkedin.profileOperations().getUserProfile();
String profileId = linkedin.profileOperations().getProfileId();
System.out.println(profileId);
return "hello";
}
}

Spring Social Example to access Facebook API.

1) Install STS from the below given site. Chose your OS dependend IDE version.
https://spring.io/tools/sts/all
2) Create a simple Maven JAVA project with following details


org.springframework.social
spring-social-facebook
2.0.3.RELEASE

3) Modify your pom.xml as given below
<!--?xml version="1.0" encoding="UTF-8"?>
<!--project xmlns="http://maven.apache.org/POM/4.0.0" xmlns:xsi="http://www.w3.org/2001/XMLSchema-instance"
xsi:schemaLocation="http://maven.apache.org/POM/4.0.0 http://maven.apache.org/xsd/maven-4.0.0.xsd">
<!--modelVersion>4.0.0<!--/modelVersion>
<!--groupId>org.springframework<!--/groupId>
<!--artifactId>gs-accessing-facebook<!--/artifactId>
<!--version>0.1.0<!--/version>
<!--parent>
<!--groupId>org.springframework.boot<!--/groupId>
<!--artifactId>spring-boot-starter-parent<!--/artifactId>
<!--version>1.4.2.RELEASE<!--/version>
<!--/parent>
<!--dependencies>
<!--dependency>
<!--groupId>org.springframework.boot<!--/groupId>
<!--artifactId>spring-boot-starter-thymeleaf<!--/artifactId>
<!--/dependency>
<!--dependency>
<!--groupId>org.springframework.social<!--/groupId>
<!--artifactId>spring-social-facebook<!--/artifactId>
<!--/dependency>
<!--/dependencies>
<!--properties>
<!--java.version>1.8<!--/java.version>
<!--/properties>
<!--build>
<!--plugins>
<!--plugin>
<!--groupId>org.springframework.boot<!--/groupId>
<!--artifactId>spring-boot-maven-plugin<!--/artifactId>
<!--/plugin>
<!--/plugins>
<!--/build>
<!--repositories>
<!--repository>
<!--id>spring-snapshots<!--/id>
<!--name>Spring Snapshots<!--/name>
<!--url>https://repo.spring.io/libs-milestone<!--/url>
<!--snapshots>
<!--enabled>false<!--/enabled>
<!--/snapshots>
<!--/repository>
<!--/repositories>
<!--pluginRepositories>
<!--pluginRepository>
<!--id>spring-snapshots<!--/id>
<!--name>Spring Snapshots<!--/name>
<!--url>https://repo.spring.io/libs-milestone<!--/url>
<!--snapshots>
<!--enabled>false<!--/enabled>
<!--/snapshots>
<!--/pluginRepository>
<!--/pluginRepositories>
<!--/project>
4) Follow the instruction givn in the below site
https://spring.io/guides/gs/accessing-facebook/
Follow step that is provided for Maven build. If you are using Gradle follow the same.
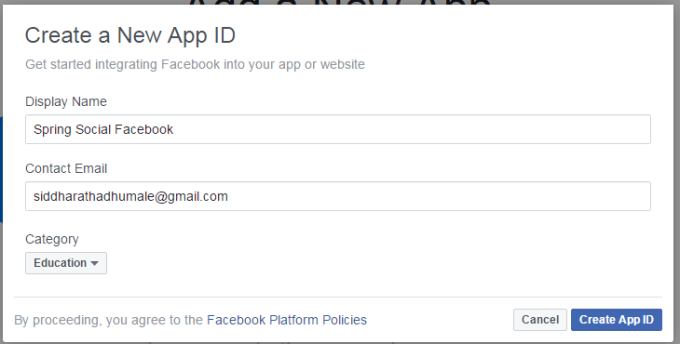
5) Register or create your Facebook application as given below
https://spring.io/guides/gs/register-facebook-app/
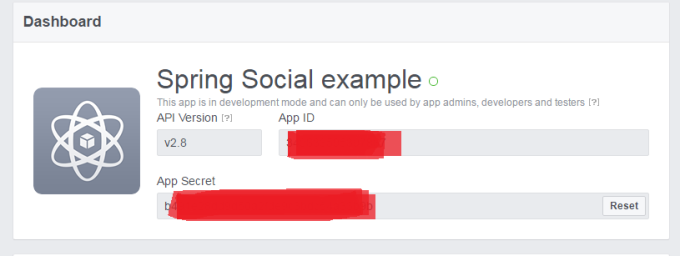
image1image2image3
from here we will get two things consumer key and consumer secret. This is used to call the Facebook API.
image4image5

image6
6) Make sure your application project folder structure look like the same. You can all download the zip from this site
image13
7) Build and run your Maven project using following configuration 
9) Once server is started you will be able to see following screen
image7

10) Click on Connect facebook and if you get below screen
image8
follow the steps given in
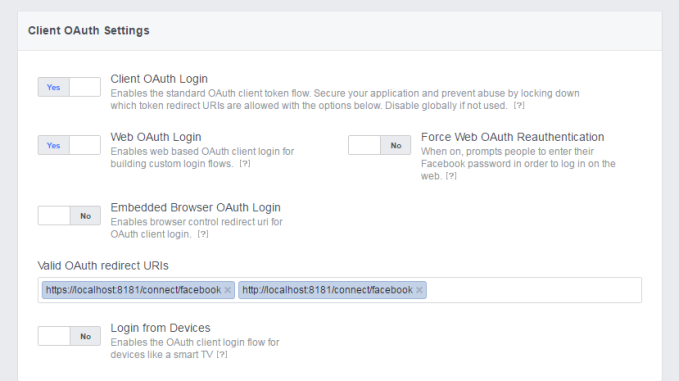
http://stackoverflow.com/questions/37063685/facebook-oauth-the-domain-of-this-url-isnt-included-in-the-apps-domain
image11

11) Click on Click here and we will see

image9image10
image12

package hello;
import org.springframework.boot.SpringApplication;
import org.springframework.boot.autoconfigure.SpringBootApplication;
@SpringBootApplication
public class Application {
public static void main(String[] args) {
SpringApplication.run(Application.class, args);
}
}

package hello;
import org.springframework.social.connect.ConnectionRepository;
import org.springframework.social.facebook.api.Facebook;
import org.springframework.social.facebook.api.PagedList;
import org.springframework.social.facebook.api.Post;
import org.springframework.social.facebook.api.User;
import org.springframework.stereotype.Controller;
import org.springframework.ui.Model;
import org.springframework.web.bind.annotation.GetMapping;
import org.springframework.web.bind.annotation.RequestMapping;
@Controller
@RequestMapping("/")
public class HelloController {
private Facebook facebook;
private ConnectionRepository connectionRepository;
public HelloController(Facebook facebook, ConnectionRepository connectionRepository) {
this.facebook = facebook;
this.connectionRepository = connectionRepository;
}
@GetMapping
public String helloFacebook(Model model) {
if (connectionRepository.findPrimaryConnection(Facebook.class) == null) {
return "redirect:/connect/facebook";
}


/* model.addAttribute("facebookProfile", facebook.userOperations().getUserProfile());
PagedList feed = facebook.feedOperations().getFeed();
model.addAttribute("feed", feed);
return "hello";*/

String [] fields = { "id","name","birthday","email","location","hometown","gender","first_name","last_name"};
User user = facebook.fetchObject("me", User.class, fields);
String name=user.getName();
String birthday=user.getBirthday();
String email=user.getEmail();
String gender=user.getGender();
String firstname=user.getFirstName();
String lastname=user.getLastName();
model.addAttribute("name",name );
model.addAttribute("birthday",birthday );
model.addAttribute("email",email );
model.addAttribute("gender",gender);
model.addAttribute("firstname",firstname);
model.addAttribute("lastname",lastname);
model.addAttribute("facebookProfile", facebook.fetchObject("me", User.class, fields));
PagedList feed = facebook.feedOperations().getFeed();
model.addAttribute("feed", feed);
return "hello";
}
}

spring.social.facebook.app-id=XXXXXX
spring.social.facebook.app-secret=XXXXX