Before starting this topic lets first understand topic like JMS and Apache ActiveMQ Server.
What is JMS?
Java Message Service (JMS) is an application program interface (API) from Sun Microsystems that supports the messaging communication between computers / applications / software components in a network.
Two basic architecture is used for communication:
i. QUEUE – This is a kind of pipeline connection with client in One-To-One chat fashion.
ii. TOPIC – This is a kind of pipeline connection withall client at one placein Group chat fashion
i. QUEUE – This is a kind of pipeline connection with client in One-To-One chat fashion.
ii. TOPIC – This is a kind of pipeline connection withall client at one placein Group chat fashion
What is Apache ActiveMQ?
ActiveMQ is an open-source, messaging software which serve as the backbone for an architecture of distributed applications built upon messaging. ActiveMQ completely implements Java Messaging Service (JMS).
Download the same from the below url and in stalled it as per your system O/S.
Download the same from the below url and in stalled it as per your system O/S.
http://activemq.apache.org/activemq-5121-release.html
Lets start creating and implementing java sender and caller class to use JMS functionality of JAVA
Step - 1. The first step to create a JMS Server. As stated above download the latest verison of Apache ActiveMQ.(activemq-5121-release.html at time of writing this blog)
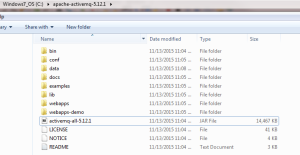
Extract the compressed file move to apache-activemq-5.12.1\bin\ folder and start the server using activemq.bat or activemq.sh file.
Make sure server should start without any issue.
Extract the compressed file move to apache-activemq-5.12.1\bin\ folder and start the server using activemq.bat or activemq.sh file.
Make sure server should start without any issue.
Test server by starting it using below command
C:\apache-activemq-5.12.1\bin>activemq.bat start
and test if it is running properly by opening user interface of server by hittling this url in browser http://localhost:8161
Step -2- Now create simple java project. As a developer I always admire Eclpise as IDE. For this example also i am following the same Legacy.
Create JAVA Project in Eclipse and create two pacakge sender and receiver
Create JAVA Project in Eclipse and create two pacakge sender and receiver
Step -3- Create Sender.java and Receiver.java class in respective folder
=========Sender
package com.siddhu.sender;import java.util.Properties;
import javax.naming.Context;
import javax.naming.InitialContext;
import javax.naming.InitialContext;
import javax.jms.Queue;
import javax.jms.Session;
import javax.jms.TextMessage;
import javax.jms.QueueSender;
import javax.jms.DeliveryMode;
import javax.jms.QueueSession;
import javax.jms.QueueConnection;
import javax.jms.QueueConnectionFactory;
import javax.jms.Session;
import javax.jms.TextMessage;
import javax.jms.QueueSender;
import javax.jms.DeliveryMode;
import javax.jms.QueueSession;
import javax.jms.QueueConnection;
import javax.jms.QueueConnectionFactory;
public class Sender {
public static void main(String[] args) throws Exception {
Properties env = new Properties();
env.put(Context.INITIAL_CONTEXT_FACTORY,
"org.apache.activemq.jndi.ActiveMQInitialContextFactory");
env.put(Context.PROVIDER_URL, "tcp://localhost:61616");
env.put("queue.queueSampleQueue", "MyNewQueue");
Properties env = new Properties();
env.put(Context.INITIAL_CONTEXT_FACTORY,
"org.apache.activemq.jndi.ActiveMQInitialContextFactory");
env.put(Context.PROVIDER_URL, "tcp://localhost:61616");
env.put("queue.queueSampleQueue", "MyNewQueue");
// get the initial context
InitialContext ctx = new InitialContext(env);
InitialContext ctx = new InitialContext(env);
// lookup the queue object
Queue queue = (Queue) ctx.lookup("queueSampleQueue");
// lookup the queue connection factory
QueueConnectionFactory connFactory = (QueueConnectionFactory) ctx.lookup("QueueConnectionFactory");
// create a queue connection
QueueConnection queueConn = connFactory.createQueueConnection();
Queue queue = (Queue) ctx.lookup("queueSampleQueue");
// lookup the queue connection factory
QueueConnectionFactory connFactory = (QueueConnectionFactory) ctx.lookup("QueueConnectionFactory");
// create a queue connection
QueueConnection queueConn = connFactory.createQueueConnection();
// create a queue session
QueueSession queueSession = queueConn.createQueueSession(false,Session.DUPS_OK_ACKNOWLEDGE);
QueueSession queueSession = queueConn.createQueueSession(false,Session.DUPS_OK_ACKNOWLEDGE);
// create a queue sender
QueueSender queueSender = queueSession.createSender(queue);
queueSender.setDeliveryMode(DeliveryMode.NON_PERSISTENT);
QueueSender queueSender = queueSession.createSender(queue);
queueSender.setDeliveryMode(DeliveryMode.NON_PERSISTENT);
// create a simple message to say "Hello this is siddharatha"
TextMessage message = queueSession.createTextMessage("Hello this is siddharatha");
TextMessage message = queueSession.createTextMessage("Hello this is siddharatha");
// send the message
queueSender.send(message);
queueSender.send(message);
System.out.println("sent: " + message.getText());
queueConn.close();
}
}
}
}
================Recevier
package com.siddhu.receiver;
import java.util.Properties;
import java.util.Properties;
import javax.naming.Context;
import javax.naming.InitialContext;
import javax.naming.InitialContext;
import javax.jms.Queue;
import javax.jms.Session;
import javax.jms.TextMessage;
import javax.jms.QueueSession;
import javax.jms.QueueReceiver;
import javax.jms.QueueConnection;
import javax.jms.QueueConnectionFactory;
import javax.jms.Session;
import javax.jms.TextMessage;
import javax.jms.QueueSession;
import javax.jms.QueueReceiver;
import javax.jms.QueueConnection;
import javax.jms.QueueConnectionFactory;
public class Receiver {
public static void main(String args[]) throws Exception {
Properties env = new Properties(); env.put(Context.INITIAL_CONTEXT_FACTORY,
"org.apache.activemq.jndi.ActiveMQInitialContextFactory");
env.put(Context.PROVIDER_URL, "tcp://localhost:61616");
env.put("queue.queueSampleQueue","MyNewQueue");
// get the initial context
InitialContext ctx = new InitialContext(env);
// lookup the queue object
Queue queue = (Queue) ctx.lookup("queueSampleQueue");
Queue queue = (Queue) ctx.lookup("queueSampleQueue");
// lookup the queue connection factory
QueueConnectionFactory connFactory = (QueueConnectionFactory) ctx.lookup("QueueConnectionFactory");
QueueConnectionFactory connFactory = (QueueConnectionFactory) ctx.lookup("QueueConnectionFactory");
// create a queue connection
QueueConnection queueConn = connFactory.createQueueConnection();
QueueConnection queueConn = connFactory.createQueueConnection();
// create a queue session
QueueSession queueSession = queueConn.createQueueSession(false,Session.AUTO_ACKNOWLEDGE);
QueueSession queueSession = queueConn.createQueueSession(false,Session.AUTO_ACKNOWLEDGE);
// create a queue receiver
QueueReceiver queueReceiver = queueSession.createReceiver(queue);
QueueReceiver queueReceiver = queueSession.createReceiver(queue);
// start the connection
queueConn.start();
queueConn.start();
// receive a message
TextMessage message = (TextMessage) queueReceiver.receive();
TextMessage message = (TextMessage) queueReceiver.receive();
// print the message
System.out.println("received: " + message.getText());
System.out.println("received: " + message.getText());
// close the queue connection
queueConn.close();
}
}
queueConn.close();
}
}
Make sure to remove all the compillation error by using activemq-all-5.12.1.jar which will be present in the folder where you had extracted your ActiveMQ server
i.e. C:\apache-activemq-5.12.1
i.e. C:\apache-activemq-5.12.1
Step 4- First run Sender and see that your message "Hello this is siddharatha" is send to the queue
Check that message is reached to the queue by opening the this url
http://localhost:8161
http://localhost:8161
It will ask for userid and passwd. Refer to the file in users.properties in conf folder of ApacheActive server i.e. C:\apache-activemq-5.12.1\conf and you will get userid and passwd generally admin by default.
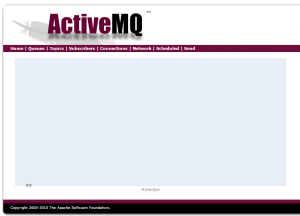
Enter credential and you will see this screen.
Blue colour graph shown that Message queue is having message in it.
Step 5- Run Receiver.java and you will find that we will get message "Hello this is siddharatha".
Also refer to the Graph image and you will find that blue colour graph is removed indicating message is consumed.
Now run one more time Receiver.java and you will find we will not get any output reason the message which we had send in the first run of Sender.java is already consumed by our Receiver.java.


No comments:
Post a Comment