Wednesday, April 29, 2020

React Flux with Simple Example

React Java script build by facebook for view part of the MVC. This means it itself did not give or suggest you any frame work to incorporate like Angular which comes with inbuild Framework to build an application. Having said this it becomes important to have a fram work to follow religiously so that project maintainability and scalability can be addressed in long term goal. As in long time after working with any application if no frame work is maintained it will be the main cause of failure along with hard to maintain and understand the project.
Flux is another open source Frame work provided by Facebook and suggested to use in React. As we have MVC framework in java application explained below
Controller :- This is the central hub of the MVC framework. It acts as an intermediate between model and view. Generally we always have one controller per application. Its main function is to handle all the request from the view in terms of action. Controller decide what to do with data either to send it to view part for showing to the user or it need to go to model to perform some DB or REST call.
View :- This represent the view part of the application and never talk directly with Model. It has to go through controller.
Model :- This represent the data that is coming from Controller. It never talk directly with View. It either take data from Controller and perform W/S or DB call or take the data from DB or REST and give to controller by informing to provide it to view for rendering.
Action --> Controller
| |
View Model

Flux is also similar to MVC but unidirectional. It has following part
Action --> Dispatcher --> Store -->View
Lets discuss few of the aspect of all describe above
'- Action send the action using dispatch to dispatcher
'- Dispacther take the action and send the data and action type to store
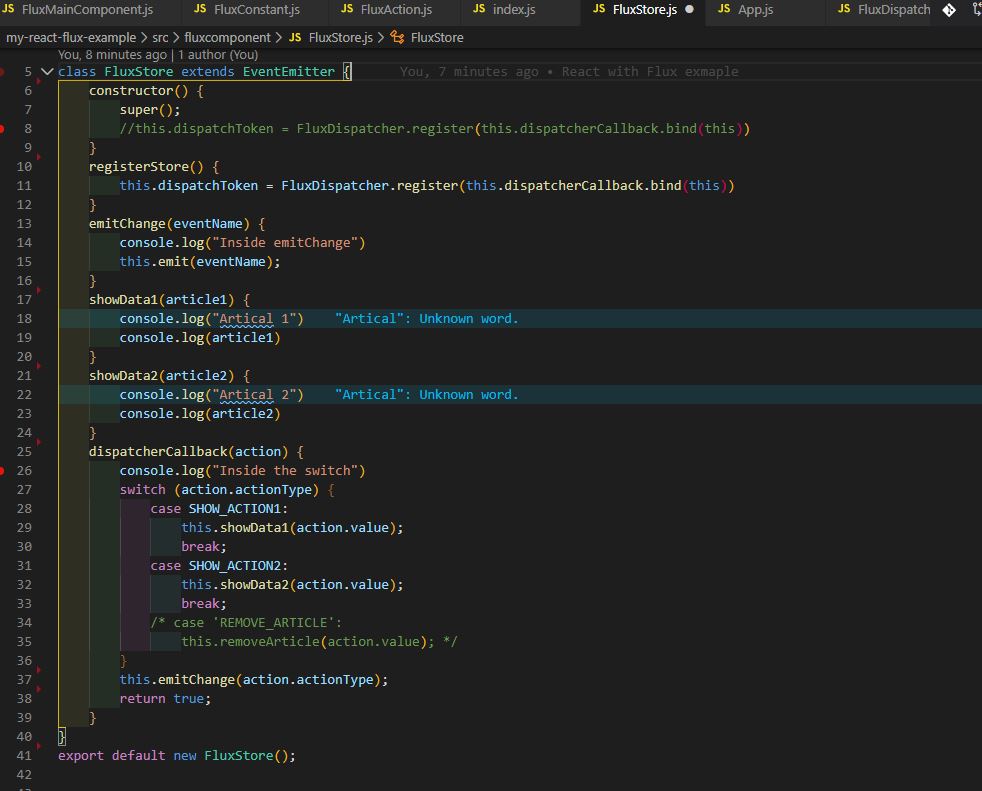
'- store responds to the dispatched action using register, switch and case.
'- Store finally emits change to view and view update as per the need.
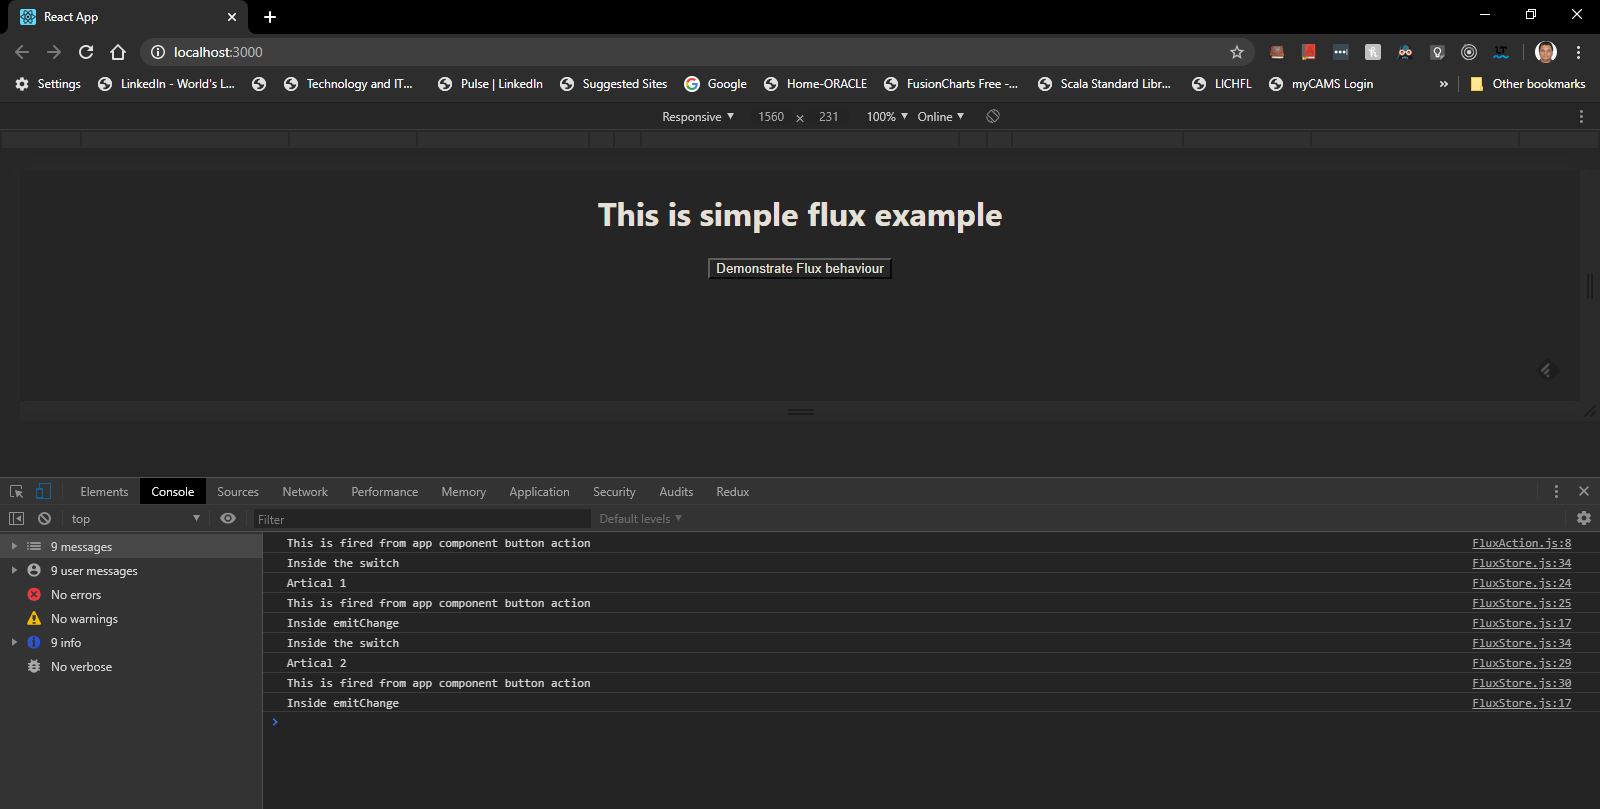
In short user perform the action i.e. clicking on button this action is send to Action class which call the Dispacther class by sending the action type (to differentiate different action) and data and then dispatcher using dispatch this action and data to all the store who has already register them self with this dispatcher. Finally when the data is taken by the store class it perform the operation and send event to View to do changes.
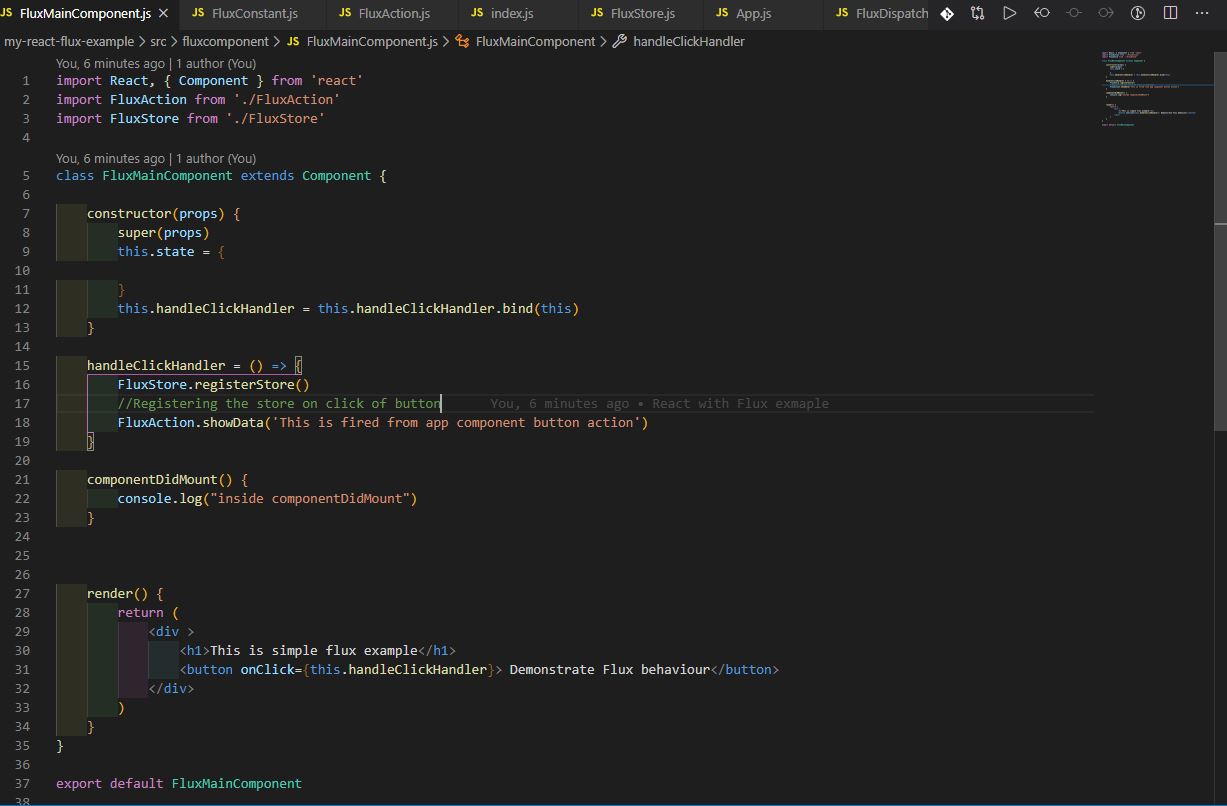
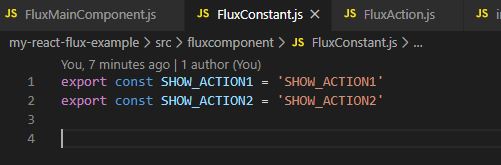
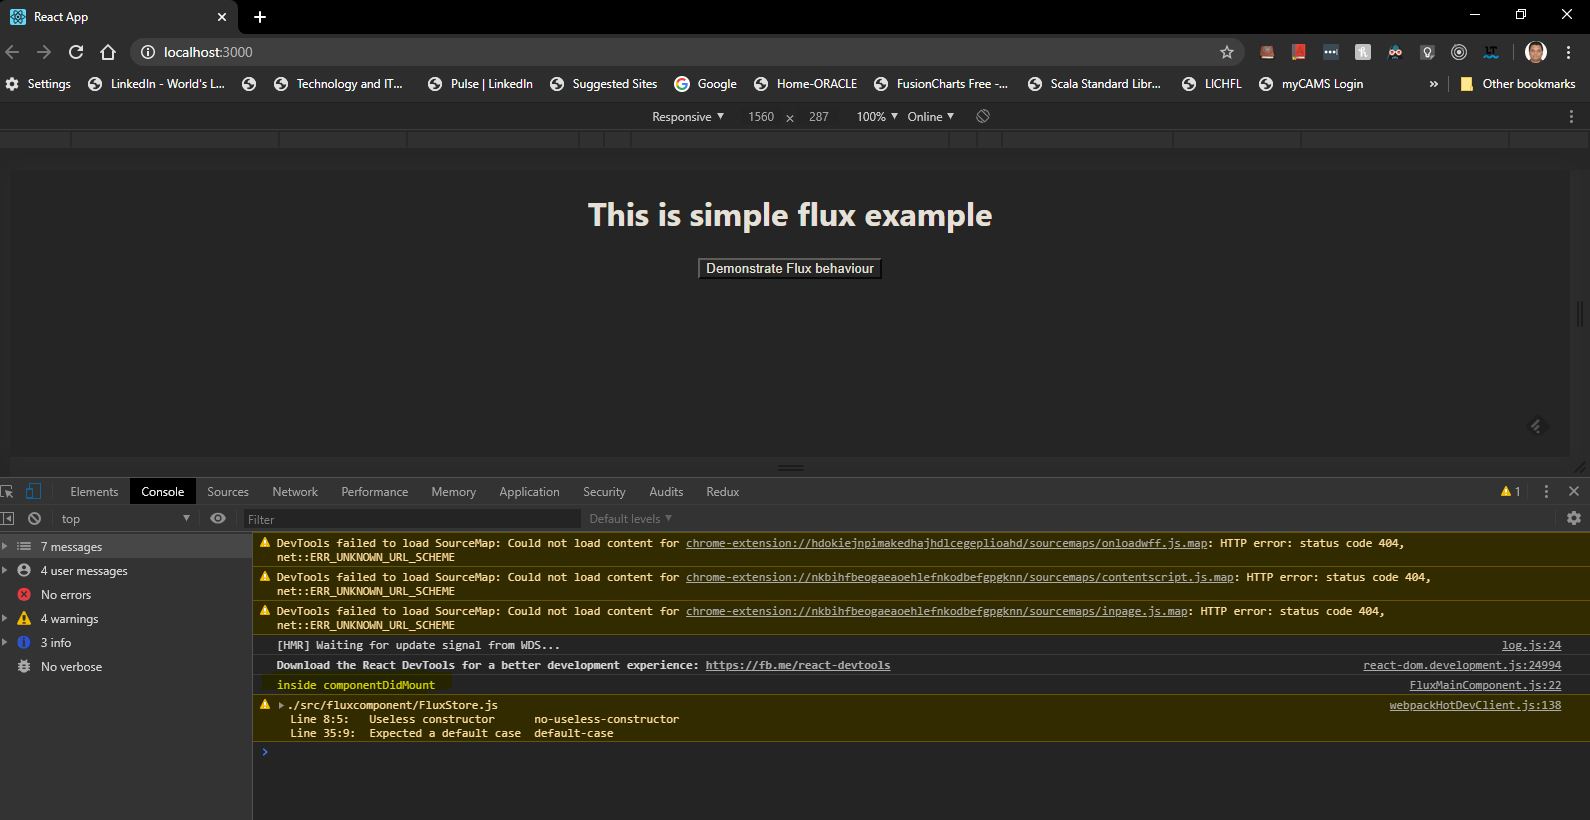
Please refer to the working code as given below

You can also download the code from URL

https://github.com/shdhumale/SimpleReactFluxExample


Folder structure
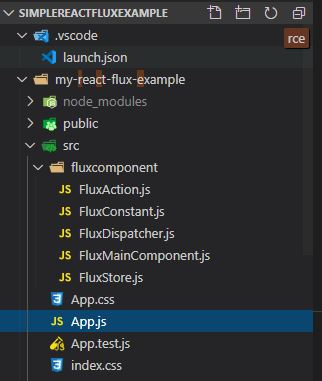
Iamge1Iamge2Iamge3Iamge4Iamge5Iamge6Iamge7Iamge8Iamge9

Thursday, April 16, 2020

Redux Library and its uses in Java Script

Redux is the third party extension that can be used for any Java script application as third party library.It act as a predictable state container .
Following are the important aspect of the Redux
-> SAR - MA :-
'- Store :- store the state of the Application. Means every application must have single state to be store,
'- Action :- indicate what need to be done with the state which is readonly. Your application must tell redux through/by firing the action to redux from your application telling what need to be done with the state. No Direct update is avaialble,
'- Reducer:- Actully carrier out the change in the state. i.e. we need to write the code in reducer (pure function that teake prevState and action as input) and change the new state depending. so how the state is transfer is depending on this reducer.
In short our application subscribe to redux, it store its state in redux, It cannot change the state directly it has to emit/dispath the action which is given to reducer which is pure function depending on the action type it will modify the state and then redux inform/send the new state to our application as it is subscribed.
'- Store :- CGSD - Create store , Getstate - to get the state of the application, susbcribe(listener) for subscrbing and unsubscribing the listener as the state change and dispatch(action) is used to make change in state in the store.
'-MiddleWare :- It is 3rd party extension act between dispatching the action and receving to reducers. It can be used for log, crash reporting, performing async task etc.
'-Asyn Action :- this is generally achieved using Thunk external library in Redux. It help us to get the action creater to return function instead of action object.
Let take an example or Use case
SAR - State (Data + Error + Loading) , Action (User request, User error, User succssess), Reducer funtion (User request => loading=true, User error => loading = false, error=true , User success =>loading = true, data=User) use axios and thunk(as middleware)
Code As given below
//We are using Axios and Thunk for making REST call using Redux
//As per process we will first follow this three steps
//1- create ActionInitiator
//2- Create Reducers that take state = InitialState and Action as parameters
//3- Create Store
//Our requirement is 1- Mak a ASync Rest call 2- Till the call is working keeping loading parameter true 3- On success (a) keeping loading parameter true and (b) fill the data 4- on error (a) keeping loading parameter true (b)) fill the error with message and (c) make/set the data error as empty
//SAR => I-AIR -ST => CGSD (Store - Action-Reducer => InitialState, Action, ActionInitiator, Reducer, Store - [Createstore, getstate, subscribe, dispatchaction, unsubscribe], thunk Async Function) -
const redux = require("redux")
const applyMiddleware = redux.applyMiddleware
const reduxThunk = require("redux-thunk").default
const axios = require("axios")
//1- Declare initialState
const initialState = {
loading: false,
users: [],
error: ''
}
//2- Create Action
const USER_REQUEST = "USER_REQUEST"
const USER_SUCCESS = "USER_SUCCESS"
const USER_ERROR = "USER_ERROR"
//3- Create Action Initiators
const fetchUserRequest = () => {
return {
type: USER_REQUEST
}
}
const fetchUserSuccess = (users) => {
return {
type: USER_SUCCESS,
payload: users
}
}
const fetchUserError = (error) => {
return {
type: USER_ERROR,
payload: error
}
}
//4- Create Reducers
const reducer = (state = initialState, action) => {
switch (action.type) {
case USER_REQUEST: return {
...state,
loading: true
}
case USER_SUCCESS: return {
loading: false,
users: action.payload,
error: ''
}
case USER_SUCCESS: return {
loading: false,
users: [],
error: action.payload
}
}
}
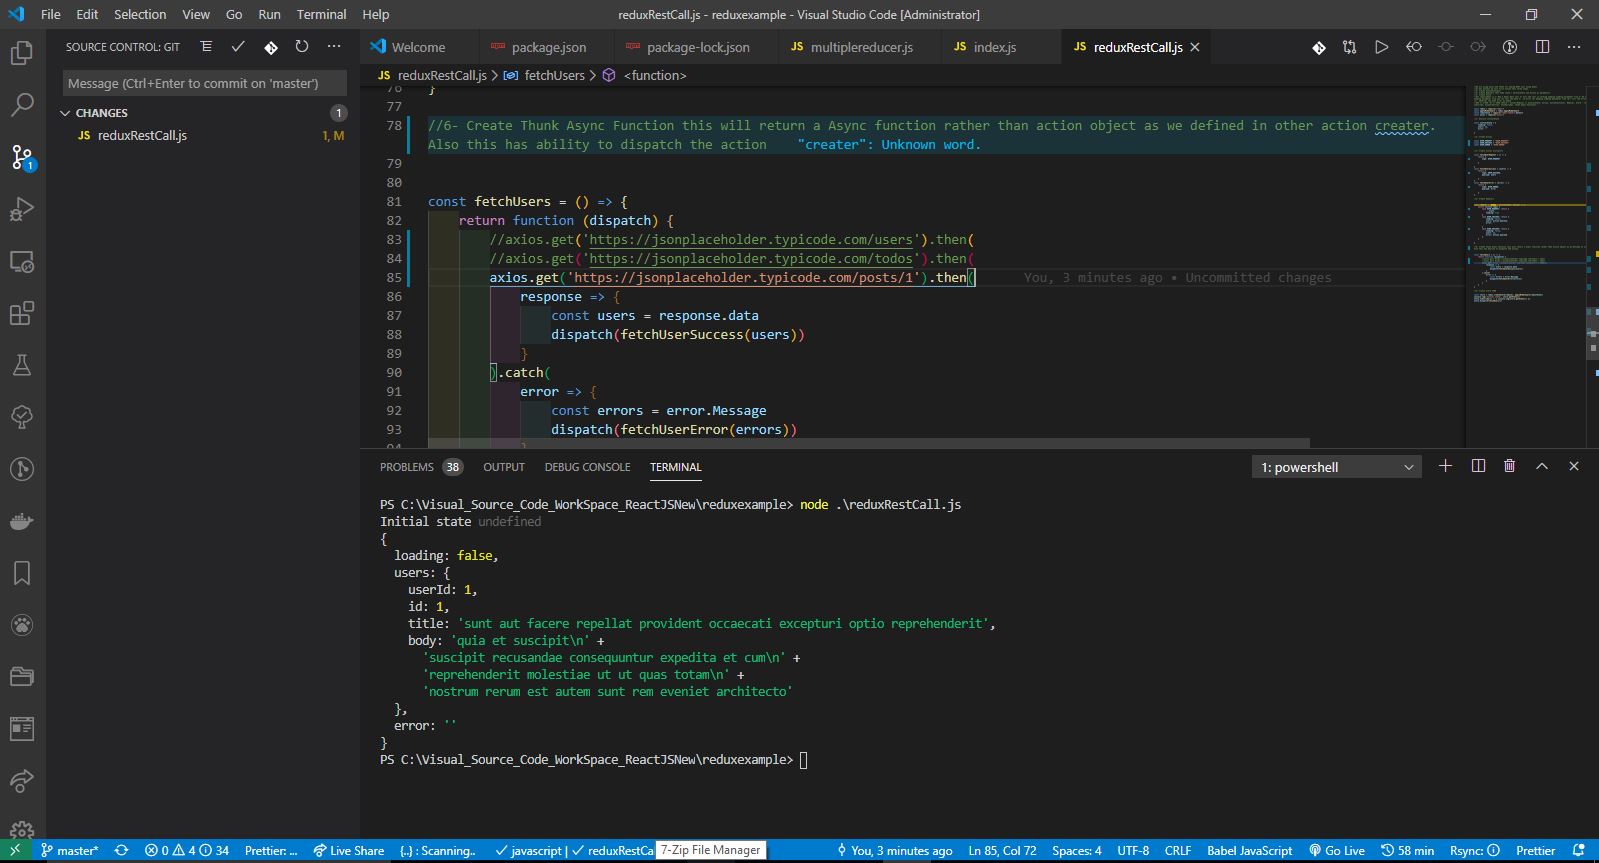
//6- Create Thunk Async Function this will return a Async function rather than action object as we defined in other action creater. Also this has ability to dispatch the action
const fetchUsers = () => {
return function (dispatch) {
//axios.get('https://jsonplaceholder.typicode.com/users').then(
//axios.get('https://jsonplaceholder.typicode.com/todos').then(
axios.get('https://jsonplaceholder.typicode.com/posts/1').then(
response => {
const users = response.data
dispatch(fetchUserSuccess(users))
}
).catch(
error => {
const errors = error.Message
dispatch(fetchUserError(errors))
}
)
}
}
//5- Create store CGSD
const store = redux.createStore(reducer, applyMiddleware(reduxThunk))
console.log('Initial state', store.getState())
store.subscribe(() => { console.log(store.getState()) })
store.dispatch(fetchUsers())

Redux1

Thursday, March 26, 2020

Mockito with Example

During unit testing of the application manytimes it is not possible to replicate exact production environment or to connect DB it become difficult to do the unit testing. To deal with such limitations Mockitto provide api to create mock for these unavailable resources.Mockito is a mocking framework that tastes really good. It lets you write beautiful tests with a clean & simple API. It is open source https://site.mockito.org/ and code can be downloaded from https://github.com/mockito/mockito
Few of the below example gives you details how we can use the concept in real world
1- SiddhuAddServiceTest
package siddhuetheremwebexample.Mockito;
import static org.junit.Assert.assertEquals;
import static org.mockito.Mockito.times;
import static org.mockito.Mockito.verify;
import static org.mockito.Mockito.when;
import org.junit.Before;
import org.junit.Test;
import org.junit.runner.RunWith;
import org.mockito.InjectMocks;
import org.mockito.Mock;
import org.mockito.MockitoAnnotations;
import org.mockito.Spy;
import org.mockito.junit.MockitoJUnitRunner;
//Refer to https://javacodehouse.com/blog/mockito-tutorial/ for more example.
//1- to add @RunWith(MockitoJUnitRunner.class) so that inner mock class object is created first.
@RunWith(MockitoJUnitRunner.class)
public class SiddhuAddServiceTest {
//use to call the original function rather then mockup.
@Spy
SiddhuAddServiceImpl objSpyAddServiceImpl;
//2- This is the place till where we want our code to be executed and rest code after this class need to be mocked.
@InjectMocks
SiddhuAddService objSiddhuAddService;
//3- this indicate which class need to be mocked. Generally it should be the all class/interface object which we are creating in @InjectMocks class
@Mock
SiddhuAddServiceInterface objSiddhuAddServiceInterface;
//4-This will indicate method/function from where junit will be executed.
//we can also use the below method to initialize mocks if we did not want to do with line 1-
/*
* @Before public void setUp() throws Exception {
*
* MockitoAnnotations.initMocks(this); }
*/ @Test
public void testSiddhuCalc() {
System.out.println("Test testSiddhuCalc Started");

//we have done mock using annotation above at 3- above method else we can also do the mock like below inside the method.
//addService = Mockito.mock(AddService.class);
objSiddhuAddService = new SiddhuAddService(objSiddhuAddServiceInterface);
int oneNum = 5;
int secondNum = 6;
int expected = 11;
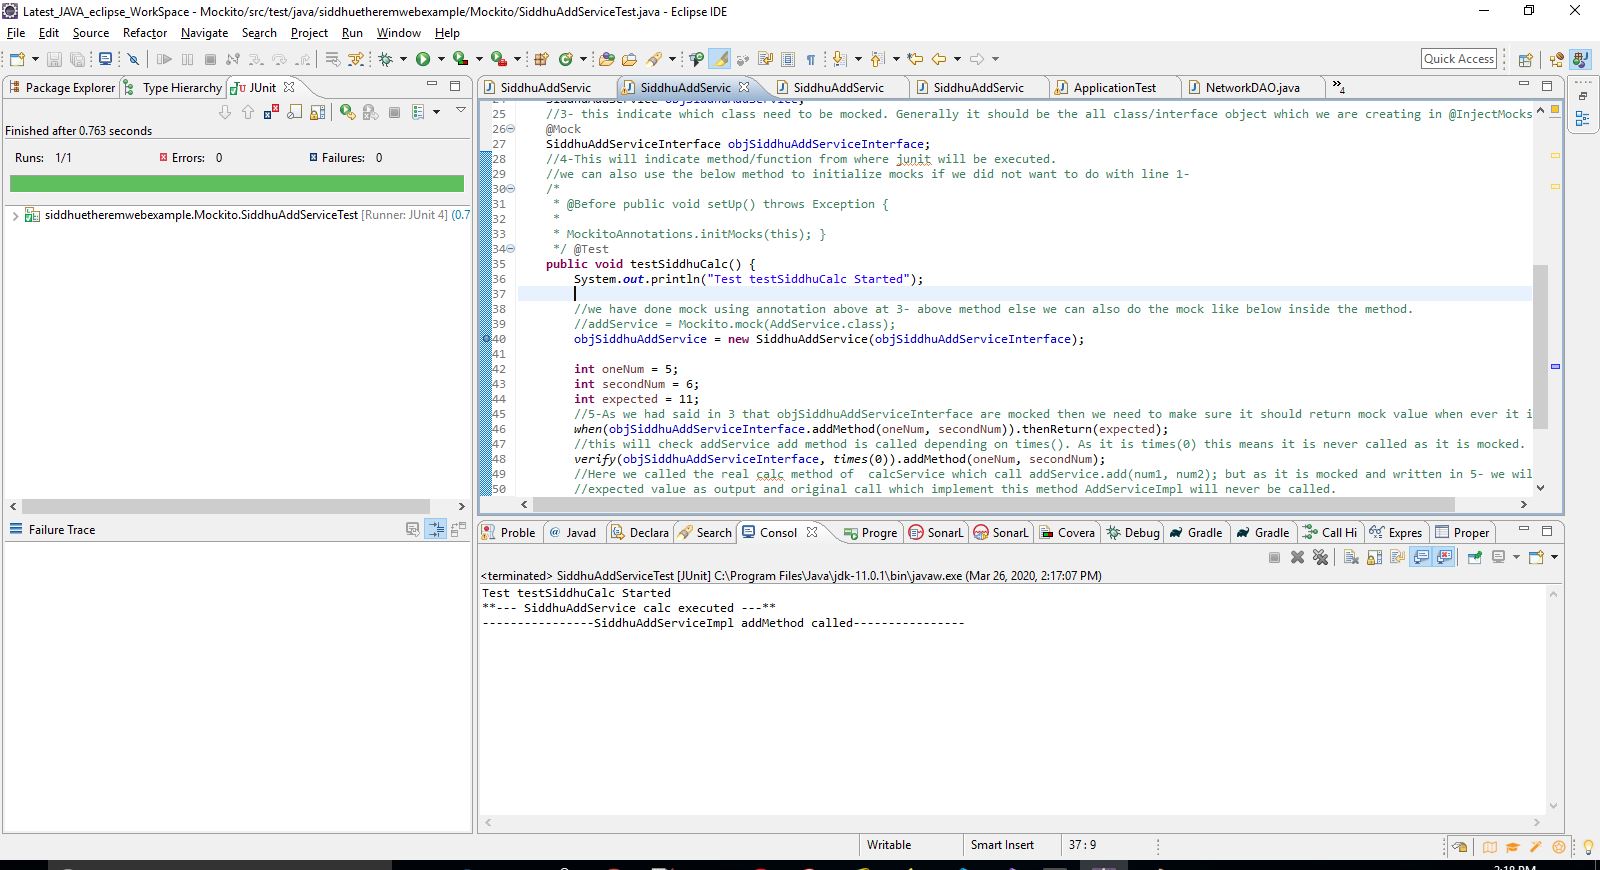
//5-As we had said in 3 that objSiddhuAddServiceInterface are mocked then we need to make sure it should return mock value when ever it is called.
when(objSiddhuAddServiceInterface.addMethod(oneNum, secondNum)).thenReturn(expected);
//this will check addService add method is called depending on times(). As it is times(0) this means it is never called as it is mocked.
verify(objSiddhuAddServiceInterface, times(0)).addMethod(oneNum, secondNum);
//Here we called the real calc method of calcService which call addService.add(num1, num2); but as it is mocked and written in 5- we will always
//expected value as output and original call which implement this method AddServiceImpl will never be called.
int actual = objSiddhuAddService.calc(oneNum, secondNum);
assertEquals(expected, objSpyAddServiceImpl.addMethod(oneNum, secondNum));
// verify(objSpyAddServiceImpl).add(num1, num2);
assertEquals(expected, actual);
}
}

2-SiddhuAddServiceInterface
package siddhuetheremwebexample.Mockito;
public interface SiddhuAddServiceInterface {
public int addMethod(int oneNum, int secondNum);
}
3- SiddhuAddService
package siddhuetheremwebexample.Mockito;
public class SiddhuAddService {

private SiddhuAddServiceInterface objSiddhuAddServiceInterface;

public SiddhuAddService(SiddhuAddServiceInterface objSiddhuAddServiceInterface) {
this.objSiddhuAddServiceInterface = objSiddhuAddServiceInterface;
}
public int calc(int num1, int num2) {
System.out.println("**--- SiddhuAddService calc executed ---**");
return objSiddhuAddServiceInterface.addMethod(num1, num2);
}
}

4-SiddhuAddServiceImpl
package siddhuetheremwebexample.Mockito;
public class SiddhuAddServiceImpl implements SiddhuAddServiceInterface {
public int addMethod(int oneNum, int secondNum) {
System.out.println("----------------SiddhuAddServiceImpl addMethod called----------------");
return oneNum + secondNum;
}
}
5-POM.xml
<project xmlns="http://maven.apache.org/POM/4.0.0"
xmlns:xsi="http://www.w3.org/2001/XMLSchema-instance"
xsi:schemaLocation="http://maven.apache.org/POM/4.0.0 http://maven.apache.org/xsd/maven-4.0.0.xsd">
<modelVersion>4.0.0</modelVersion>
<groupId>siddhuetheremwebexample</groupId>
<artifactId>Mockito</artifactId>
<version>0.0.1-SNAPSHOT</version>
<packaging>jar</packaging>
<name>Mockito</name>
<url>http://maven.apache.org</url>
<properties>
<project.build.sourceEncoding>UTF-8</project.build.sourceEncoding>
</properties>
<dependencies>
<dependency>
<groupId>org.mockito</groupId>
<artifactId>mockito-core</artifactId>
<version>3.3.3</version>
<scope>test</scope>
</dependency>
<dependency>
<groupId>junit</groupId>
<artifactId>junit</artifactId>
<version>4.13</version>
<scope>test</scope>
</dependency>
</dependencies>
</project>

Image2
Image3
One of the good example I found from this site
https://howtodoinjava.com/mockito/junit-mockito-example/
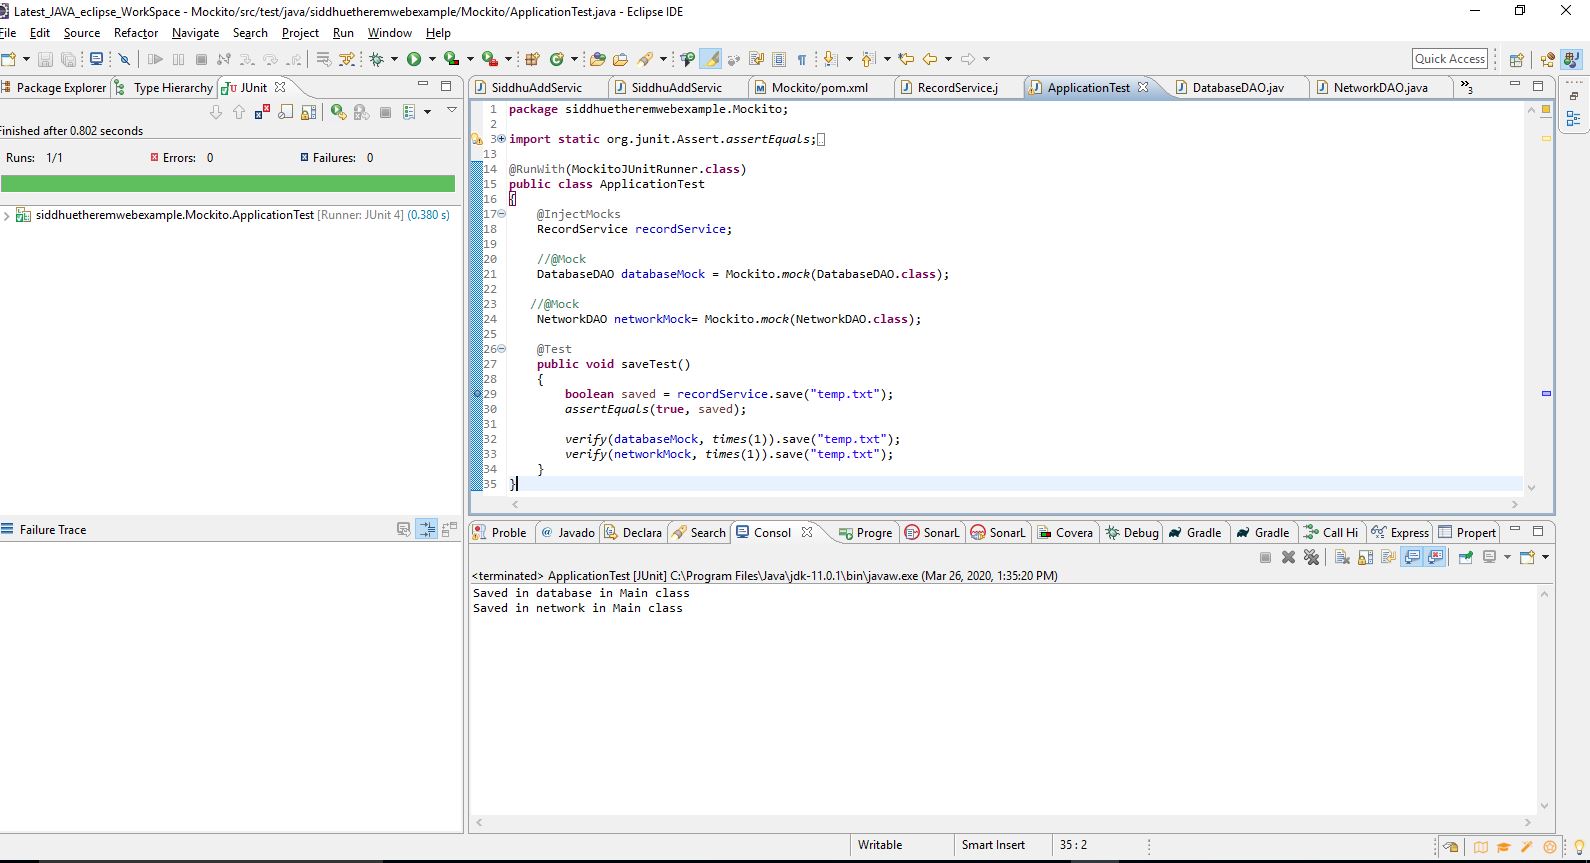
1- ApplicationTest
package siddhuetheremwebexample.Mockito;
import static org.junit.Assert.assertEquals;
import static org.mockito.Mockito.times;
import static org.mockito.Mockito.verify;
import org.junit.Test;
import org.junit.runner.RunWith;
import org.mockito.InjectMocks;
import org.mockito.Mock;
import org.mockito.Mockito;
import org.mockito.junit.MockitoJUnitRunner;
@RunWith(MockitoJUnitRunner.class)
public class ApplicationTest
{
@InjectMocks
RecordService recordService;
//@Mock
DatabaseDAO databaseMock = Mockito.mock(DatabaseDAO.class);
//@Mock
NetworkDAO networkMock= Mockito.mock(NetworkDAO.class);
@Test
public void saveTest()
{
boolean saved = recordService.save("temp.txt");
assertEquals(true, saved);
verify(databaseMock, times(1)).save("temp.txt");
verify(networkMock, times(1)).save("temp.txt");
}
}
2-RecordService
package siddhuetheremwebexample.Mockito;
public class RecordService
{
DatabaseDAO database;
NetworkDAO network;
//setters and getters
public boolean save(String fileName)
{
database.save(fileName);
System.out.println("Saved in database in Main class");
network.save(fileName);
System.out.println("Saved in network in Main class");
return true;
}
}
3-DatabaseDAO
package siddhuetheremwebexample.Mockito;
public class DatabaseDAO
{
public void save(String fileName) {
System.out.println("Saved in database");
}
}
4- NetworkDAO
package siddhuetheremwebexample.Mockito;
public class NetworkDAO
{
public void save(String fileName) {
System.out.println("Saved in network location");
}
}
Image1
Reference:-
Refer to https://javacodehouse.com/blog/mockito-tutorial/ for more example.

Tuesday, March 17, 2020

How to monitor or watch folder for file creation , deletion and update using java

In past for requirement where in whenever any file is created or updated or deleted if we want to perform some action we need to either go to JMS, RabbitMQ etc options. Other option was to have write our own event handling. But in JDK7 and above we get inbuilt NIO package that come with WatchService and WatchKey concept. Using WatchKey we register the service on folder which we want to watch for event like create/delete/modifyi.e.
Path faxFolder = Paths.get("C:\\Latest_JAVA_eclipse_WorkSpace\\ConvertValue\\src\\fax");
WatchService watchService = FileSystems.getDefault().newWatchService();
WatchKey key = faxFolder.register(watchService,
StandardWatchEventKinds.ENTRY_CREATE,
StandardWatchEventKinds.ENTRY_MODIFY,
StandardWatchEventKinds.ENTRY_DELETE);

code:-
import java.io.IOException;
import java.nio.file.FileSystems;
import java.nio.file.Path;
import java.nio.file.Paths;
import java.nio.file.StandardWatchEventKinds;
import java.nio.file.WatchEvent;
import java.nio.file.WatchKey;
import java.nio.file.WatchService;
public class SiddhuDirchange {
public static void main(String[] args) throws Exception {
Path faxFolder = Paths.get("C:\\Latest_JAVA_eclipse_WorkSpace\\ConvertValue\\src\\fax");
WatchService watchService = FileSystems.getDefault().newWatchService();
WatchKey key = faxFolder.register(watchService,
StandardWatchEventKinds.ENTRY_CREATE,
StandardWatchEventKinds.ENTRY_MODIFY,
StandardWatchEventKinds.ENTRY_DELETE);
boolean valid = true;

do {

for (WatchEvent event : key.pollEvents()) {
WatchEvent.Kind kind = event.kind();
if (StandardWatchEventKinds.ENTRY_CREATE.equals(event.kind())) {
System.out.println("File Created:");
key.reset();
}
if (StandardWatchEventKinds.ENTRY_DELETE.equals(event.kind())) {
System.out.println("File delete:");
key.reset();
}
if (StandardWatchEventKinds.ENTRY_MODIFY.equals(event.kind())) {
System.out.println("File modifies:");
key.reset();
}

}
//Dont forget to reset the key.
valid = key.reset();
} while (valid);
}
}
Note: to get the file name you can use
String fileName = event.context().toString();
System.out.println("File Name for create/update/delete:" + fileName);

Thursday, February 27, 2020

Creating simple Docker File / Docker image and Docker container to execute hello world

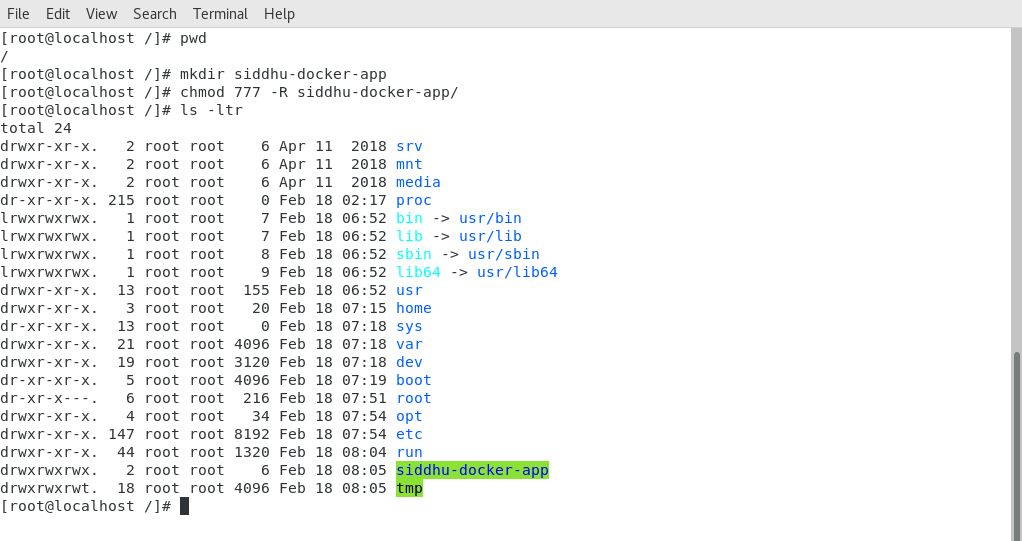
1- Create folder
mkdir siddhu-docker-app
2- Provide all rights to this folder
chmod 77 -R siddhu-docker-app
Image1
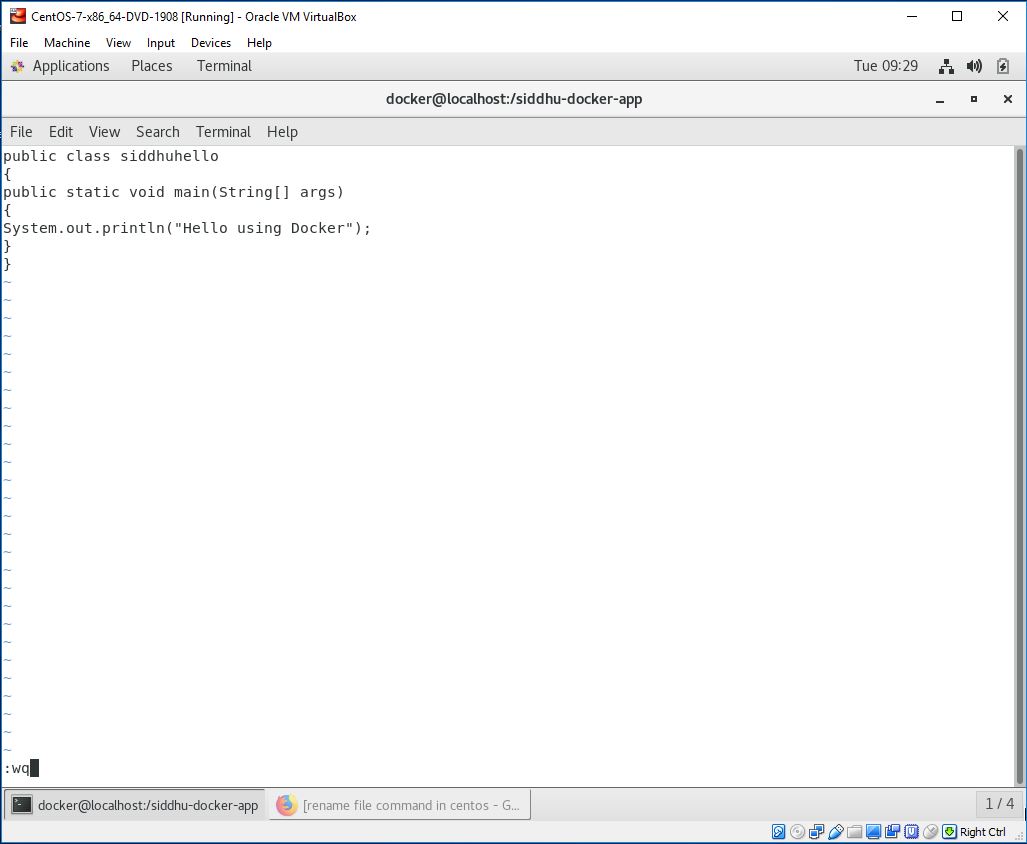
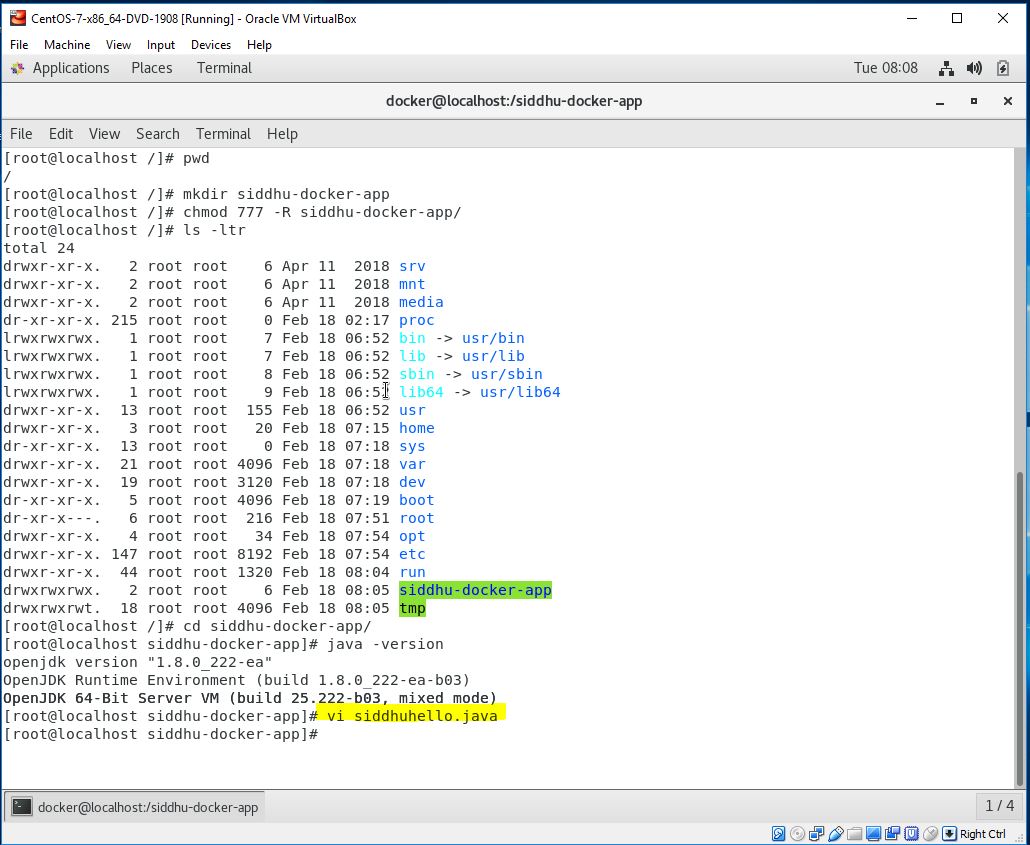
3- Create simple helloworld java programe
class sidduhello{
public static void main(String[] args){
System.out.println("Hello from using Docker");
}
}
Save it inside the directory siddhu-docker-app as sidduhello.java.
Image2Image3
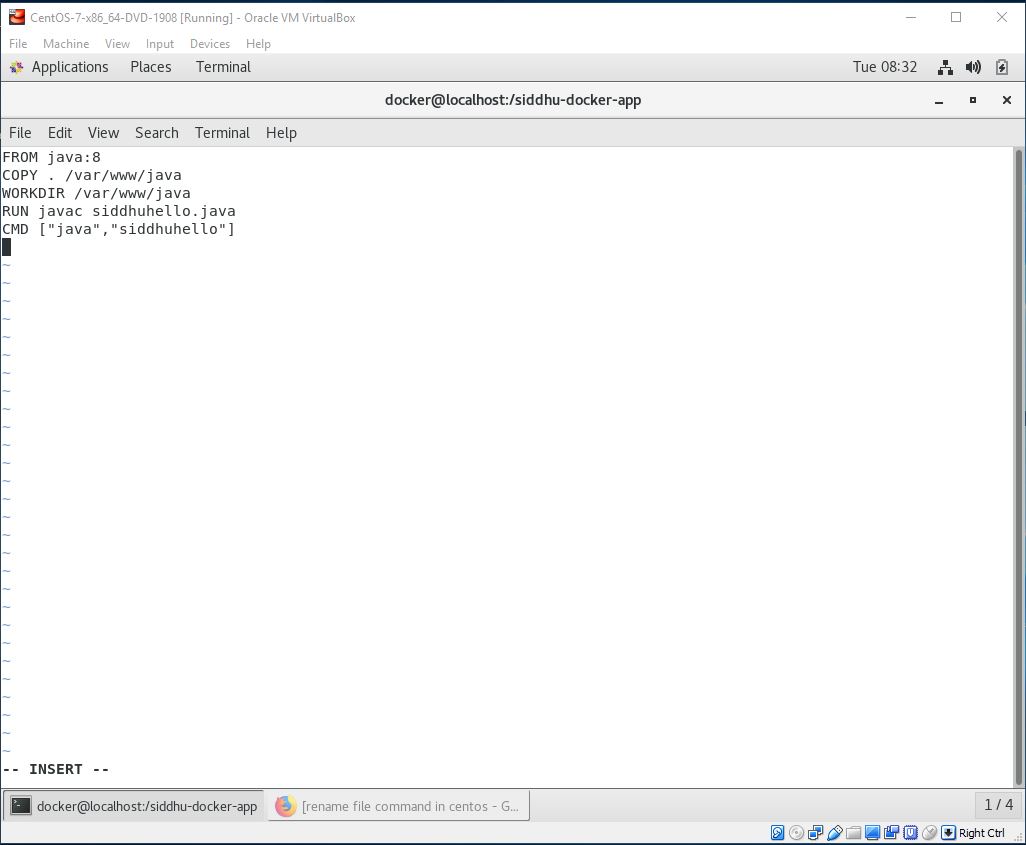
4- Lets Create a Dockerfile with name as "Dockerfile"
Dockerfile contains instructions for the Docker. It did not have any file extension.
// Start of Dockerfile text
FROM java:8
COPY . /var/www/java
WORKDIR /var/www/java
RUN javac sidduhello.java
CMD ["java", "sidduhello"]
// End of Dockerfile text
Note:- Write all instructions in uppercase because it is convention.
Image4
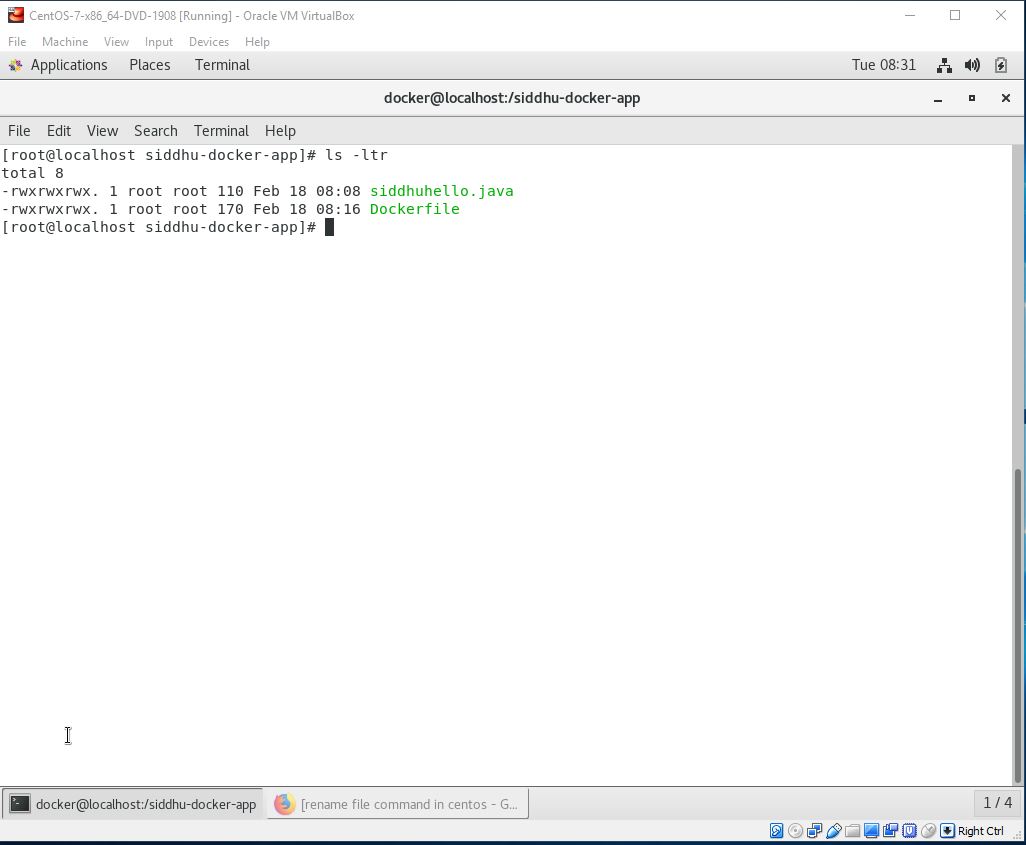
Now make sure to have our both files i.e. Dockerfile and sidduhello.java in out siddhu-docker-app directory.

5- Lest Build Docker Image
After creating the docker Files we need to create the docker images.Docker image contains all the code+lib+class+packages etc that is required to be executed in docker containers.
Now change the working directory i.e. move inside our siddhu-docker-app folder
Give chmod 777 to both these file as shown below
Image5
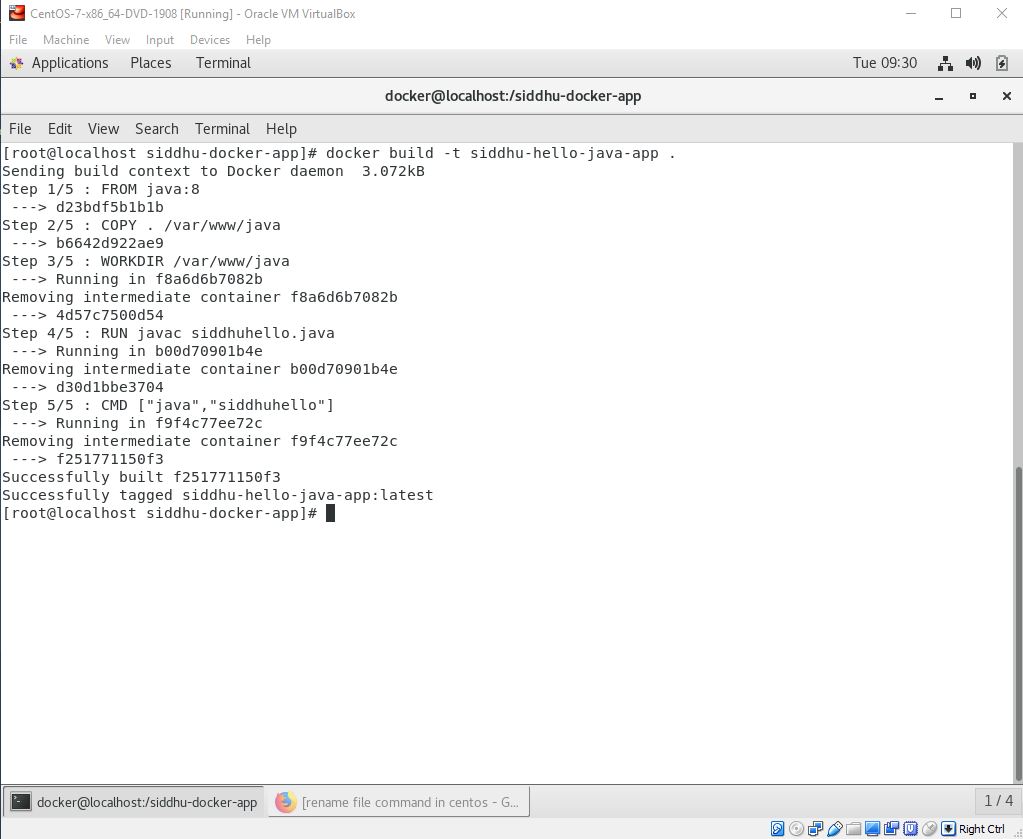
Execute below command
docker build -t siddhu-hello-java-app .

Descriptions:-
docker:- this command tell installed docker progrmae to take some action
build :- This command is used to create the Images
siddhu-hello-java-app :- This is the name of the images and its upto you what name you want to give.
. :- final dots say that docker files which need to be used to create image is located in the current directory
Image6
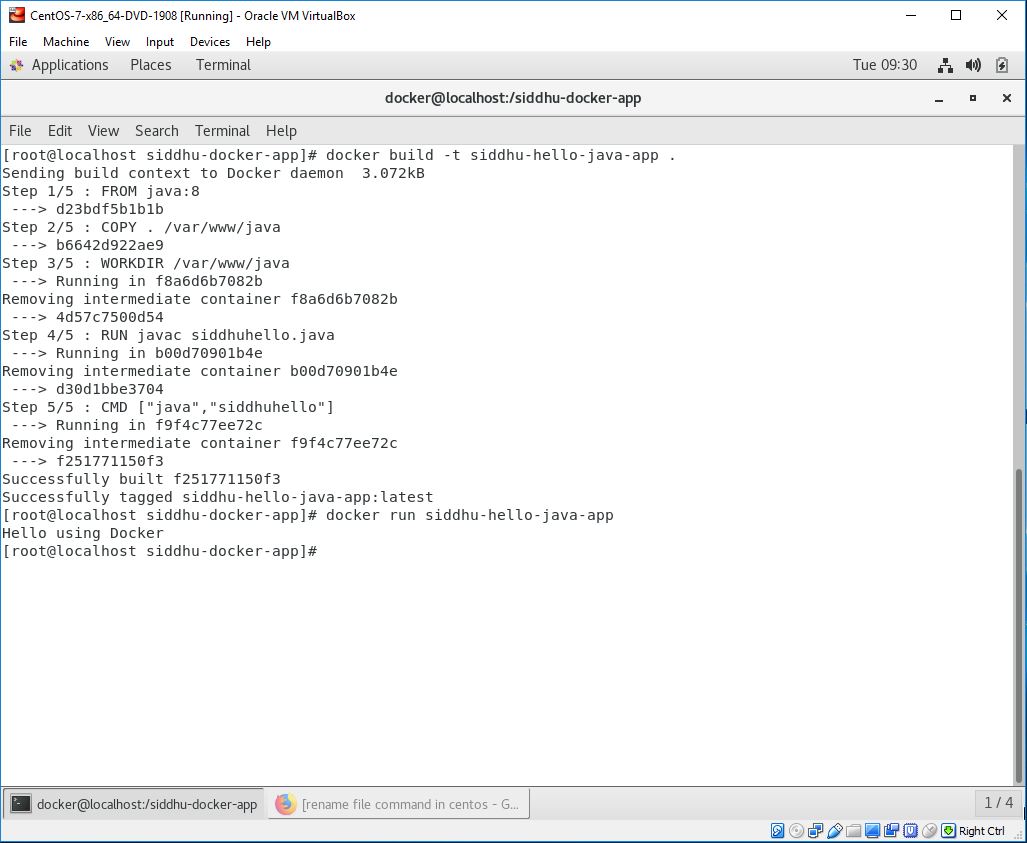
After successfully building the image. Now, we can run our docker image.
6- Now lets Run Docker Image
Once the docker image is build this can be taken as the core file to build docker container.
docker run siddhu-hello-java-app
Image7
In general practise Docker Images are huge in size so Devops engineer chose the option to download the docker files from Docker hub/Git hub using Jenkin and then using installed docker on the respective machine build docker files from it. And as on when required we execute this file using run command to create Docker container

There are many commands in Docker but most of the time you will be working on following commands

1- Start
2- Stop
3- Pull
4- Push
5- PS
6- PS all
7- log
8- exec -it
9- rm
10- rmi
11- image

Wednesday, February 26, 2020

Docker in simple terms

Docker is a tool designed to make it easier to create, deploy, and run applications by using containers. Containers allow a developer to package up an application with all of the parts it needs, such as libraries and other dependencies, and deploy it as one package.
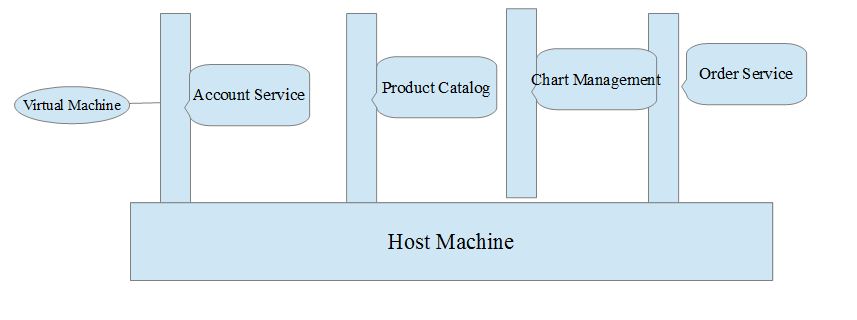
Now we might think why we need Docker concept. Lets take simple example. We have a shooing web application which has the aspect such as login/security, product catalog, Account Service, Cart Server and order Server. In best practice we prefer to have micro service either build on Spring BOOT or other frame work. Micro-service has its own modeler benefits. now to run this in real environment we would have
1- Host machine
2- Many Virtual Machine to start/setup individual micro-service i.e. one for each Micro-service login/security, product catalog, Account Service, Cart Server and order Server.
Image1
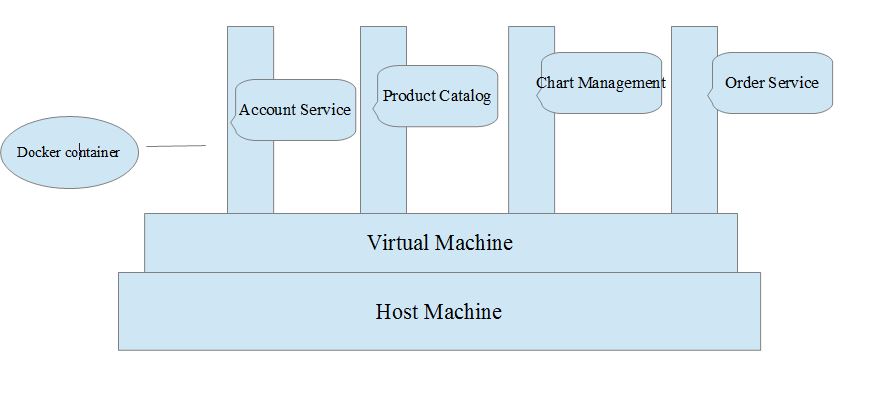
But in above scenario there is lost of memory, space , ram, resource as every Micro-service consume one virtual machine. To over come this we have the concept of Docker
Image2


As you see above now our all Micro-server is kept in Docker Container which run on the one single Virtual Machine. Due to this docker container now the micro-service did not need to reboot individual but only one VM need to boot and all service are ready to operate ... additional benefits are they did not waste RAM as now only one Virtual machine is there its same ram is shared with other Micro-service instance.
To understand Docker we need to know following below points.
1- Docker Files:- A Dockerfile is a text document/file that contains all the commands a user could call on the command line to assemble/build an image.The docker "build command" builds an image from a Dockerfile and a CONTEXT. The build’s CONTEXT is the set/collections of files at a specified location PATH or URL. The PATH is a directory on your local file-system. The URL is a Git repository location. A CONTEXT is processed recursively.
2- Docker Image :- This is file created from Docker files. It is used to execute code in docker container. A Docker image includes the elements needed to run an application as a container -- such as code, config files, environment variables, libraries and run time. If the image is deployed to a Docker environment it can then be executed as a Docker container. The docker run command will create a container from a given image. Command example
docker run hello-world
docker => this command ask installed docker to take some action
run => use to inform docker to execute image with name as hello-world and finally run execute and create hello-world container.

3- Docker Container -
- This is Rum time instance of docker file
- It is Light weight alternative of virtual machine
- It did not need ram
- It did not need to boot
- Its use host O/S.
- It did not use huge hard disc
- It is also important to note that containers differ from virtual machines (VMs), which encapsulate an entire OS with the executable code atop an abstraction layer from the physical hardware resources.
4- Docker hub - cloud base repository for storing docker images. it has both public and private repository.
5- docker files -->docker images --> docker hub --> different system download the docker images from Hub and build the environment for it.
6- Docker images are huge in size so general practice is to have docker file on docker hub or git hub and then jenkin CI server take it from there and build docker images and then docker container from it finally deploy it on different server.
7- Docker Components
- Docker Register -> storage of docker images.either on public or private repository, local or cloud, git

8- Install docker
- first install prerequisite
- second install docker-engine
- start docker engine
- download centos image from docker hub
- run centos docker iamge and create centos docker container.
9- Docket compose:- it help to run the different docker container in a single command. rather than executing single individual command to run sepearate docker container we will have one docker compose and when we run this docker compose it will run different docker container in the sequence we want. This are written in YAML files.
Installation of Docker and Docker-compose

1- follow below steps
Steps
1- sudo yum install -y yum-utils device-mapper-persistent-data lvm2
2- sudo yum-config-manager --add-repo https://download.docker.com/linux/centos/docker-ce.repo
3- sudo yum install docker-ce
4- sudo usermod -aG docker $(whoami)
5- sudo systemctl enable docker.service
6- sudo systemctl start docker.service

2- Then check docker is installed properly using below command
docker info
docker run hello-world

3- Finally install docker-compose use below steps
curl -L "https://github.com/docker/compose/releases/download/1.23.2/docker-compose-$(uname -s)-$(uname -m)" -o /usr/local/bin/docker-compose
chmod +x /usr/local/bin/docker-compose
ln -s /usr/local/bin/docker-compose /usr/bin/docker-compose
4- Check if docker-compose is installed using below command
docker-compose --version
Reference
https://github.com/NaturalHistoryMuseum/scratchpads2/wiki/Install-Docker-and-Docker-Compose-(Centos-7)

https://www.hostinger.in/tutorials/how-to-install-docker-compose-centos-7/

Wednesday, February 05, 2020

Starting Apache FTP Server on window machine

1- download the appache server
https://mina.apache.org/ftpserver-project/downloads.html

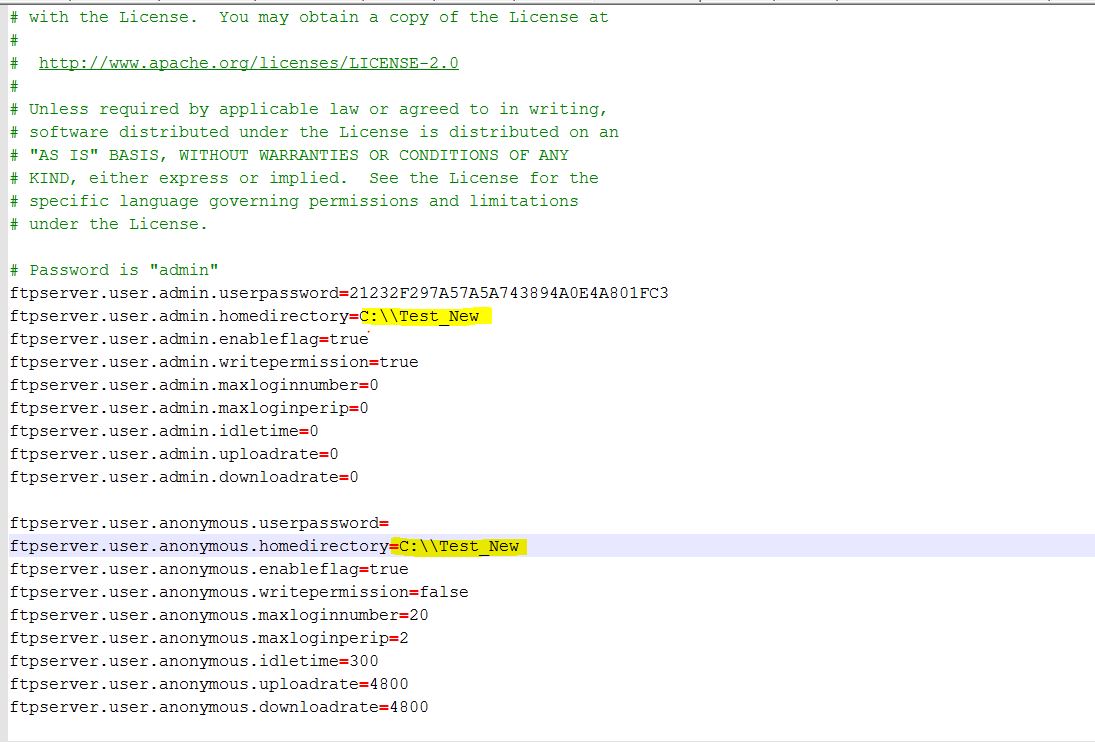
2- Modify below things in as shown in below figure
C:\apache-ftpserver-1.1.1\apache-ftpserver-1.1.1\res\conf\users.properties
Image1
below folder will tell the FTPClien that this will be by default folder where we can do the operation
ftpserver.user.anonymous.homedirectory=C:\\Test_New

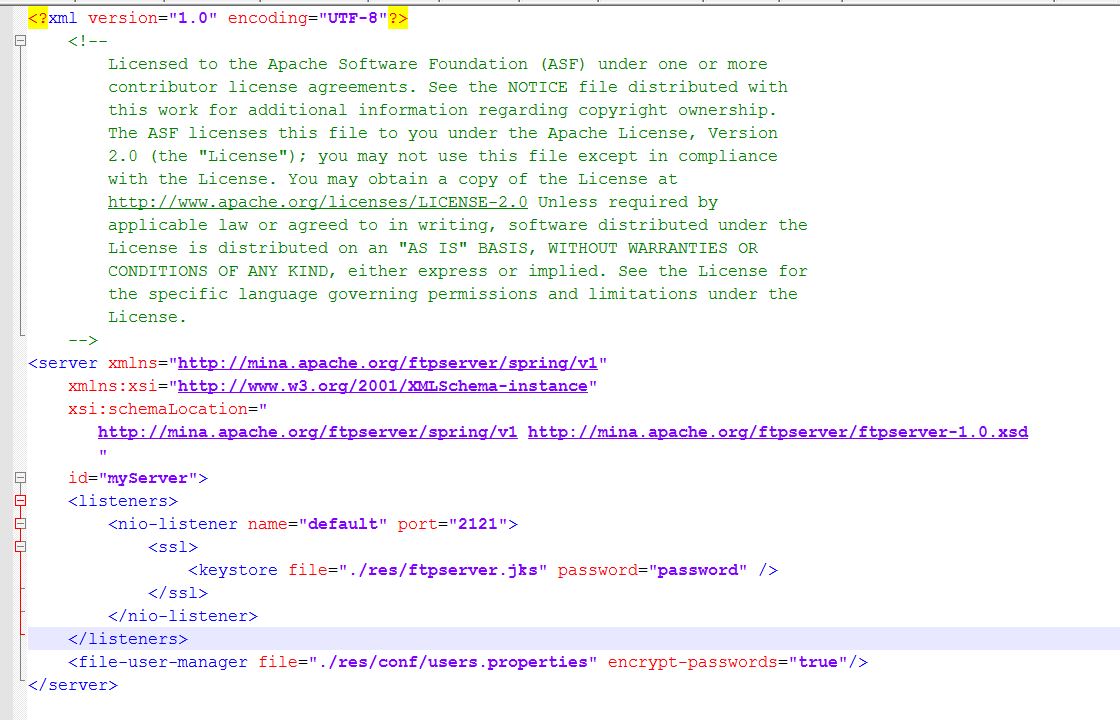
3- Make sure to add this tag inside
C:\apache-ftpserver-1.1.1\apache-ftpserver-1.1.1\res\conf\ftpd-typical.xml
Image2
<file-user-manager file="./res/conf/users.properties" encrypt-passwords="true"/>
This will make sure that password field which we mapped with user.properties as in encrypted mode.

3- No we are ready to connect to Apache FTP Server.
Start the server using following below command
C:\apache-ftpserver-1.1.1\apache-ftpserver-1.1.1\bin>ftpd.bat res/conf/ftpd-typical.xml
Using XML configuration file res/conf/ftpd-typical.xml...
FtpServer started

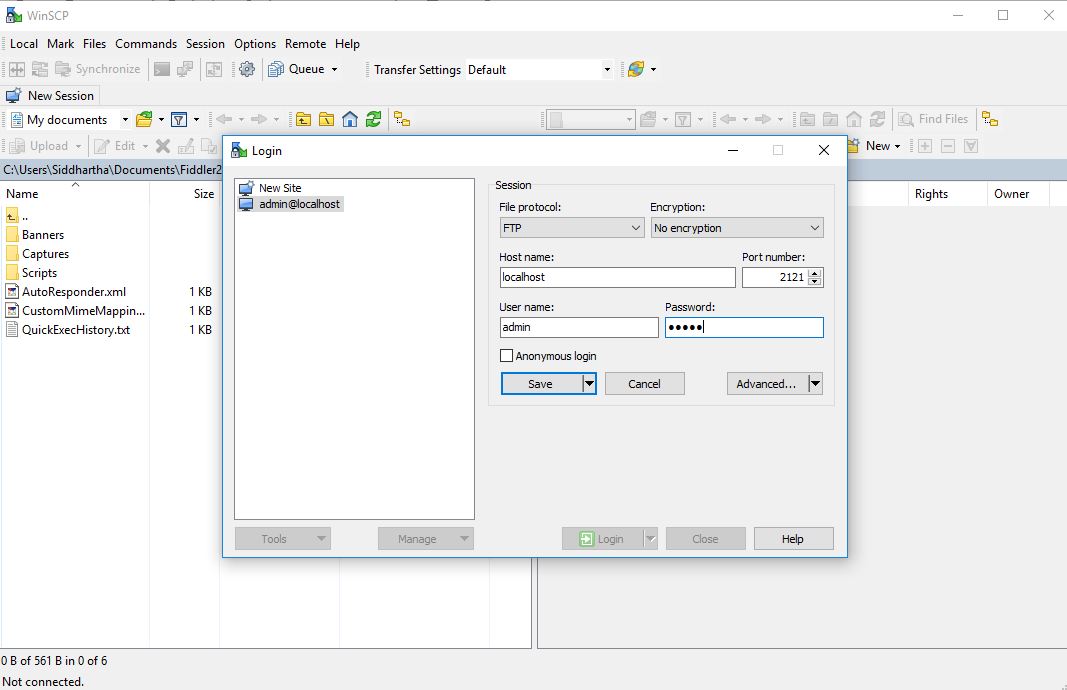
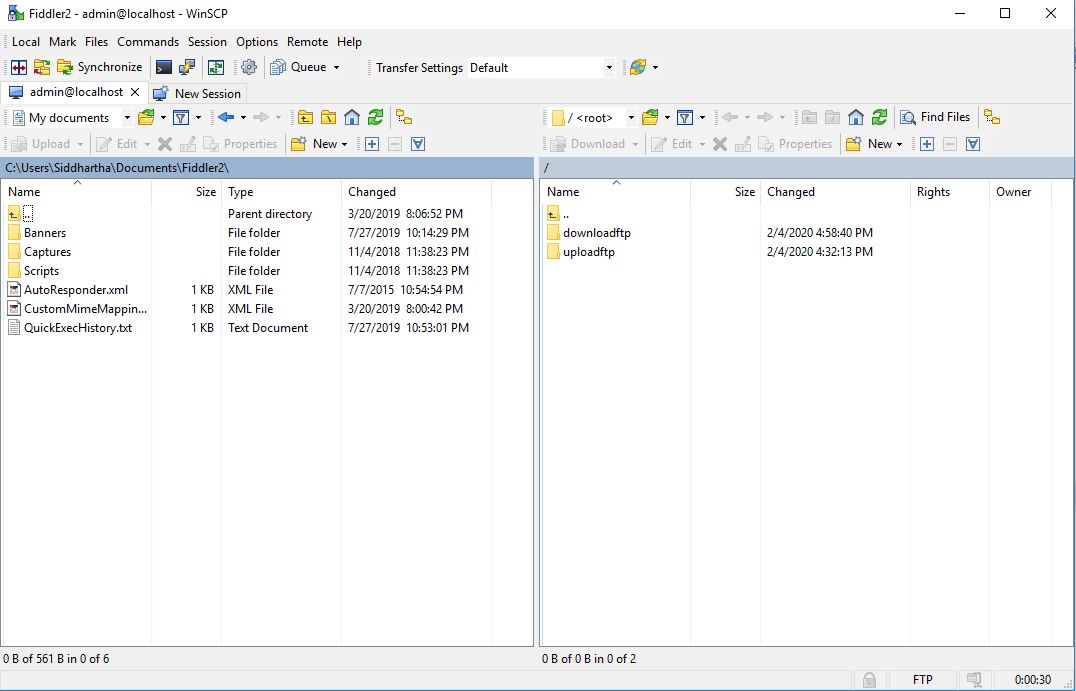
4- Connect using Filezilla or winscp. I am using WINSCP
Image3Image4

Note:By default the user id and password for apache ftp is admin admin