Thursday, June 01, 2017

Simple Spring Web Flow Example

Simple Spring Web Flow Example
Spring Webflow we can develop a guided navigation in the application. We can define web flow as a colection of steps for single execution of Business logic. Either the whole Business logic get exectued or it gets fails if any of the intermediate step fails. Webflow consist of many steps called states. 
In a typicall Example we can define following work flow
State can be broadly classfied into follwing aspects
1- Start State :- Stating phase of the Spring Web flow
2- View State :- This is the view phase in which End user is typically displayed the screen on this they perform certain action.
3- Action State :- This is the action state on which end user perform certain action on the screen.
4- End state :- Ending phase of the Spring Web flow
Start State -- > Display Login --> User Action on screen --> Success --> Show Success Login  Screen
S tart State -- > Display Login --> User Action on screen --> --> Failure --> Show Error screen -- > Both End
Entering a state typically results in a view screen being displayed to the user. On that view, user perform some events and that event are handled by the state. These events can trigger transitions to other states which result in view navigations. Spreing Web-Flow is based on top of Spring MVC and hence provides all the goodies of Spring MVC plus the added control over the transitions.
Now Lets start the example
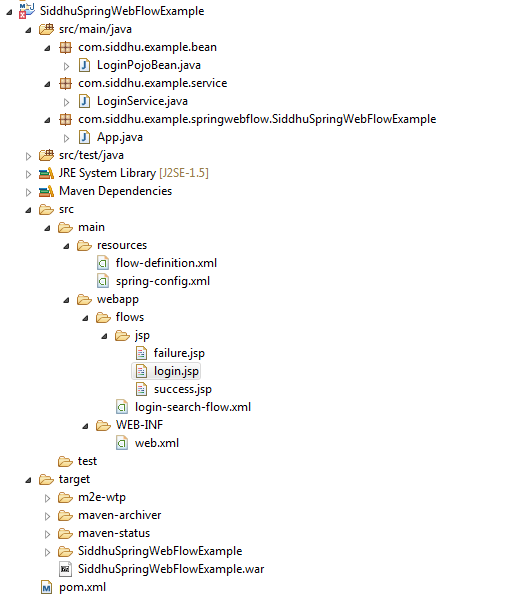
Step 1:- First create a pojo class that will help us to handle the form data of the screen which is enterted by end user
package com.siddhu.example.bean;
import java.io.Serializable;
public class LoginPojoBean implements Serializable
{
/**
*
*/
private static final long serialVersionUID = 1L;
public String getuName() {
return uName;
}
public void setuName(String uName) {
this.uName = uName;
}
public String getPword() {
return pword;
}
public void setPword(String pword) {
this.pword = pword;
}
@Override
public String toString() {
return "LoginBean [uName=" + uName + ", pword=" + pword + "]";
}
private String uName;
private String pword;
}
Step 2:- Define the Service class which will perform action event/action state i.e. authenticate the user. After Authentication and based on the authenticateUser method ouput , web-flow will decide the view to be rendered to the end user. 
Service class basically define our Action State. We use Annotation mark to declare class as service this will help the Spring Bean Factory to pick the service class at run time as per the configuration done in xml. 
package com.siddhu.example.service;
import org.springframework.stereotype.Service;
import com.siddhu.example.bean.LoginPojoBean;
@Service
public class LoginService
{
public String authenticateUser(LoginPojoBean loginBean)
{
String userName = loginBean.getuName();
String password = loginBean.getpWord();
if(userName.equals("Siddhu") && password.equals("siddhu"))
{
return "true";
}
else
{
return "false";
}
}
}
Step 3:- After implementation of action state we need to define and implement business flow. Flow will allow our user to navigate as per the bussiness need and help in completion of a single task in the context of the application. Generally in this flow is collection of multiple view and serive class and executed in accordence with the cofiguration given in xml files. Flow help the user to move too forward or backword as per the business logic. We use xml configuration for defining the business flow
login-search-flow.xml:-
<!--?xml version="1.0" encoding="UTF-8"?>
<!--flow xmlns="http://www.springframework.org/schema/webflow"
xmlns:xsi="http://www.w3.org/2001/XMLSchema-instance"
xsi:schemaLocation="http://www.springframework.org/schema/webflow
http://www.springframework.org/schema/webflow/spring-webflow-2.4.xsd">
<!--var name="loginPojoBean" class="com.siddhu.example.bean.LoginPojoBean" />
<!--view-state id="displayLoginView" view="jsp/login.jsp" model="loginPojoBean">
<!--transition on="performLogin" to="performLoginAction" />
<!--/view-state>
<!--action-state id="performLoginAction">
<!--evaluate expression="loginService.authenticateUser(loginPojoBean)" />
<!--transition on="true" to="displaySuccess" />
<!--transition on="false" to="displayError" />
<!--/action-state>
<!--view-state id="displaySuccess" view="jsp/success.jsp" model="loginPojoBean"/>
<!--view-state id="displayError" view="jsp/failure.jsp" />
<!--/flow>
In above code we first define the pojobean class which accumulate user screen data on which we need to play business logic. i.e. loginPojoBean. 
The first view in the flow becomes the default view which is shown to the end user. In our case it is jsp/login.jsp which will be displayed to the end user first time. Once the user perform operation of entering user id and password and submits the request, flow moves to action-state tag to determine dynamically which view should be rendered. i.e. when user enter submit button it will find performLoginAction action tag and evaluate this method loginService.authenticateUser(loginPojoBean).
Depending on the out put of authenticateUser i.e. true or false respective state id view will be displayed i.e. if the out put is true then displaySuccess view-state id having view="jsp/success.jsp"  will be displayed else view-state id="displayError" view="jsp/failure.jsp" will be displayed.
We need to understand here that there are two parameter which are mandatory and necessary to be included in coding of view during development and that parameter is _eventId and _flowExecutionKey.
We had added the same in our login.jsp
<!--input type="hidden" name="_eventId" value="performLogin">
<!--input type="hidden" name="_flowExecutionKey" value="${flowExecutionKey}" />
we are using value="performLogin" in our login-search-flow.xml file <!--transition on="performLogin" to="performLoginAction" />
Step 4:- Now once we had define our business logic, Flow in terms of xml we need to configure of hook our flow with the system where we want to implement Spring Web flow. By hooking our flow Spring container by default take care of all other parts.
This is done in below xml files.
flow-definition.xml:- 
<!--?xml version="1.0" encoding="UTF-8"?>
<!--beans xmlns="http://www.springframework.org/schema/beans"
xmlns:xsi="http://www.w3.org/2001/XMLSchema-instance" xmlns:flow="http://www.springframework.org/schema/webflow-config"
xsi:schemaLocation="http://www.springframework.org/schema/webflow-config
http://www.springframework.org/schema/webflow-config/spring-webflow-config-2.4.xsd
http://www.springframework.org/schema/beans
http://www.springframework.org/schema/beans/spring-beans-3.0.xsd">
<!--bean class="org.springframework.webflow.mvc.servlet.FlowHandlerMapping">
<!--property name="flowRegistry" ref="loginSearchFlowRegistry" />
<!--/bean>
<!--bean class="org.springframework.webflow.mvc.servlet.FlowHandlerAdapter">
<!--property name="flowExecutor" ref="loginSearchFlowExecutor" />
<!--/bean>
<!--flow:flow-executor id="loginSearchFlowExecutor" flow-registry="loginSearchFlowRegistry" />
<!--flow:flow-registry id="loginSearchFlowRegistry">
<!--flow:flow-location id="loginSearchFlow" path="/flows/login-search-flow.xml" />
<!--/flow:flow-registry>
<!--/beans>
Above files define two main aspect of Apring Web Flow 
1- flowExecutor :- As the name suggest it will help in arranging the flow while referring to flowRegistry
2- flowRegistry :- This will tell the application which xml file need to be referred while performing the flow logic.i.e. in our case loginSearchFlowRegistry refer to /flows/login-search-flow.xml
Additionally if we look into the above xml we will find two main class FlowHandlerMapping and FlowHandlerAdapter. These are the two core class of spring Web flow. FlowHandlerMapping is responsible for creating the appropriate URLs for all the flows defined in the application. FlowHandlerAdapter encapsulates the actual flow and delegates the specific flows to be handled by the Spring Flow Controllers
Step 5:- Finally we need to inform spring container to take our hook and perform operation as per define in the flow xml. For this we define spring-config.xml. It contains the basic information for the spring container for tasks like rendering the views, bean declarations and includes the flow-definition.xml file for the container to load.
spring-config.xml:- 
<!--?xml version="1.0" encoding="UTF-8"?>
<!--beans xmlns="http://www.springframework.org/schema/beans"
xmlns:context="http://www.springframework.org/schema/context"
xmlns:xsi="http://www.w3.org/2001/XMLSchema-instance" xmlns:flow="http://www.springframework.org/schema/webflow-config"
xsi:schemaLocation="
http://www.springframework.org/schema/webflow-config
http://www.springframework.org/schema/webflow-config/spring-webflow-config-2.4.xsd
   http://www.springframework.org/schema/beans
   http://www.springframework.org/schema/beans/spring-beans-3.0.xsd
   http://www.springframework.org/schema/context
   http://www.springframework.org/schema/context/spring-context-3.0.xsd">
<!--context:component-scan base-package="com.siddhu.example" />
<!--bean
class="org.springframework.web.servlet.view.InternalResourceViewResolver">
<!--property name="prefix" value="/jsp/" />
<!--property name="suffix" value=".jsp" />
<!--/bean>
<!--import resource="flow-definition.xml"/>
<!--/beans>
Code for display
login.jsp:- 
<!--%@ page isELIgnored="false" %>
<!--html>
<!--body>
<!--h2>Please Login<!--/h2>
<!--form method="post" action="${flowExecutionUrl}">
<!--input type="hidden" name="_eventId" value="performLogin">
<!--input type="hidden" name="_flowExecutionKey" value="${flowExecutionKey}" />
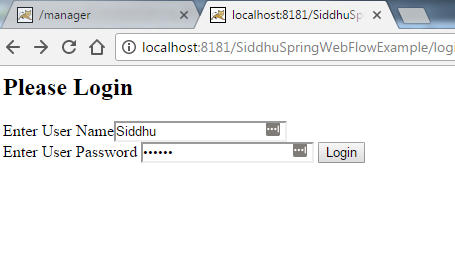
Enter User Name<!--input type="text" name="uName" maxlength="40"><!--br>
Enter User Password <!--input type="password" name="pWord" maxlength="40">
<!--input type="submit" value="Login" />
<!--/form>
<!--/body>
<!--/html>
Success.jsp:-
<!--%@ page language="java" contentType="text/html; charset=ISO-8859-1"
    pageEncoding="ISO-8859-1"%>
    <!--%@ page isELIgnored ="false" %>
<!--!DOCTYPE html PUBLIC "-//W3C//DTD HTML 4.01 Transitional//EN" "http://www.w3.org/TR/html4/loose.dtd">
<!--html>
<!--head>
<!--meta http-equiv="Content-Type" content="text/html; charset=ISO-8859-1">
<!--title>Login Successful<!--/title>
<!--/head>
<!--body>
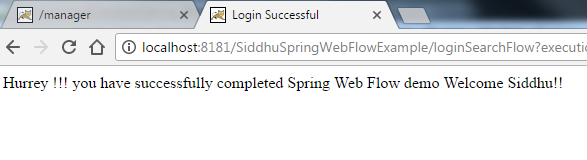
Welcome ${loginBean.userName}!!
<!--/body>
<!--/html>
Failure.jsp
<!--%@ page language="java" contentType="text/html; charset=ISO-8859-1"
    pageEncoding="ISO-8859-1"%>
    <!--%@ page isELIgnored ="false" %>
<!--!DOCTYPE html PUBLIC "-//W3C//DTD HTML 4.01 Transitional//EN" "http://www.w3.org/TR/html4/loose.dtd">
<!--html>
<!--head>
<!--meta http-equiv="Content-Type" content="text/html; charset=ISO-8859-1">
<!--title>Invalid Credentials<!--/title>
<!--/head>
<!--body>
Invalid User Name or Password. Please try again!
<!--/body>
<!--/html>

Pom.xml:-
<!--project xmlns="http://maven.apache.org/POM/4.0.0" xmlns:xsi="http://www.w3.org/2001/XMLSchema-instance"
xsi:schemaLocation="http://maven.apache.org/POM/4.0.0 http://maven.apache.org/xsd/maven-4.0.0.xsd">
<!--modelVersion>4.0.0<!--/modelVersion>
<!--groupId>com.siddhu.example.springwebflow<!--/groupId>
<!--artifactId>SiddhuSpringWebFlowExample<!--/artifactId>
<!--version>0.0.1-SNAPSHOT<!--/version>
<!--packaging>war<!--/packaging>
<!--name>SiddhuSpringWebFlowExample<!--/name>
<!--url>http://maven.apache.org<!--/url>
<!--properties>
<!--project.build.sourceEncoding>UTF-8<!--/project.build.sourceEncoding>
<!--/properties>
<!--dependencies>
<!--dependency>
<!--groupId>junit<!--/groupId>
<!--artifactId>junit<!--/artifactId>
<!--version>3.8.1<!--/version>
<!--scope>test<!--/scope>
<!--/dependency>
<!--dependency>
<!--groupId>org.springframework.webflow<!--/groupId>
<!--artifactId>spring-webflow<!--/artifactId>
<!--version>2.4.2.RELEASE<!--/version>
<!--/dependency>
<!--/dependencies>
<!--build>
<!--finalName>SiddhuSpringWebFlowExample<!--/finalName>
<!--/build>
<!--/project>
M_Image1M_Image2
M_Image4.png

Wednesday, May 31, 2017

How to Remove -Dmaven.multiModuleProjectDirectory system property is not set. Check $M2_HOME environment variable and mvn script match In Eclipse.

Generally when ever you installed new Maven version and try to debug or run the maven project we get following error on the console of Eclispe
-Dmaven.multiModuleProjectDirectory system property is not set. Check $M2_HOME environment variable and mvn script match
This indicate that when we try to exeute our project through MAVEN plug in of eclipse it is not able to find the M2_HOME. Setting this paratmer on the Global i.e. %PATH% will not help.
We need to set the same in Eclipse IDe
Step :-
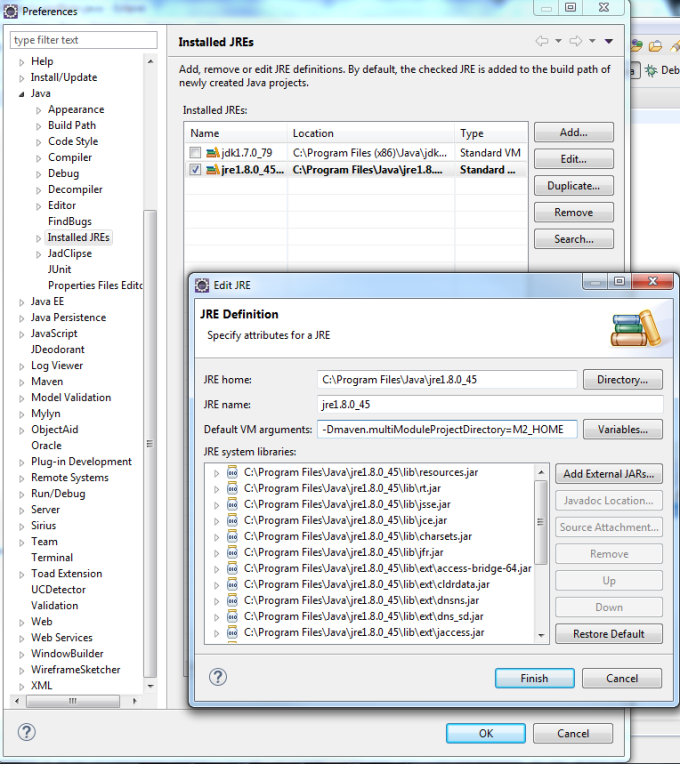
Go to Eclipse Menu bar -- > Window --> Preference --> Click on Installed JRE --> Click on Edit Button --> Add follwoing -Dmaven.multiModuleProjectDirectory=M2_HOME in Default VM argumetns.

Error_Maven

Monday, April 24, 2017

JMeter Concept

Jmeter is used for Performance, Stress and Load.


- Execution Flow :-
TPG-CPT-SPAL -
- (Test Plan --1 to *--> Test Group -- >
- Configuration elements [Its allow you to create defaults and variables to be used by Samplers. ]
- Pre-Processors [A pre-processor element runs just before a sampler executes. ]
- Timers [Timer element enable you to define period to waite between each request.]
-  [Logic controller :- It control the order of processing of Samplers in a Thread i.e. ForEach Controller, While Controller, Loop Controller, IF Controller]
- Sampler [Samplers allow JMeter to send specific types of requests to a server]
- Post-Processors [A post-processor executes after a sampler finishes its execution.](unless SampleResult is null)
- Assertions [Assertions allow you to include some validation test on the response of your request made using a Sampler.] (unless SampleResult is null)
- Listeners [Listeners let you view the results of Samplers in the form of tables, graphs, trees, or simple text in some log files.] (unless SampleResult is null))

Wednesday, April 12, 2017

Selendroid Automation for own Created apk file

Step 1:- Download this selendroid-standalone-0.17.0-with-dependencies.jar from below given url
https://github.com/selendroid/selendroid/releases/download/0.17.0/selendroid-standalone-0.17.0-with-dependencies.jar
and use this command to start it on port 4444 (Use your desire port to start this jar)

C:\Software\Mobile_Automation\newone\NewAPK>java -jar selendroid-standalone-0.17.0-with-dependencies.jar
Step 2:- Run AVD Manager.exe kept at location
C:\Users\Test\AppData\Local\Android\sdk
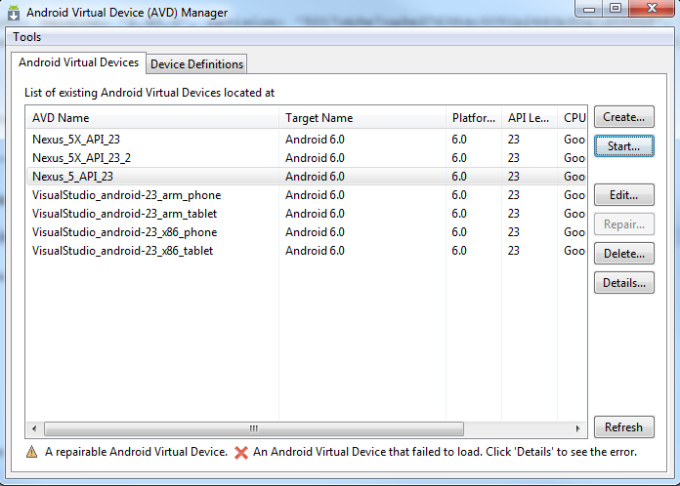
and Start Emulator i.e. execute AVD Manager.exe which we want to run
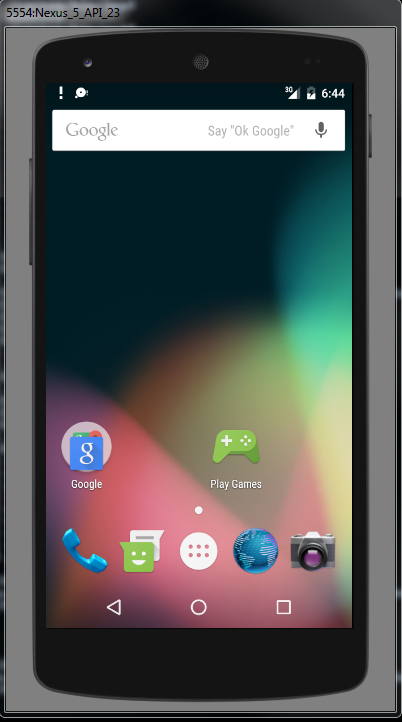
Step 3:- Once Emulator is start make sure to confirm that we are able to see our deployed apk main activity class and app id on this page on the screen along with Emulator name
http://localhost:4444/wd/hub/status
Image1

Step 4 :- Create signed apk from android studio using keystore file palced at debug.keystore available at C:\Users\test\AppData\Local\Android\sdk\platform-tools\debug.keystore for windows and for linux ~/.android/debug.keystore
Keystore name: "debug.keystore"
Keystore password: "android"
Key alias: "androiddebugkey"
Key password: "android"
CN: "CN=Android Debug,O=Android,C=US"
Or you can also used your signed jar using your own *.keystore
https://shdhumale.wordpress.com/2017/04/10/how-to-make-apk-signed-before-installing-it-in-android-device/
Note:- Refer below screen shot for signing the apk from Android Studio.
Image1Image2
Step 5:- This is optional step if not done it will be taken care in Step 6. Install our APK in Emulator.If you don't want to use install command for installing APK you can directly drag drop apk on the Emulator screen and it will deploy your APK.
Step 6:- Take app-release-unaligned.apk that is created in step4 and start your selendroid standalone server using below command and check if you are able to see your applicaition the ui. i.e. http://localhost:4444/wd/hub/status

java -jar selendroid-standalone-0.17.0-with-dependencies.jar -keystore C:\Software\Mobile_Automation\newone\NewAPK\debug.keystore -keystorePassword android -aut app-release-unaligned.apk
or

java -jar selendroid-standalone-0.17.0-with-dependencies.jar -app app-release-unaligned.apk

Step 7:- Make sure to inspect the tag/widget id of our apk file refer to belwo site for the same.
http://selendroid.io/inspector.html
Image3
Use below java code to execute your test case
package com.test.siddhu;
import io.selendroid.client.SelendroidDriver;
import io.selendroid.common.SelendroidCapabilities;
import io.selendroid.common.device.DeviceTargetPlatform;
import io.selendroid.standalone.SelendroidLauncher;
import java.net.URL;
import org.junit.Assert;
import org.junit.Test;
import org.openqa.selenium.By;
import org.openqa.selenium.WebDriver;
import org.openqa.selenium.WebElement;
public class MobileWebTest {
private SelendroidLauncher selendroidServer = null;
private WebDriver driver = null;
@Test
public void shouldSearchWithEbay() {

try {

/* SelendroidConfiguration config = new SelendroidConfiguration();
config.addSupportedApp("/resigned-app-debug.apk");
selendroidServer = new SelendroidLauncher(config);
selendroidServer.launchSelendroid();
SelendroidCapabilities capabilities = new SelendroidCapabilities("add.siddhu.com.siddhuaddproject:1.0");
capabilities.setPlatformVersion(DeviceTargetPlatform.ANDROID22);
capabilities.setEmulator(true);
driver = new SelendroidDriver(capabilities);*/
/* SelendroidConfiguration config = new SelendroidConfiguration();
config.addSupportedApp("C:\\Software\\Mobile_Automation\\newone\\app-release-unaligned.apk");
selendroidServer = new SelendroidLauncher(config);
selendroidServer.launchSelendroid();*/
//SelendroidCapabilities capabilities = new SelendroidCapabilities("add.siddhu.com.siddhuaddproject:1.0");
// SelendroidCapabilities capa = new SelendroidCapabilities("add.siddhu.com.siddhuaddproject:1.0");
//capa.setPlatformVersion(DeviceTargetPlatform.ANDROID19);
//capa.setEmulator(true);
//capa.setModel("Nexus 5");
//WebDriver driver = new SelendroidDriver(capa);

//SelendroidCapabilities caps = SelendroidCapabilities.emulator("add.siddhu.com.siddhuaddproject:1.0");
//SelendroidCapabilities capabilities = new SelendroidCapabilities("add.siddhu.com.siddhuaddproject:1.0");
/* capabilities.setAut("add.siddhu.com.siddhuaddproject:1.0");
capabilities.setBrowserName("selendroid");
capabilities.setCapability("appPackage", "add.siddhu.com.siddhuaddproject");
capabilities.setCapability("appActivity", "add.siddhu.com.siddhuaddproject.MainActivity");*/
URL url = new URL("http://localhost:4444/wd/hub");
// DesiredCapabilities desiredCapabilities = SelendroidCapabilities.android();
//WebDriver driver = new SelendroidDriver(url,capabilities);
SelendroidCapabilities caps = new SelendroidCapabilities("add.siddhu.com.siddhuaddproject:1.0");
caps.setLaunchActivity("add.siddhu.com.siddhuaddproject.MainActivity");
// explicitly state that we want to run our test on an Android API level 10 device
//caps.setPlatformVersion(DeviceTargetPlatform.ANDROID10);

// explicitly state that we use an emulator (an AVD) for test execution rather than a physical device
caps.setEmulator(true);
WebDriver driver = new SelendroidDriver(url,caps);


WebElement inputField1 = driver.findElement(By.id("editText"));
Assert.assertEquals("true", inputField1.getAttribute("enabled"));
inputField1.sendKeys("12");


WebElement inputField2 = driver.findElement(By.id("editText2"));
Assert.assertEquals("true", inputField2.getAttribute("enabled"));
inputField2.sendKeys("13");

WebElement button = driver.findElement(By.id("button"));
button.click();
// Delay time to take effect
Thread.sleep(5000);

WebElement inputField3 = driver.findElement(By.id("editText3"));
Assert.assertEquals("true", inputField3.getAttribute("enabled")); 
Assert.assertEquals("25", inputField3.getText());

driver.quit();
} catch (Exception e) {
// TODO Auto-generated catch block
e.printStackTrace();
}
}
}
Image4
Note: - If you are getting below

Selendroid server on the device didn't came up after 20sec:
OR
WARNING: Could not free Selendroid port
SEVERE: Error executing command: C:\Users\test\AppData\Local\Android\sdk\platform-tools\adb.exe forward --remove tcp:8080
Make sure to see Logcat i.e. C:\Users\test\AppData\Local\Android\sdk\platform-tools\adb.exe logcat
and check the detail log for me my application/apk was installing in the emulator but was not able to display on the screen. It was getting closed immediately and the answer was in below exception
04-12 12:56:23.729 6520 6534 E SELENDROID: java.io.FileNotFoundException: /sdcard/appcrash.log: open failed: ENOENT (No such file or directory)
To over come this add following line inside your AndroidManifest.xml
<!--uses-permission android:name="android.permission.INTERNET" />
<!--uses-permission android:name="android.permission.ACCESS_NETWORK_STATE"/>
<!--uses-permission android:name="android.permission.READ_EXTERNAL_STORAGE"/>
<!--uses-permission android:name="android.permission.WRITE_EXTERNAL_STORAGE"/>
For Example we had taken apk which provide addition of two value on gui.
Image5

Monday, April 10, 2017

How to make apk signed before installing it in Android Device

Step 1:- Execute this command and create an keystore files.

keytool -genkey -v -keystore debug.keystore -alias sampleName -keyalg RSA -keysize 2048 -validity 20000
Fill following information
Password
First and lastname
Name of Organization unit
Name of Organization
City
State
Country
You can find the debug.keystore file in the following location
Step :2 -jarsigner -verbose -keystore debug.keystore C:\Software\Mobile_Automation\app-debug.apk sampleName
or
jarsigner -verbose -sigalg SHA1withRSA -digestalg SHA1 -keystore debug.keystore C:\Software\Mobile_Automation\app-debug.apk sampleName
Step 3:- Verify it is signed apk now using below command
jarsigner -verify C:\Software\Mobile_Automation\app-debug.apk

===========

Put your signed apk inside platform-tools folder of Android sdk and execute install command.
C:\Users\test\AppData\Local\Android\sdk\platform-tools>adb.exe install app-debug.apk
[100%] /data/local/tmp/app-debug.apk
pkg: /data/local/tmp/app-debug.apk
Success

Friday, April 07, 2017

How to do automation testing using Selenium Deriver for Mobile device i.e. Android or Hybride

Step 1:- Download this selendroid-standalone-0.17.0-with-dependencies.jar from below given url
https://github.com/selendroid/selendroid/releases/download/0.17.0/selendroid-standalone-0.17.0-with-dependencies.jar
and use this command to start it on port 4444 (Use your desire port to start this jar)

C:\Software\Mobile_Automation>java -jar selendroid-standalone-0.17.0-with-dependencies.jar -port 4444
Step 2:- Run AVD Manager.exe kept at location
C:\Users\Test\AppData\Local\Android\sdk
Image4
and Start Emulator which we want to run
Step 3:- Once Emulator is start make sure to confirm that we are able to see this page on the screen along with Emulator name
http://localhost:4444/wd/hub/status

Step 5:- Run following below class and see the result
package io.selendroid.demo.mobileweb;
import io.selendroid.client.SelendroidDriver;
import io.selendroid.common.SelendroidCapabilities;
import io.selendroid.standalone.SelendroidConfiguration;
import io.selendroid.standalone.SelendroidLauncher;
import java.net.MalformedURLException;
import java.net.URL;
import java.util.Map;
import org.junit.After;
import org.junit.Before;
import org.junit.Test;
import org.openqa.selenium.By;
import org.openqa.selenium.WebDriver;
import org.openqa.selenium.WebElement;
import org.openqa.selenium.remote.DesiredCapabilities;
public class MobileWebTest {
private SelendroidLauncher selendroidServer = null;
private WebDriver driver = null;
@Test
public void shouldSearchWithEbay() {

try {

URL url = new URL("http://localhost:4444/wd/hub");
DesiredCapabilities desiredCapabilities = SelendroidCapabilities.android();
WebDriver driver = new SelendroidDriver(url,desiredCapabilities);

// And now use this to visit ebay
driver.get("http://www.google.in");
// Find the text input element by its id
WebElement element = driver.findElement(By.id("lst-ib"));
// Enter something to search for
element.sendKeys("shdhumale.wordpress.com");
// Now submit the form. WebDriver will find the form for us from the element
element.submit();
// Check the title of the page
System.out.println("Reached here" );
driver.quit();
} catch (Exception e) {
// TODO Auto-generated catch block
e.printStackTrace();
}
}
}
Image1Image2Image3

Tuesday, April 04, 2017

How to run Selenium Test case with JAVA using browserless platform i.e. Phantomjs

Step 1:- First download Phantomjs.exe from the given path
http://phantomjs.org/
Step 2:- Download the required phantomjsdriver-1.2.1.jar for our Selenium project and keep the same into Selenium Project lib folder and project classpath.

Step 3:- Create below given capabilities and provide the same capabilities to WebDriver using PhantomJSDriver
DesiredCapabilities caps = new DesiredCapabilities();
caps.setJavascriptEnabled(true);
caps.setCapability(PhantomJSDriverService.PHANTOMJS_EXECUTABLE_PATH_PROPERTY, "C:\\Software\\phantomjs-2.1.1-windows\\phantomjs-2.1.1-windows\\bin\\phantomjs.exe");
WebDriver driver = new PhantomJSDriver(caps);
Note: You can also try for HrmlUnitDriver 
Refer this site for more information
http://www.guru99.com/selenium-with-htmlunit-driver-phantomjs.html